Running a store means a hundred small facts that go stale: a phone number, a tax rate, a
price list, a language you do not offer yet. This chapter is the control room where you keep all of it
current yourself, from the storefront's look to currencies, tax, languages and optional modules, so
none of it ever has to wait for a developer.
The problem: the boutique moves, the WhatsApp number changes, and the old
details live on in every footer until a customer calls a disconnected number. Meanwhile a best-seller
quietly runs out because nothing warned you the stock was getting low.
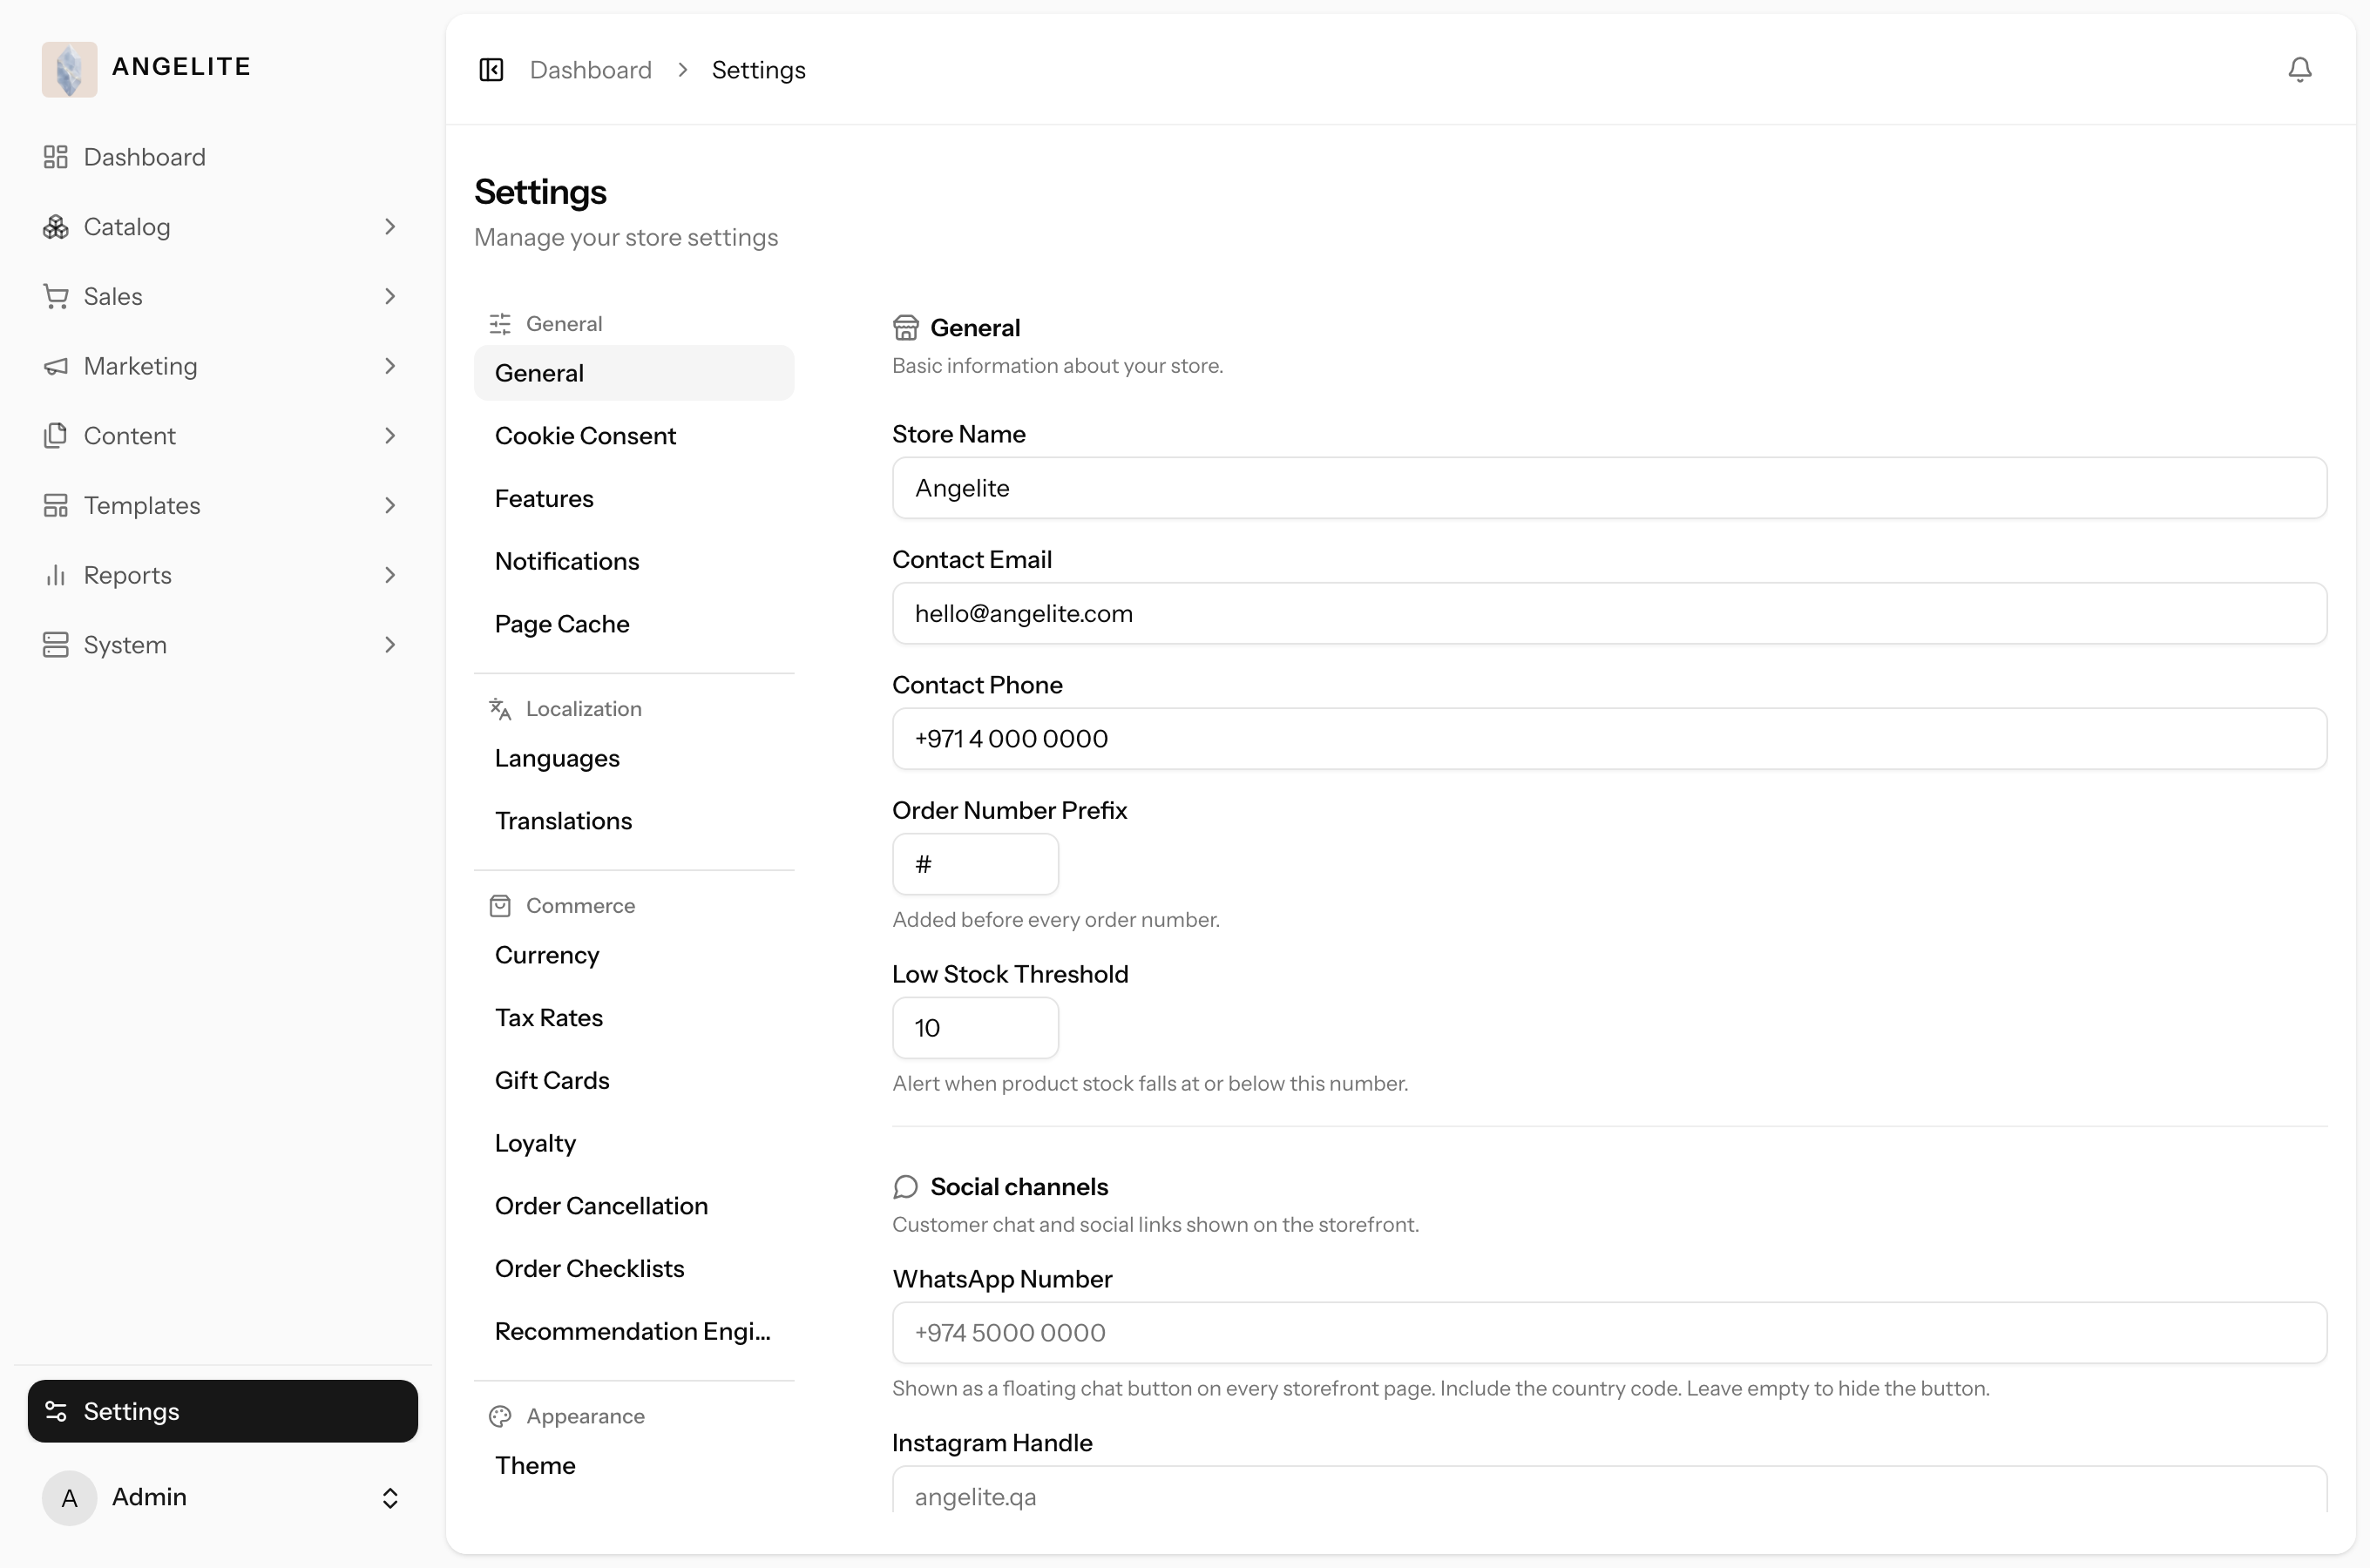
One place for the basic facts about your store: its name, the contact email and phone, and
your social channels, kept current everywhere the storefront shows them. You also set the stock level at
which a product is flagged as running low, and choose whether the storefront footer shows a newsletter
sign-up form.
In practice
Say you have just moved the boutique to a new address in Doha and switched to a
fresh WhatsApp number, and a few ready-to-wear abayas keep selling out before you notice the stock is low.
How Angelite handles it: open Settings → General, update the
contact phone and email and your Instagram link so every page footer and contact page shows the new
details, then set the low-stock threshold to, say, three pieces so the catalogue flags an abaya as
running low in time for you to reorder, and click Save.
How to use it
Open Settings → General.
Fill in the store name, contact details and social links.
Set the low-stock threshold and switch the footer newsletter sign-up on or off.
Click Save. The changes take effect across the store right away.
Where: Settings → General.
Appearance & theme
Admin
The problem: a seasonal refresh of colours, fonts and logo normally means
briefing a developer, waiting for the work, and paying for it, so the storefront's look stays frozen long
after the brand has moved on.
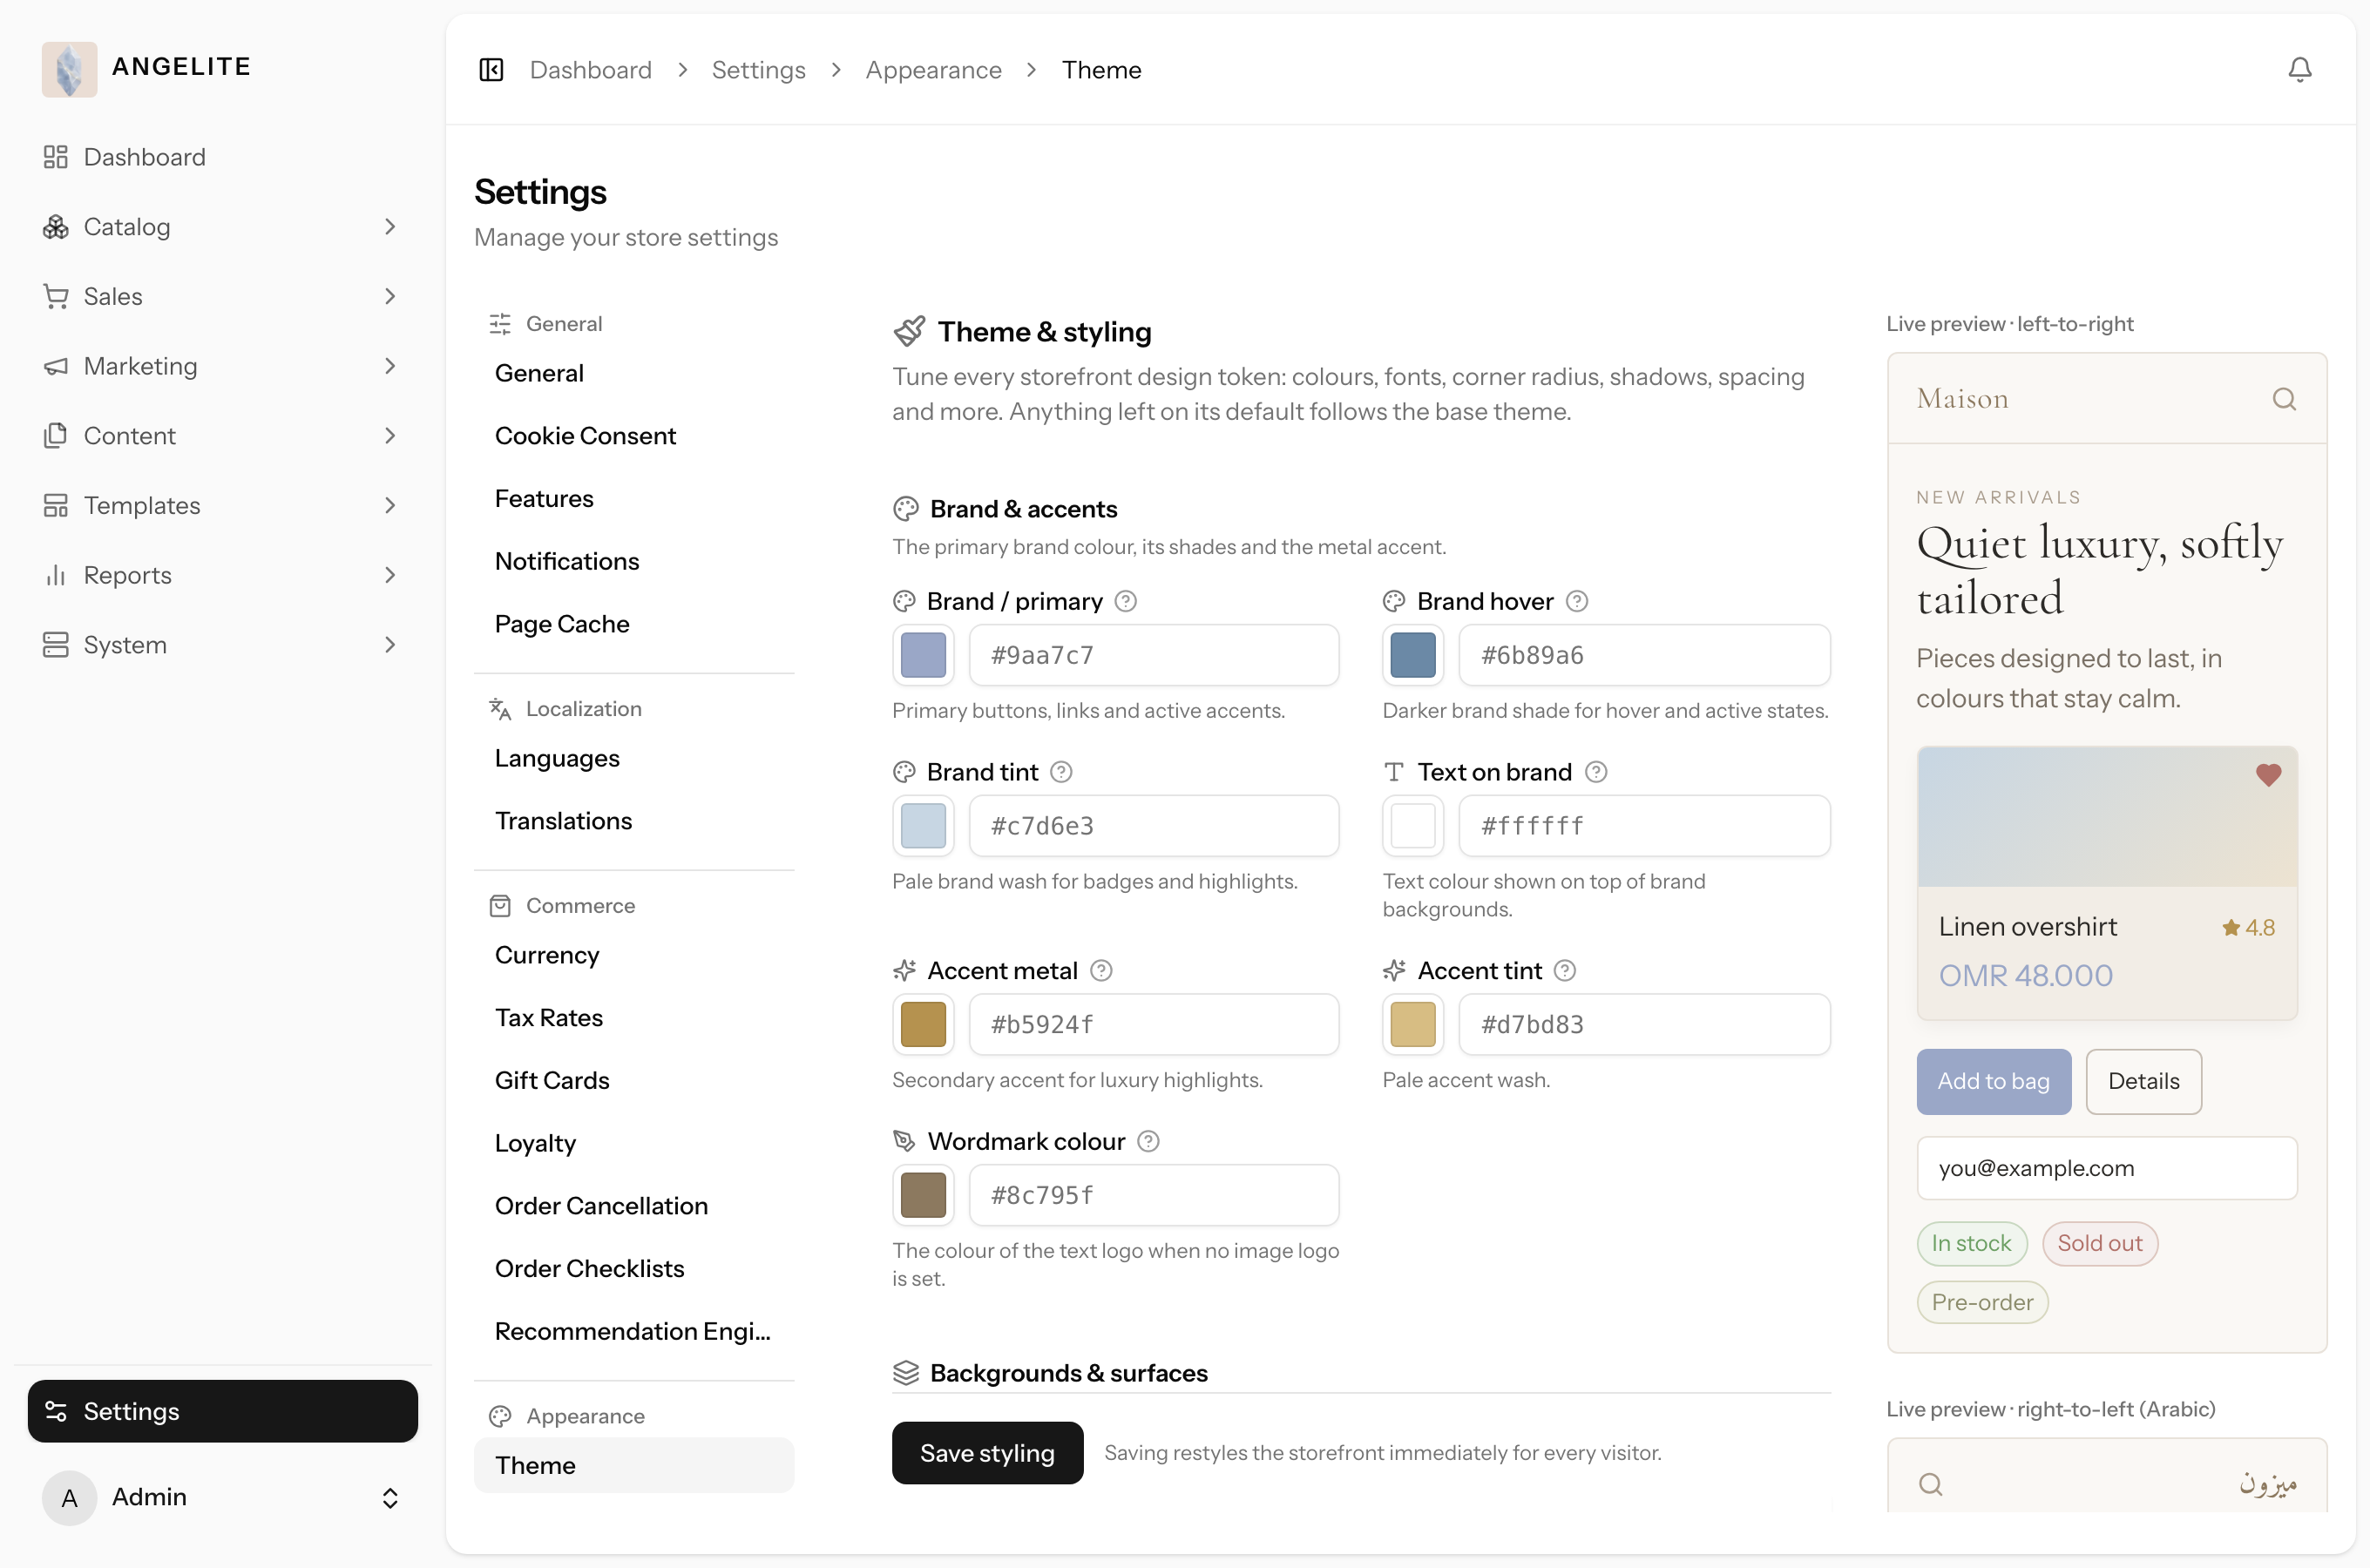
Reshape how the storefront looks yourself, with no code and no developer. A live theme
editor lets you choose colours, fonts and corner styles and see the result instantly. You also
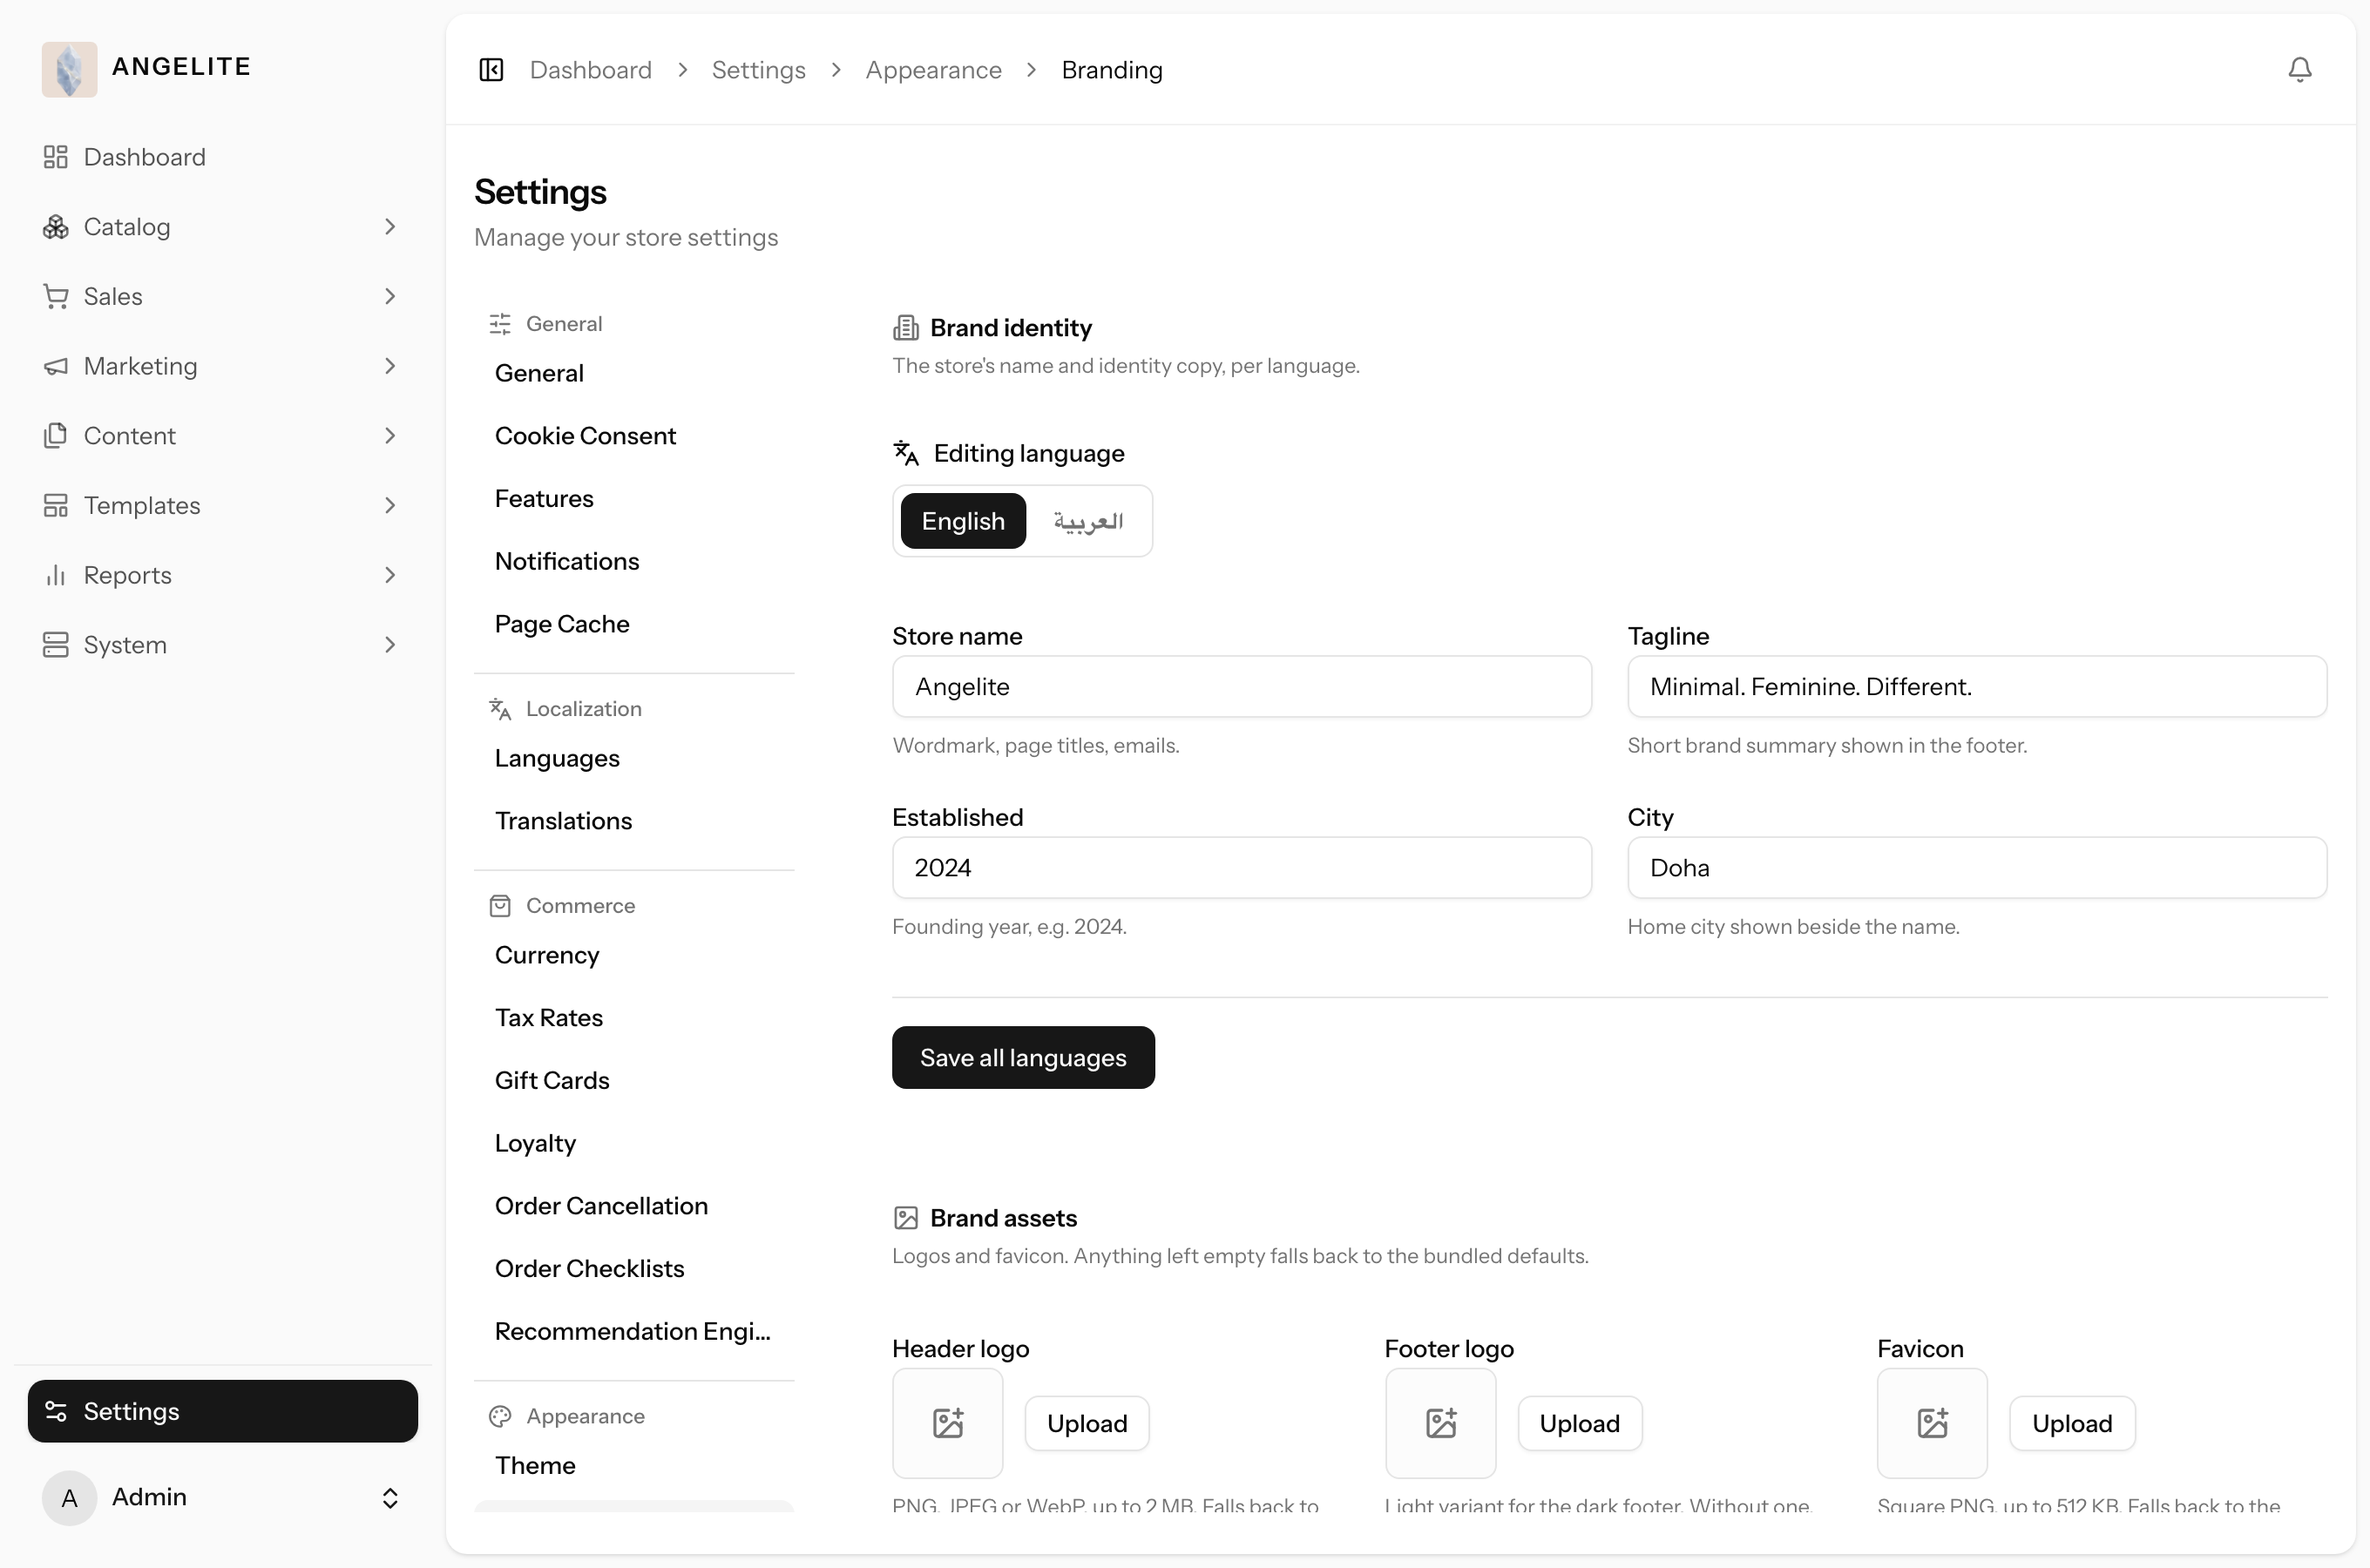
upload your logo and favicon, pick the header layout, set your site-wide SEO, and write your brand
copy in each language, and every change lands on the live store the moment you save.
In practice
Imagine you are refreshing the brand for the new season and want the storefront to
feel warmer, with a soft gold accent and gently rounded corners, plus your new logo across the top.
How Angelite handles it: open Settings → Appearance, on the
Theme tab nudge the accent colour to your gold and increase the corner radius while
the inline preview shows the buttons and product cards changing in real time, then on the
Branding tab upload the new header logo and favicon, and Save. The whole storefront
takes on the new look without any rebuild or developer involved.
How to use it
Open Settings → Appearance.
On the Theme tab, adjust colours, fonts, corner radius and spacing, and watch the inline preview update as you go.
On the Branding tab, upload your header and footer logos and your favicon, and write the store name and tagline per language.
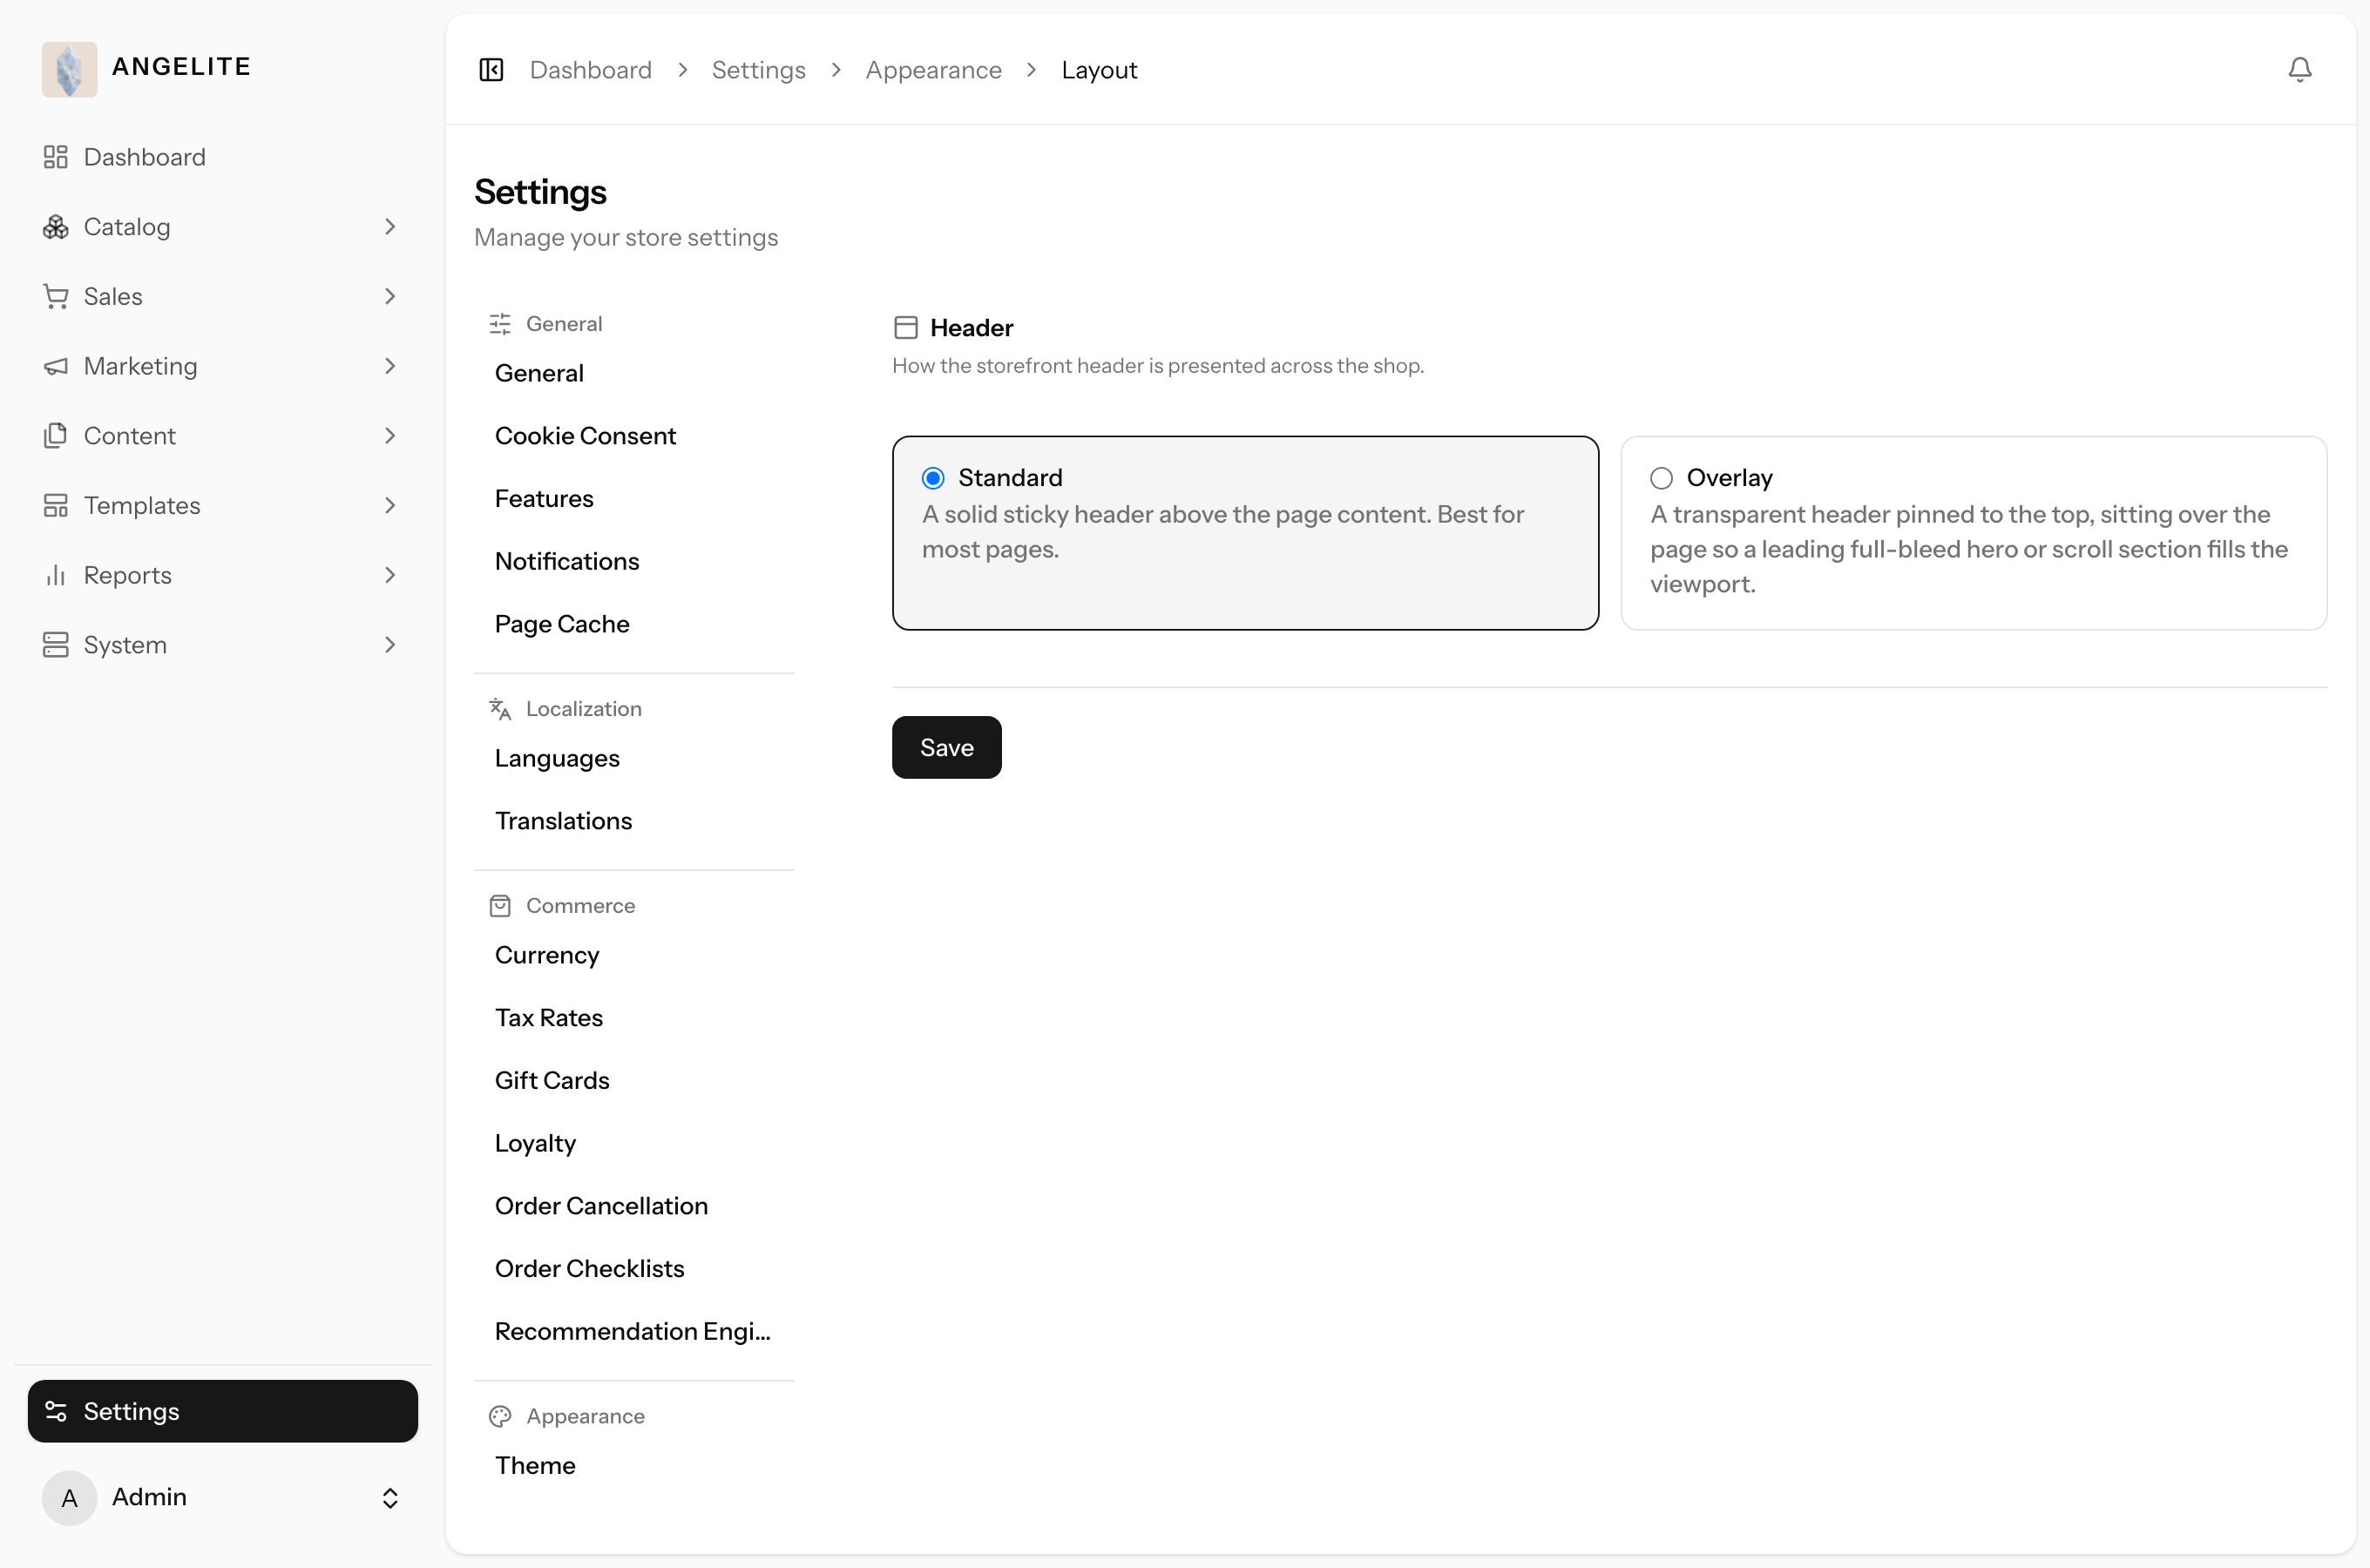
On the Layout tab, choose between a standard solid header and an overlay header for the homepage.
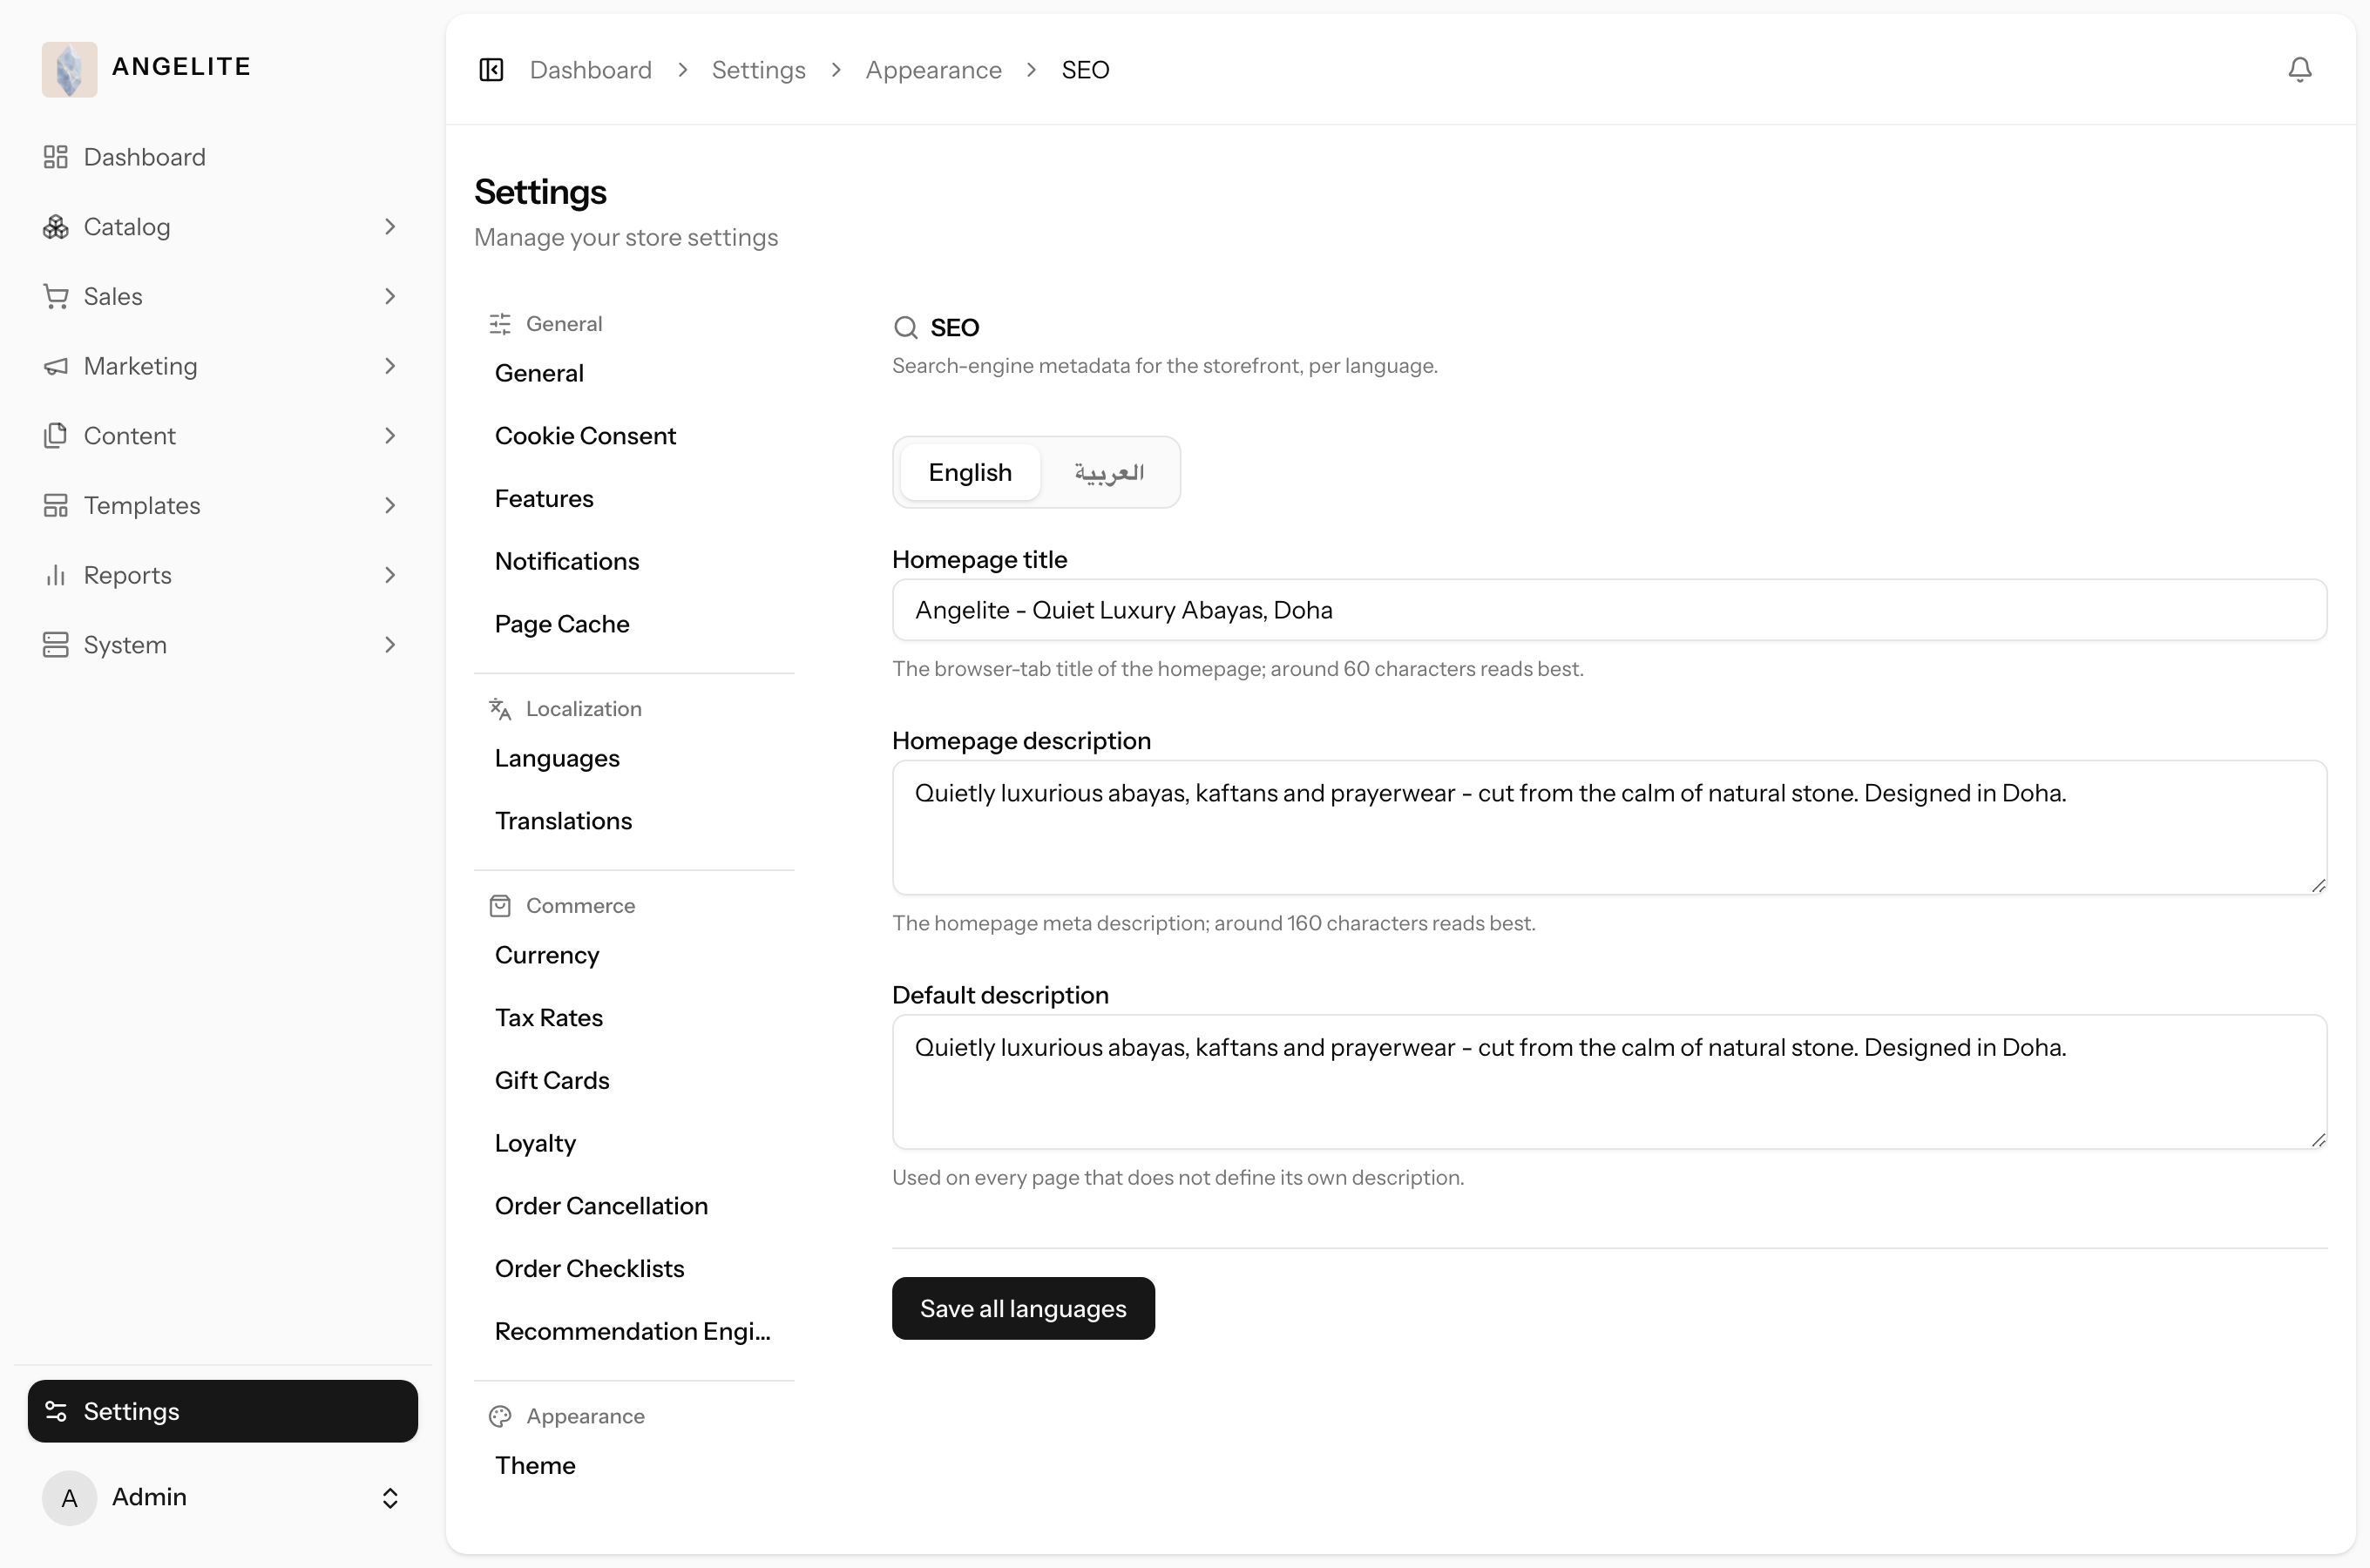
On the SEO tab, set the homepage title and description and a default description for the rest of the site.
Save each tab. The storefront updates without a rebuild.
Where: Settings → Appearance → Theme, the live design-token editor.Where: the Branding tab, with logo and favicon uploads and per-language brand copy.Where: the Layout tab, where you pick the storefront header style.Where: the SEO tab, for your homepage title, description and site-wide default.
Tip: this is the page to use when you want the same platform to look like
a completely different brand. Everything here is editable from the dashboard.
Languages
Admin
The problem: a new circle of shoppers browses in a language your store
does not speak, and adding one usually means a developer editing templates while those visitors quietly
shop somewhere they can read.
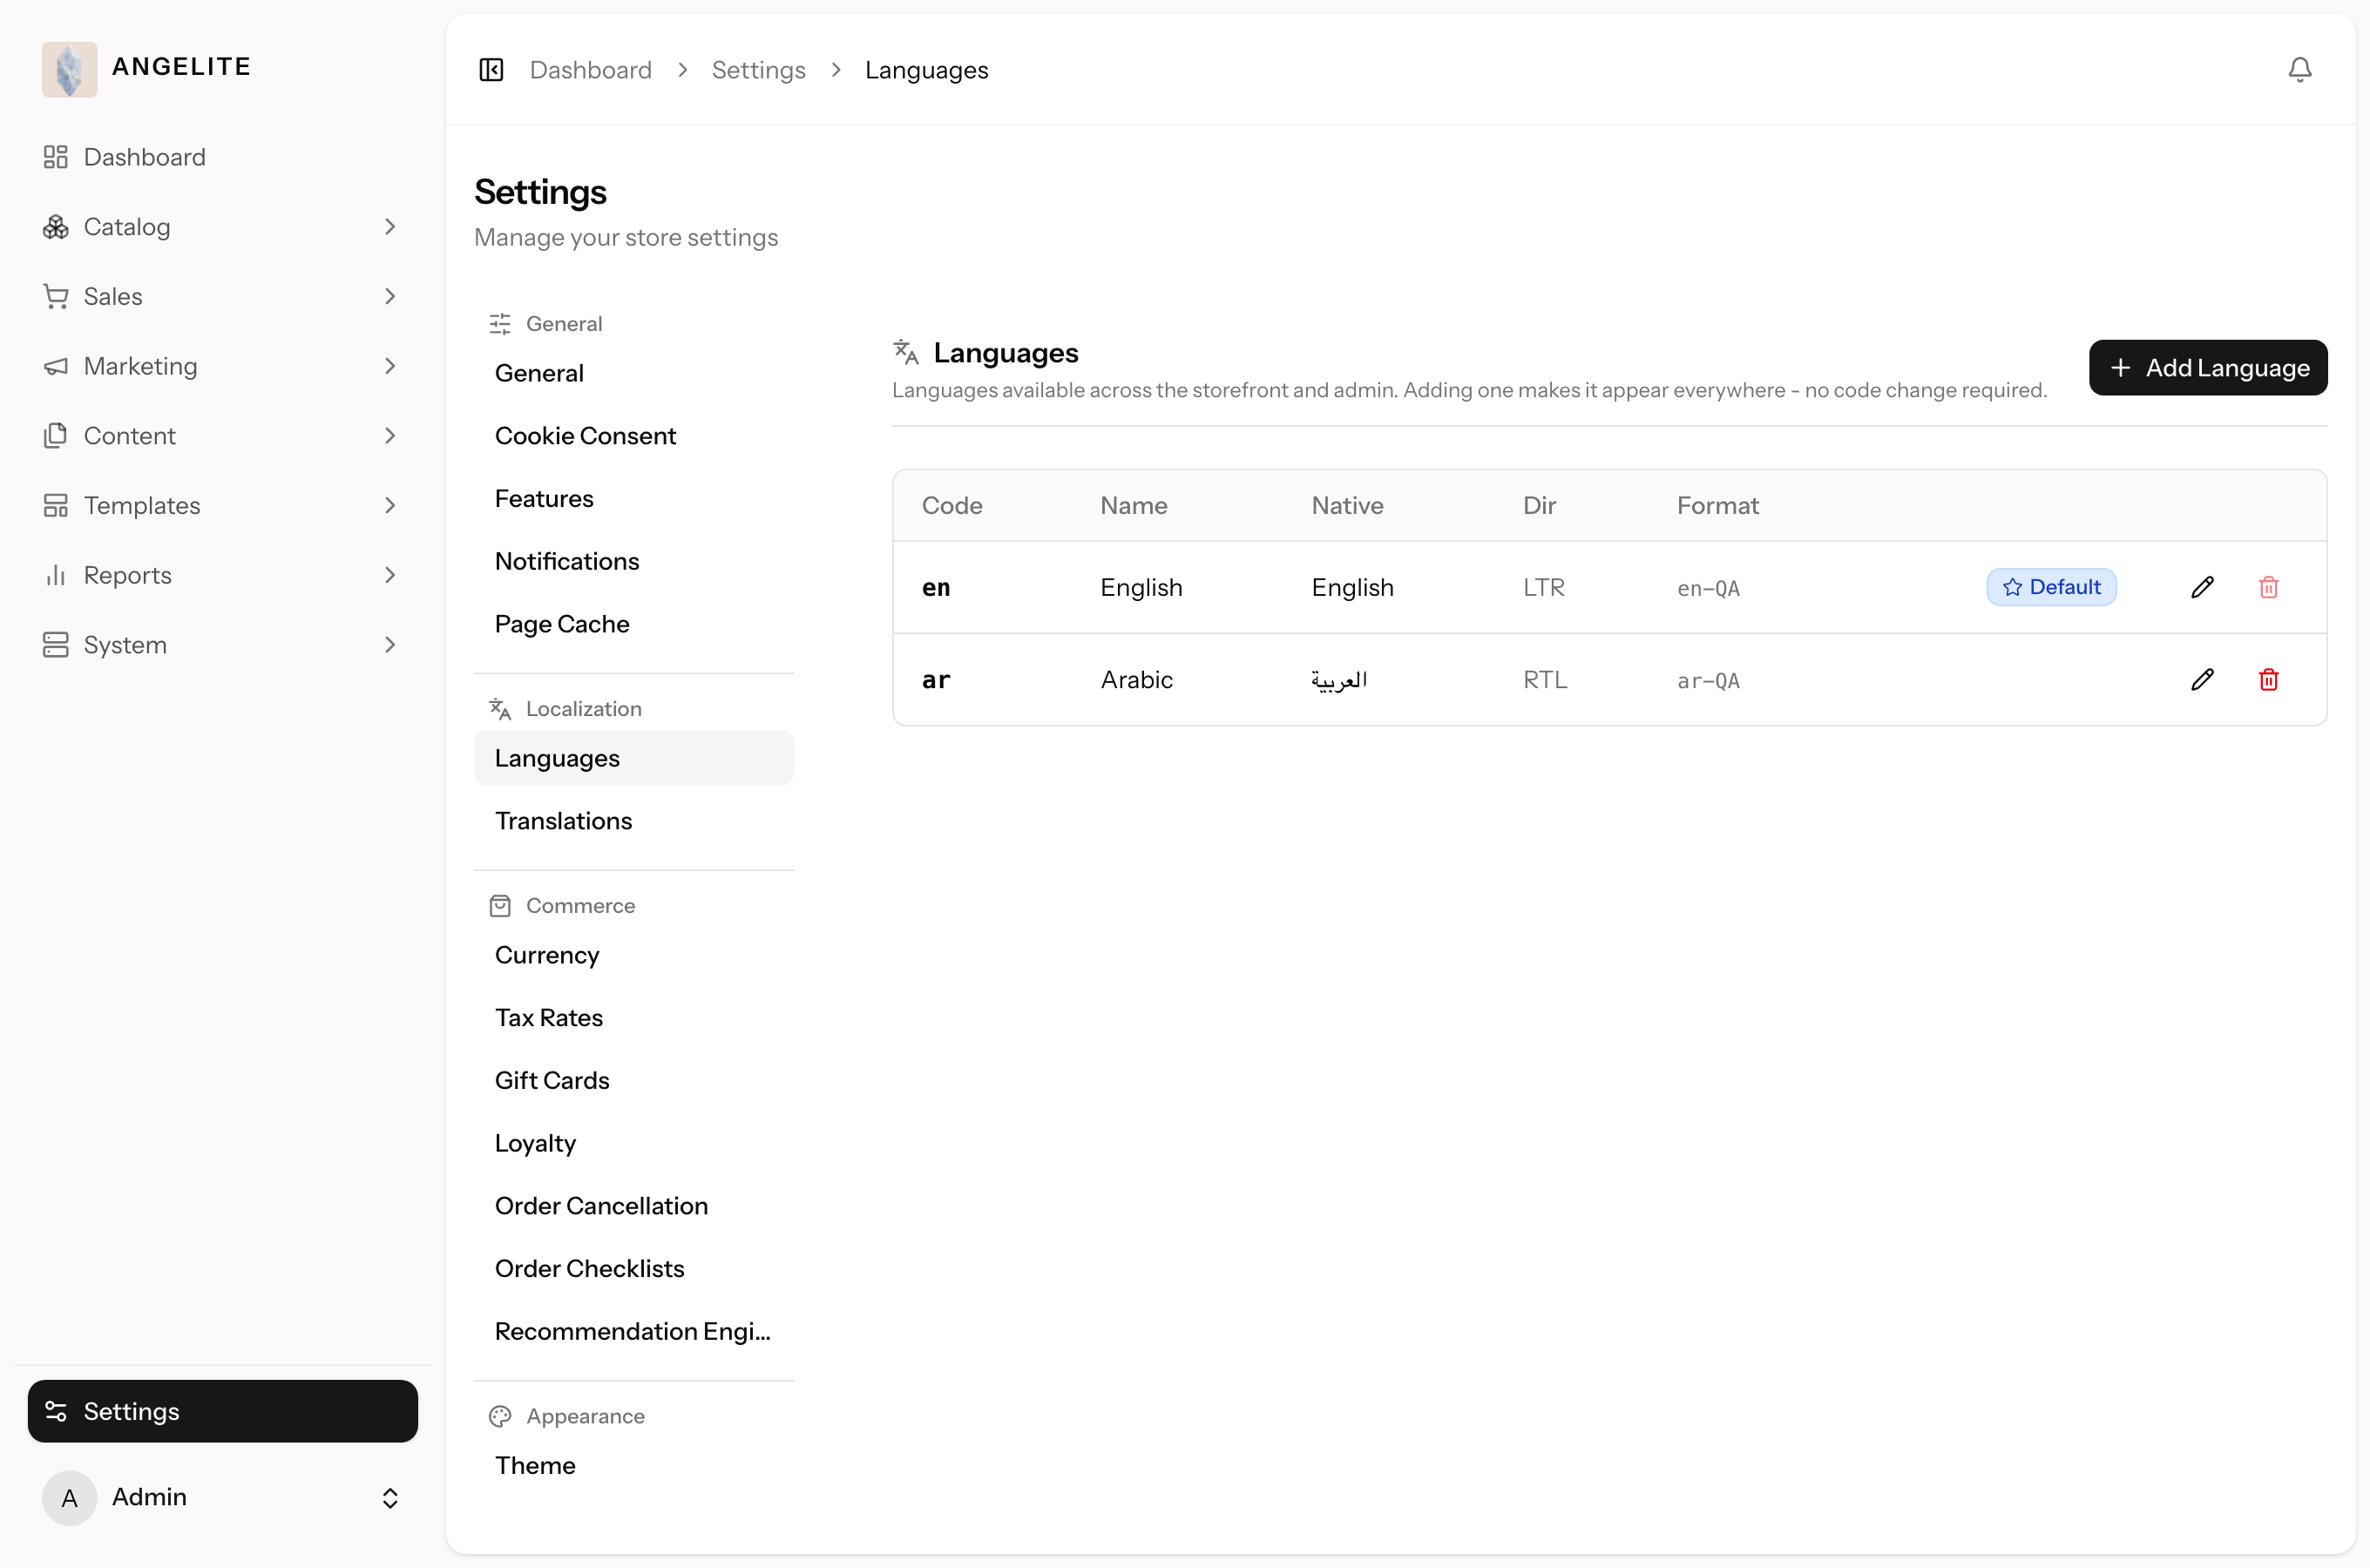
Manage every language your store offers, entirely from the dashboard. Add a new language,
edit its name and reading direction, remove one you no longer need, and choose which language is the
default. Adding a language flows through the whole store automatically, including the language switcher
and number formatting.
In practice
Say you have started shipping made-to-order abayas to French-speaking visitors in the Gulf
and want to offer the storefront in French alongside your English and Arabic.
How Angelite handles it: open Settings → Languages, click
Add language, enter French with its native name and a left-to-right reading
direction, and Save. French immediately appears in the storefront language switcher, the admin
translation tabs, and number formatting, with no code change, so you can then translate your abaya
names and brand copy into it.
How to use it
Open Settings → Languages.
Click Add language and enter its name, native name and reading direction.
Edit any language, or set one as the default. The default language cannot be removed.
Save. The new language appears everywhere customers and admins can switch language.
Where: Settings → Languages.
UI translations
Admin
The problem: one clumsy phrase on the storefront, a button that reads
awkwardly in Arabic, makes the whole shop feel less polished, and it normally sits there for days while
a developer finds time to edit a file.
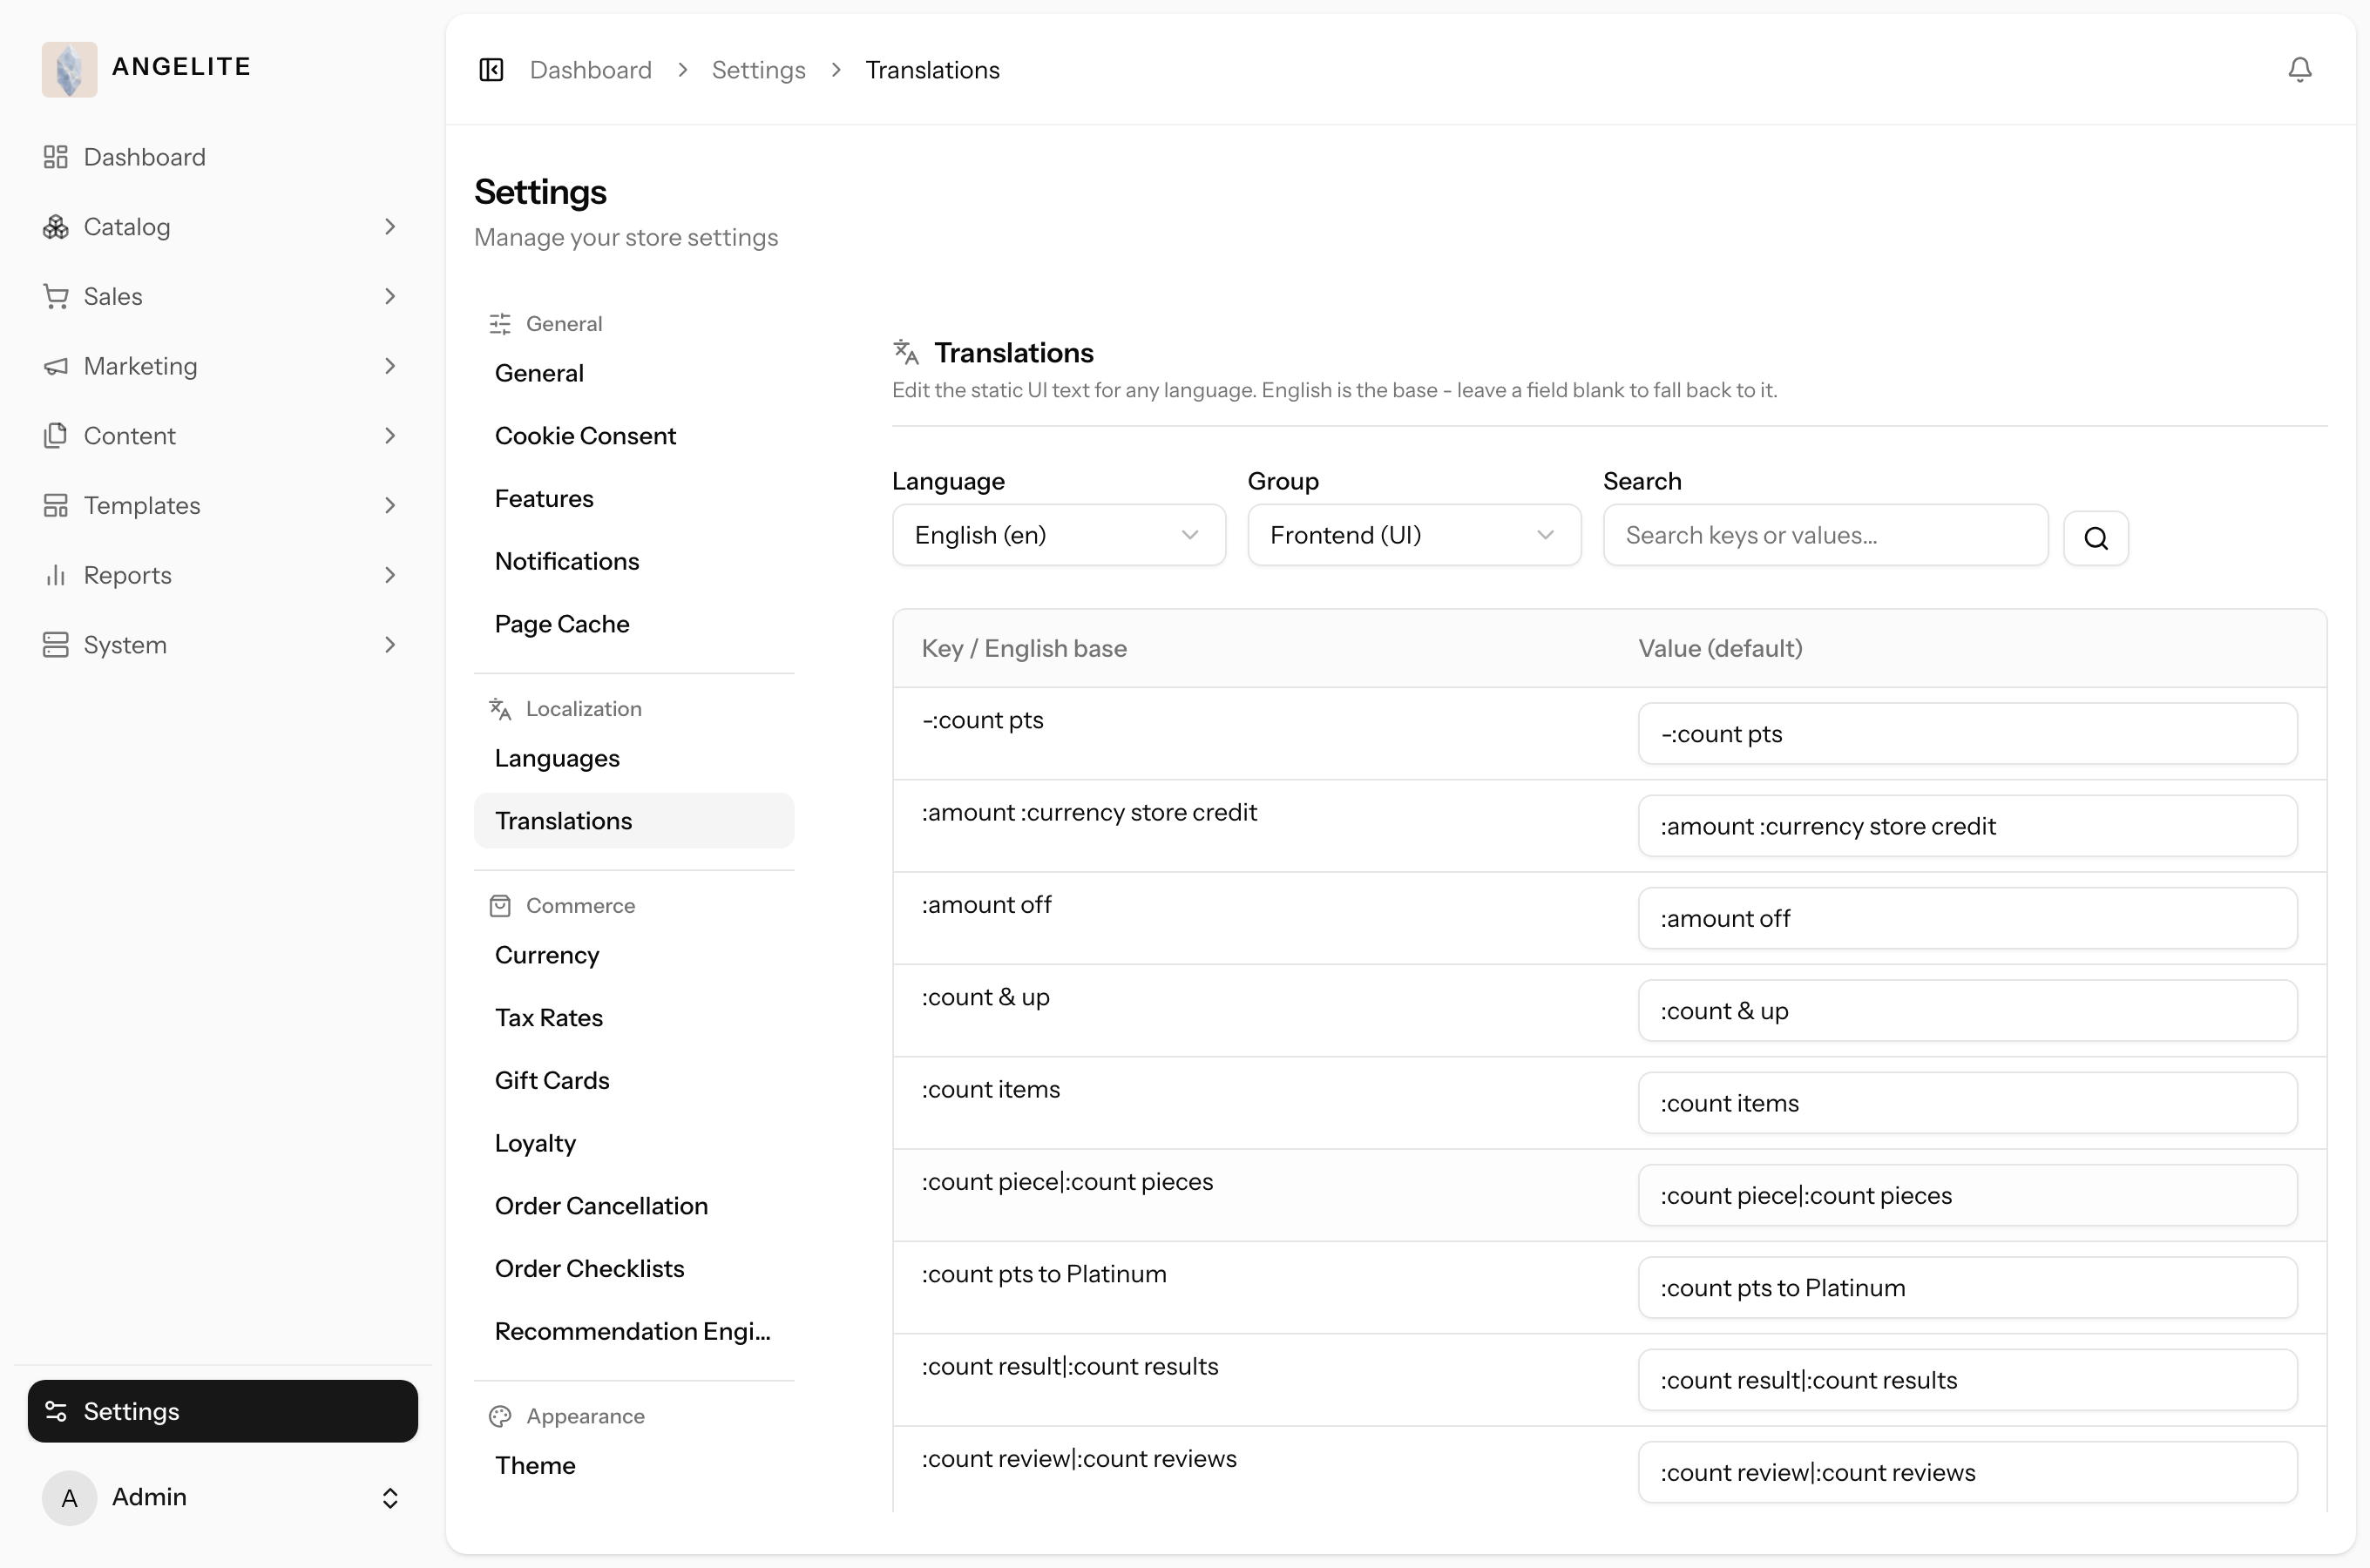
Edit every fixed word and phrase shown on screen, in each language, straight from the
dashboard. This covers buttons, labels and messages across the storefront, with no files to touch
and no developer involved, and the new wording shows the moment you save.
In practice
Say the storefront button reads "Add to bag" but you would rather it say "Add to
cart" in English and you want to fine-tune the Arabic wording so it reads more naturally to your
Qatari shoppers.
How Angelite handles it: open Settings → Translations, search
for the existing wording, type your preferred English and Arabic text in their boxes, and Save. The
new label shows on the storefront straight away, so the change happens without touching any file or
waiting on a developer.
How to use it
Open Settings → Translations.
Find the phrase you want to change, by group or by searching for the wording.
Edit its text for each language and save.
The new wording appears on the storefront immediately.
Where: Settings → Translations.
Commerce
Currencies
Admin
The problem: a shopper in Riyadh or Kuwait City sees your riyal price
converted into an odd fraction like 173.42, and a price that looks strange feels wrong, one more reason
to hesitate at checkout.
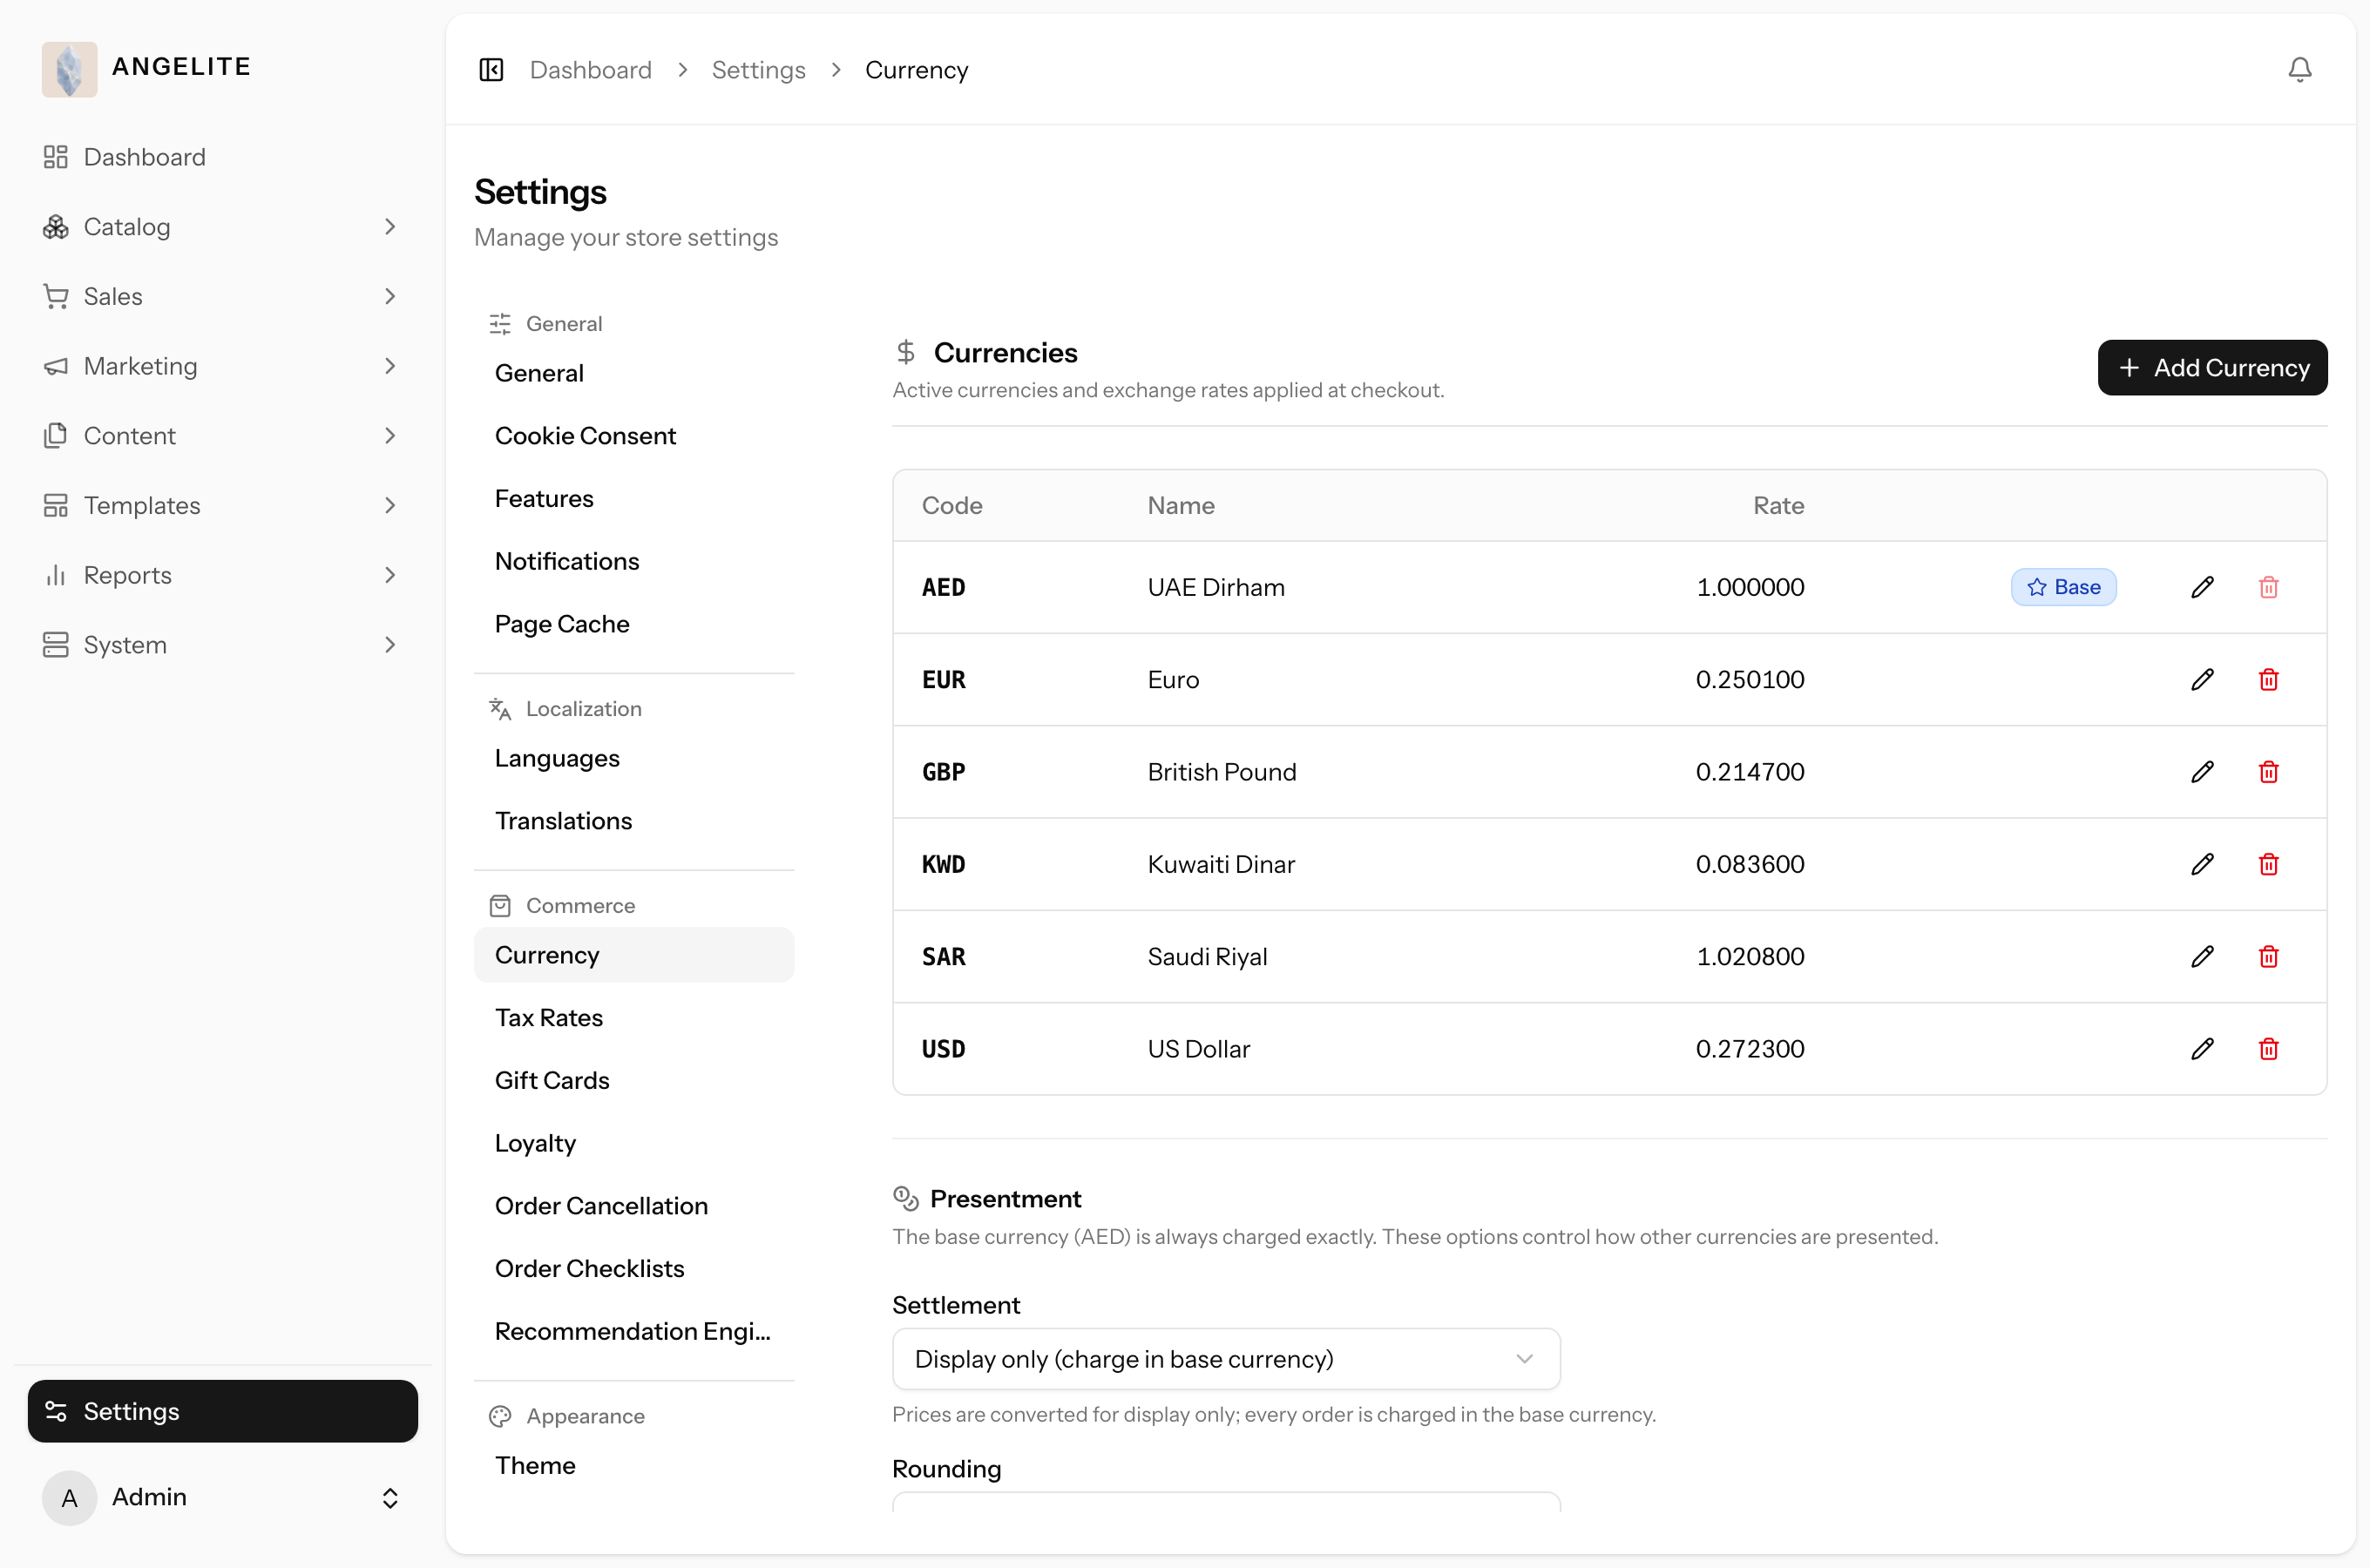
Manage the currencies your store sells in. Add currencies, set their exchange rates or
sync them automatically, and choose how each converted price is shown: the exact conversion, a charm
price ending in .99, or a clean whole number. You can also decide whether an order settles in the
shopper's chosen currency or always in your own riyals.
In practice
Say your prices are set in Qatari riyal but a growing number of shoppers browse from
Saudi Arabia and Kuwait, and you want them to see Saudi riyals and Kuwaiti dinars that look tidy rather
than ending in odd fractions.
How Angelite handles it: open Settings → Currencies, add the
Saudi riyal and Kuwaiti dinar, click Refresh rates to pull live rates from your
connected exchange-rate provider, then in the Presentment area set the rounding so an abaya shows as a
neat figure, and choose whether the order settles in the shopper's currency or always in your riyals.
Shoppers now see clean local prices everywhere on the storefront.
How to use it
Open Settings → Currencies (in the Commerce section).
Add a currency or edit an existing one, and set its rate against your base currency.
Click Refresh rates to pull live rates when an automatic exchange-rate provider is connected.
In the Presentment area below the table, choose whether converted prices show the exact conversion, a charm price ending in .99, or a whole number, and which currency an order settles in.
Save. The chosen presentment applies across the storefront.
Where: Settings → Currencies.
Note: the default base currency cannot be deleted, and all your money
figures are stored in it; other currencies are presented on top by conversion.
Tax rates
Admin
The problem: you start shipping into a market that charges VAT on
clothing, and the arithmetic has to be right on every order: under-collect and the bill lands on you,
get it wrong the other way and a customer disputes a total that changed after she paid.
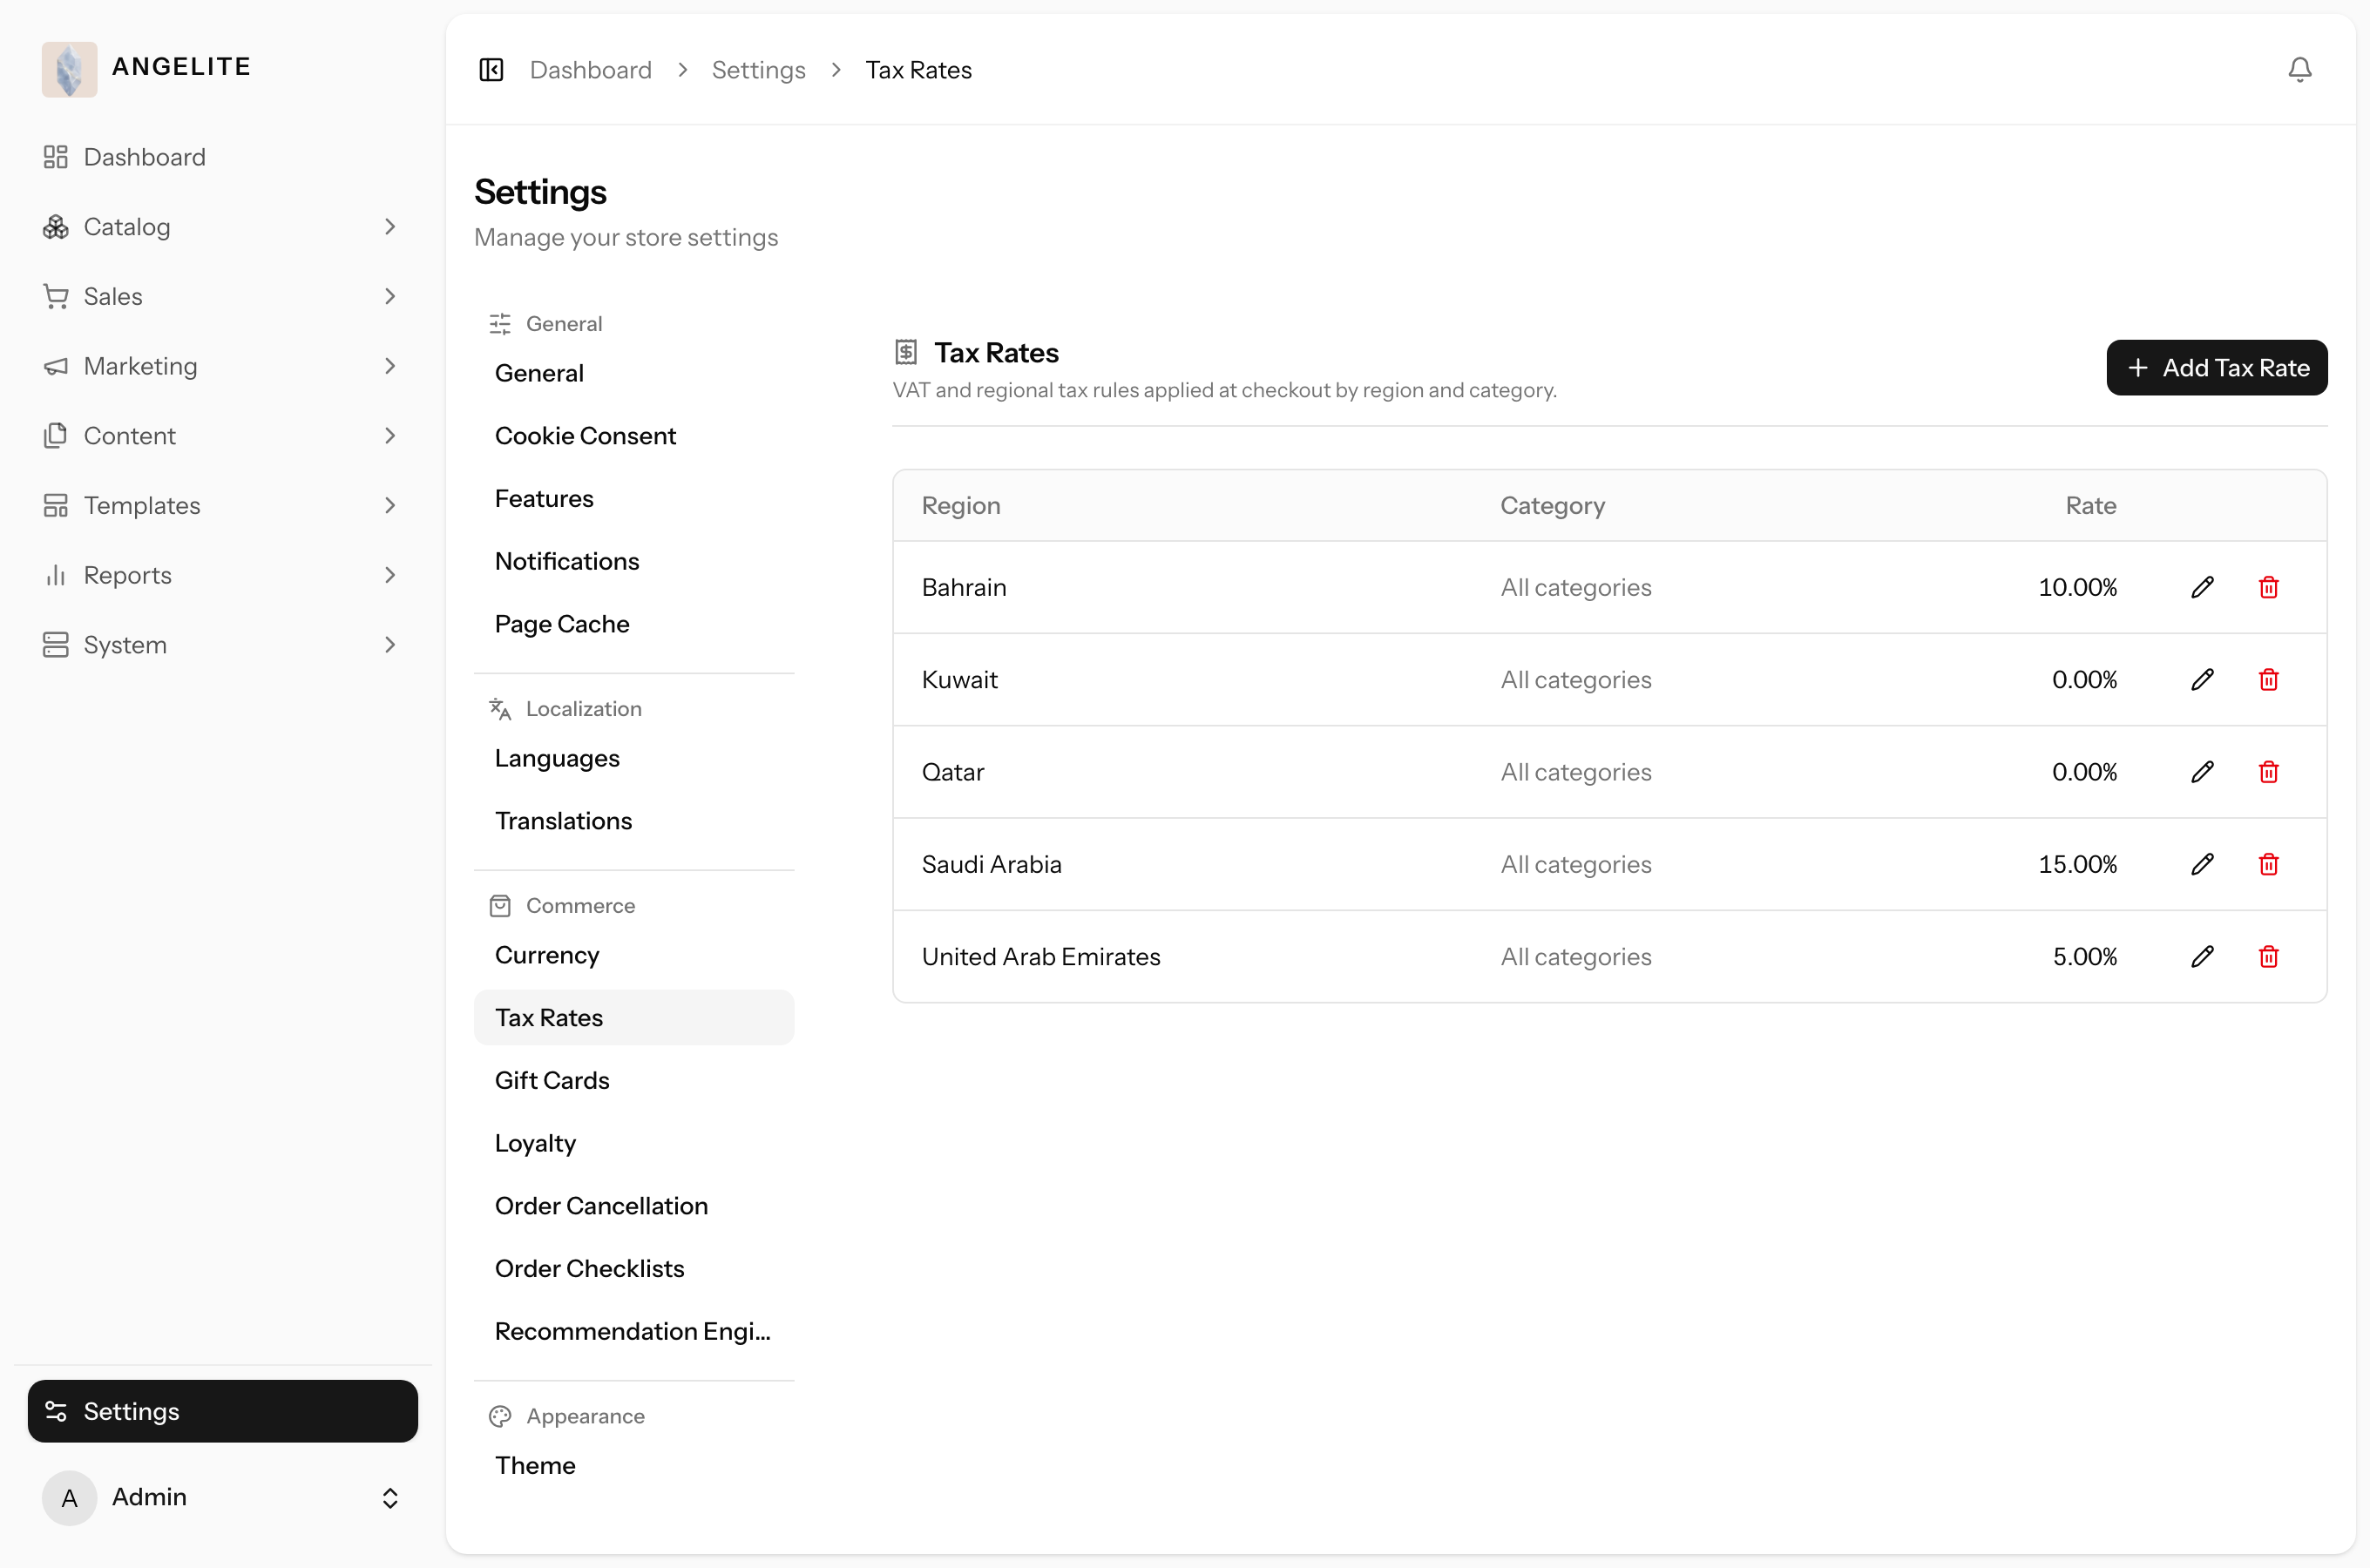
Set the sales tax (VAT) charged at checkout. For each region you set a percentage, and you
can make a rate apply only to one product category if you want; where both exist the category rate wins,
and the region-wide rate covers everything else. The tax is worked out per item at checkout and frozen
onto the order, so the invoice never shifts afterwards.
In practice
Imagine you start selling into a market that charges VAT on clothing, and you need
orders shipping there to add the correct tax while your Qatar orders stay at zero.
How Angelite handles it: open Settings → Tax rates, add a rate
for that region, set the percentage, and optionally narrow it to your abaya category if it differs
from other goods, then Save. From that point every matching order works out the tax per item at
checkout and freezes the figure onto the order, so the customer's invoice shows exactly what they
were charged.
How to use it
Open Settings → Tax rates.
Add a rate, choose its region, optionally narrow it to a category, and enter the percentage.
Save. The rate is applied to matching orders at checkout from then on.
Where: Settings → Tax rates.
Tip: match the region to the same country code the storefront uses at
checkout, otherwise the rate will not be picked up and tax comes out at zero.
Gift-card settings
AdminOptional · Gift Cards
The problem: a shopper wants to gift an abaya but will not risk guessing
a size or a style, and with nothing else to offer her, she leaves without buying anything at all.
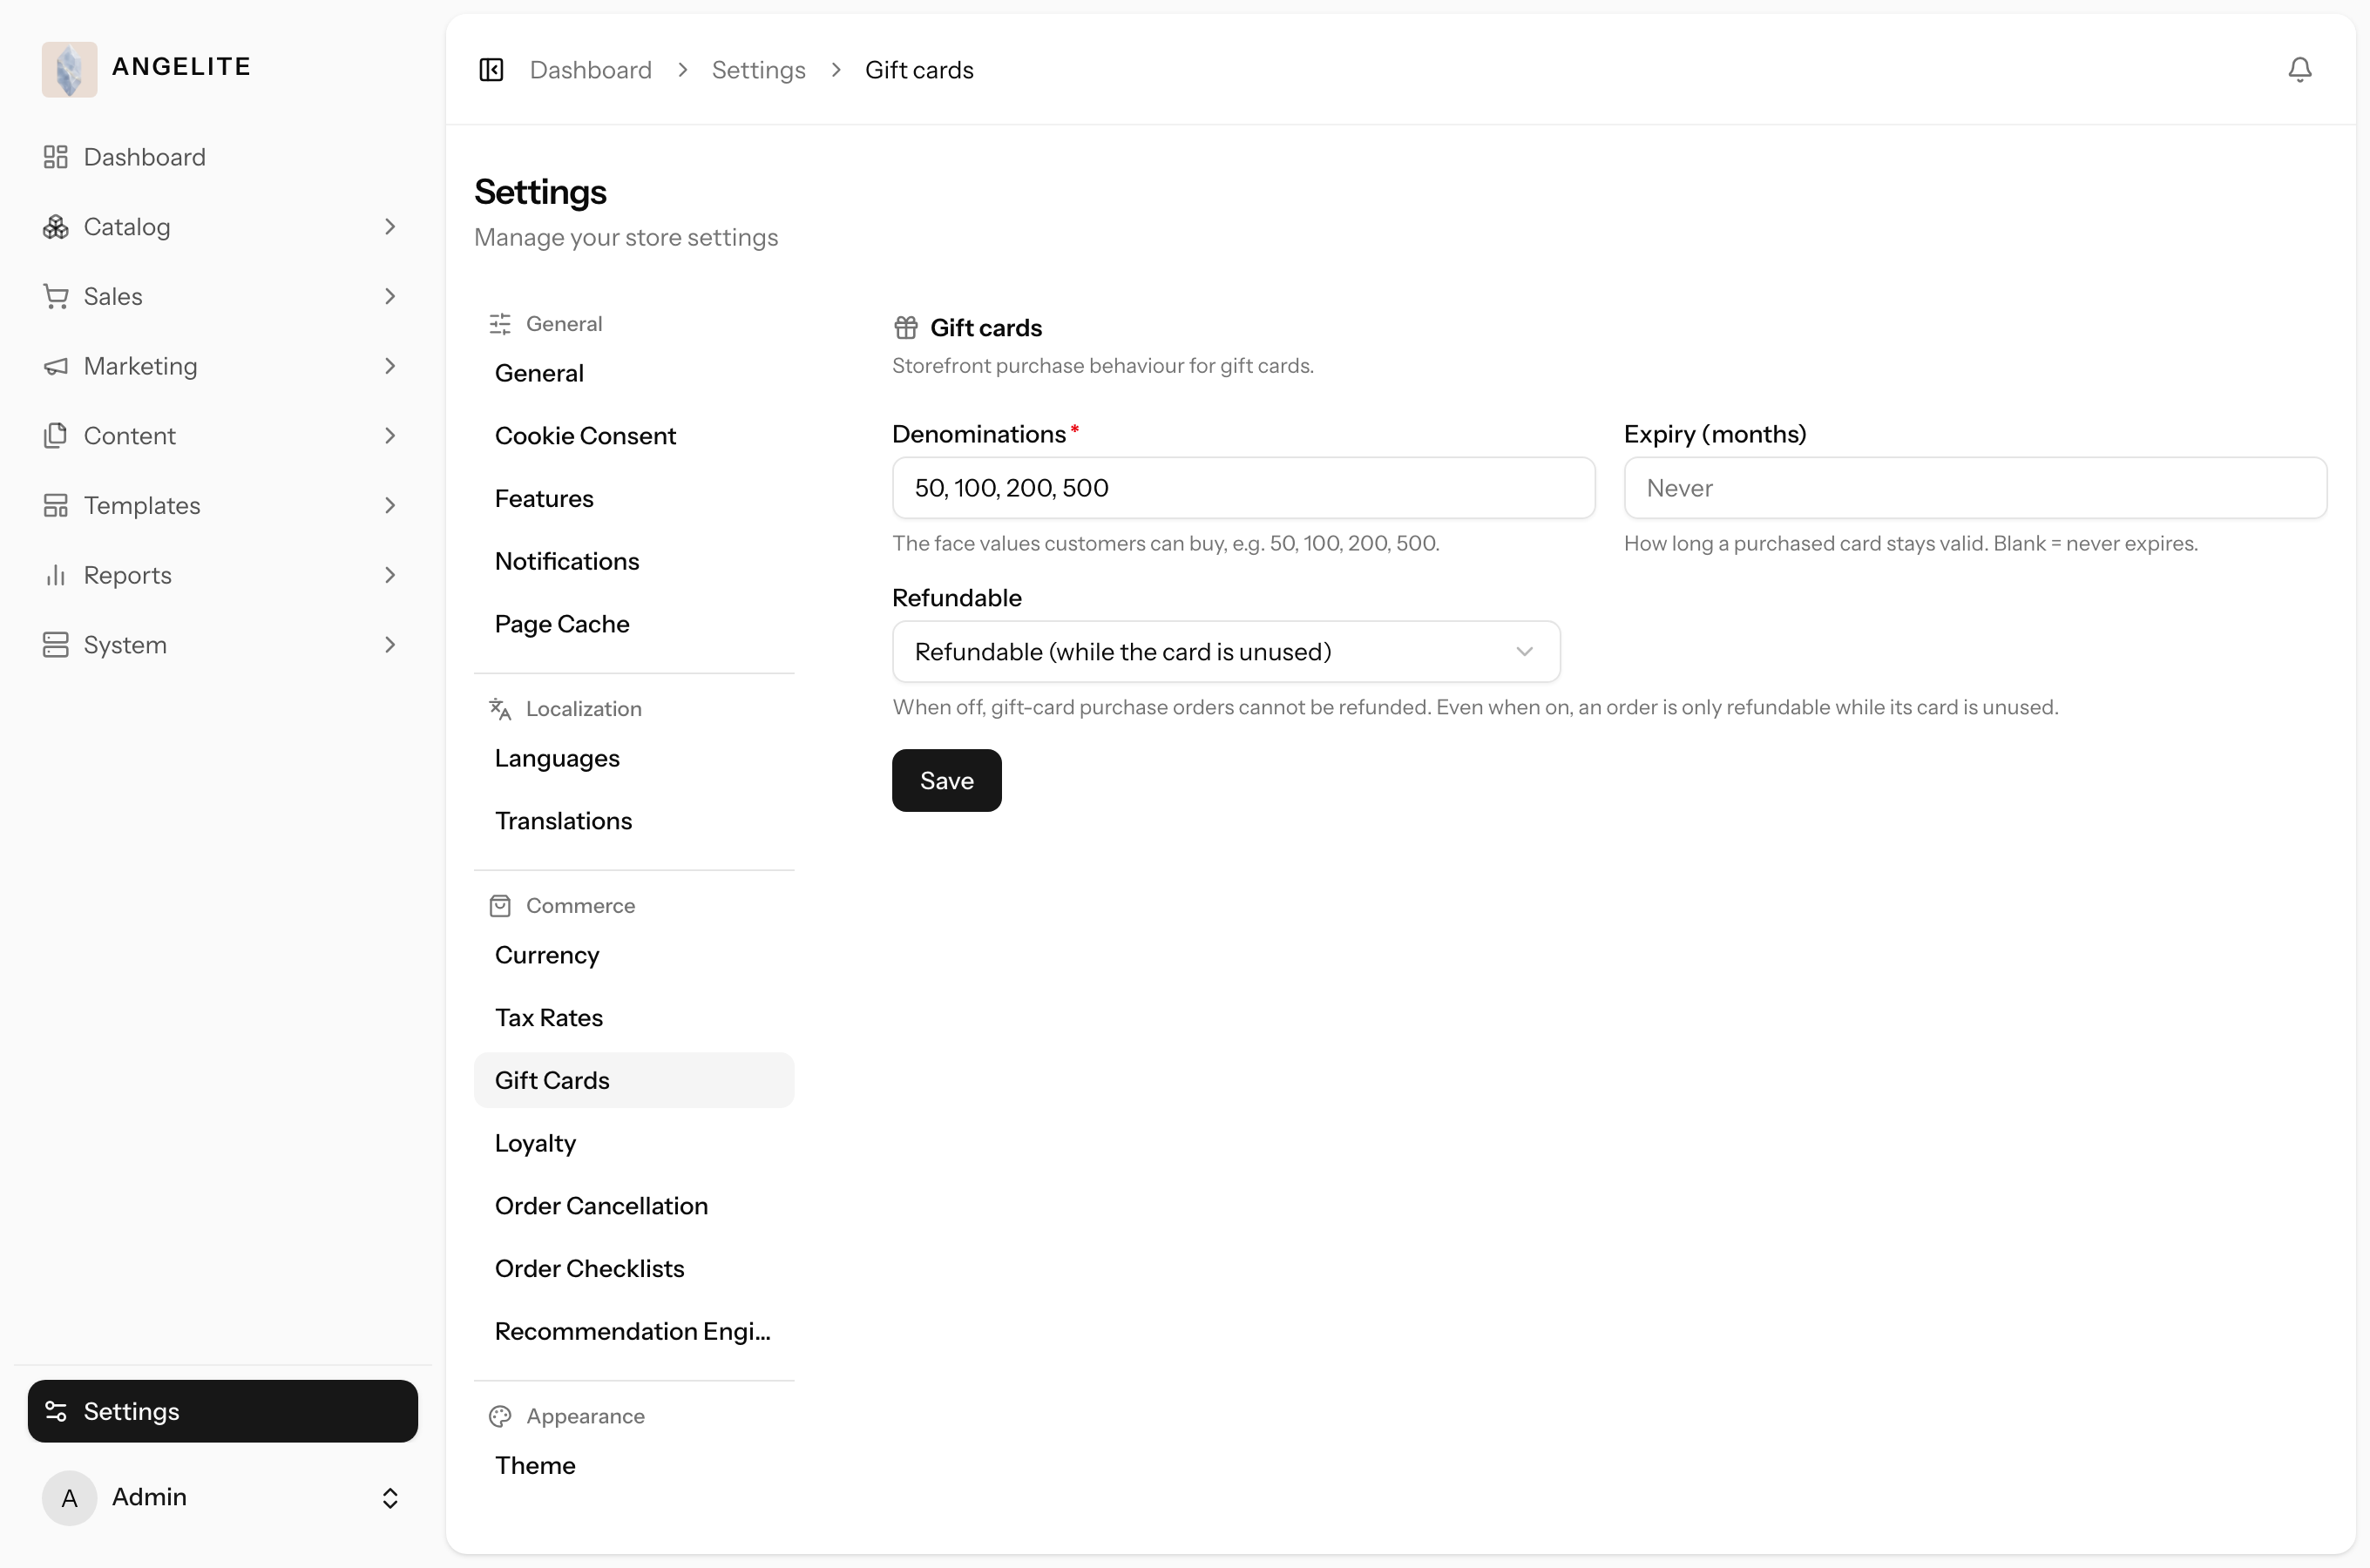
Turn that undecided gift-giver into a sale by controlling how customers buy gift cards. Set
the purchase amounts on offer, how long a card stays valid before it expires, and whether a gift-card
purchase can be refunded, so the recipient picks exactly what she wants.
In practice
Say Eid is coming and many shoppers want to gift an abaya but prefer to let the
recipient choose, so you decide to offer gift cards in a few set amounts that stay valid for a year.
How Angelite handles it: open Settings → Gift cards, enter the
purchase amounts you want on offer such as 250, 500 and 1000 riyals, set the expiry term to twelve
months, and choose whether a gift-card purchase may be refunded, then Save. Shoppers can now buy a
gift card in those amounts at checkout, ready to hand to family for Eid.
How to use it
Open Settings → Gift cards (in the Commerce section).
Enter the purchase denominations you want to offer and the expiry term.
Choose whether gift-card purchases may be refunded.
Save.
Where: Settings → Gift cards (visible when the Gift cards module is on).
Note: even when purchases are refundable, an order is only refundable
while its card is still unused.
Order cancellation reasons
Admin
The problem: orders get cancelled and all you ever learn is that they
were, so the same fixable cause, a size guide that misleads or a delivery that felt slow, keeps quietly
costing you sales.
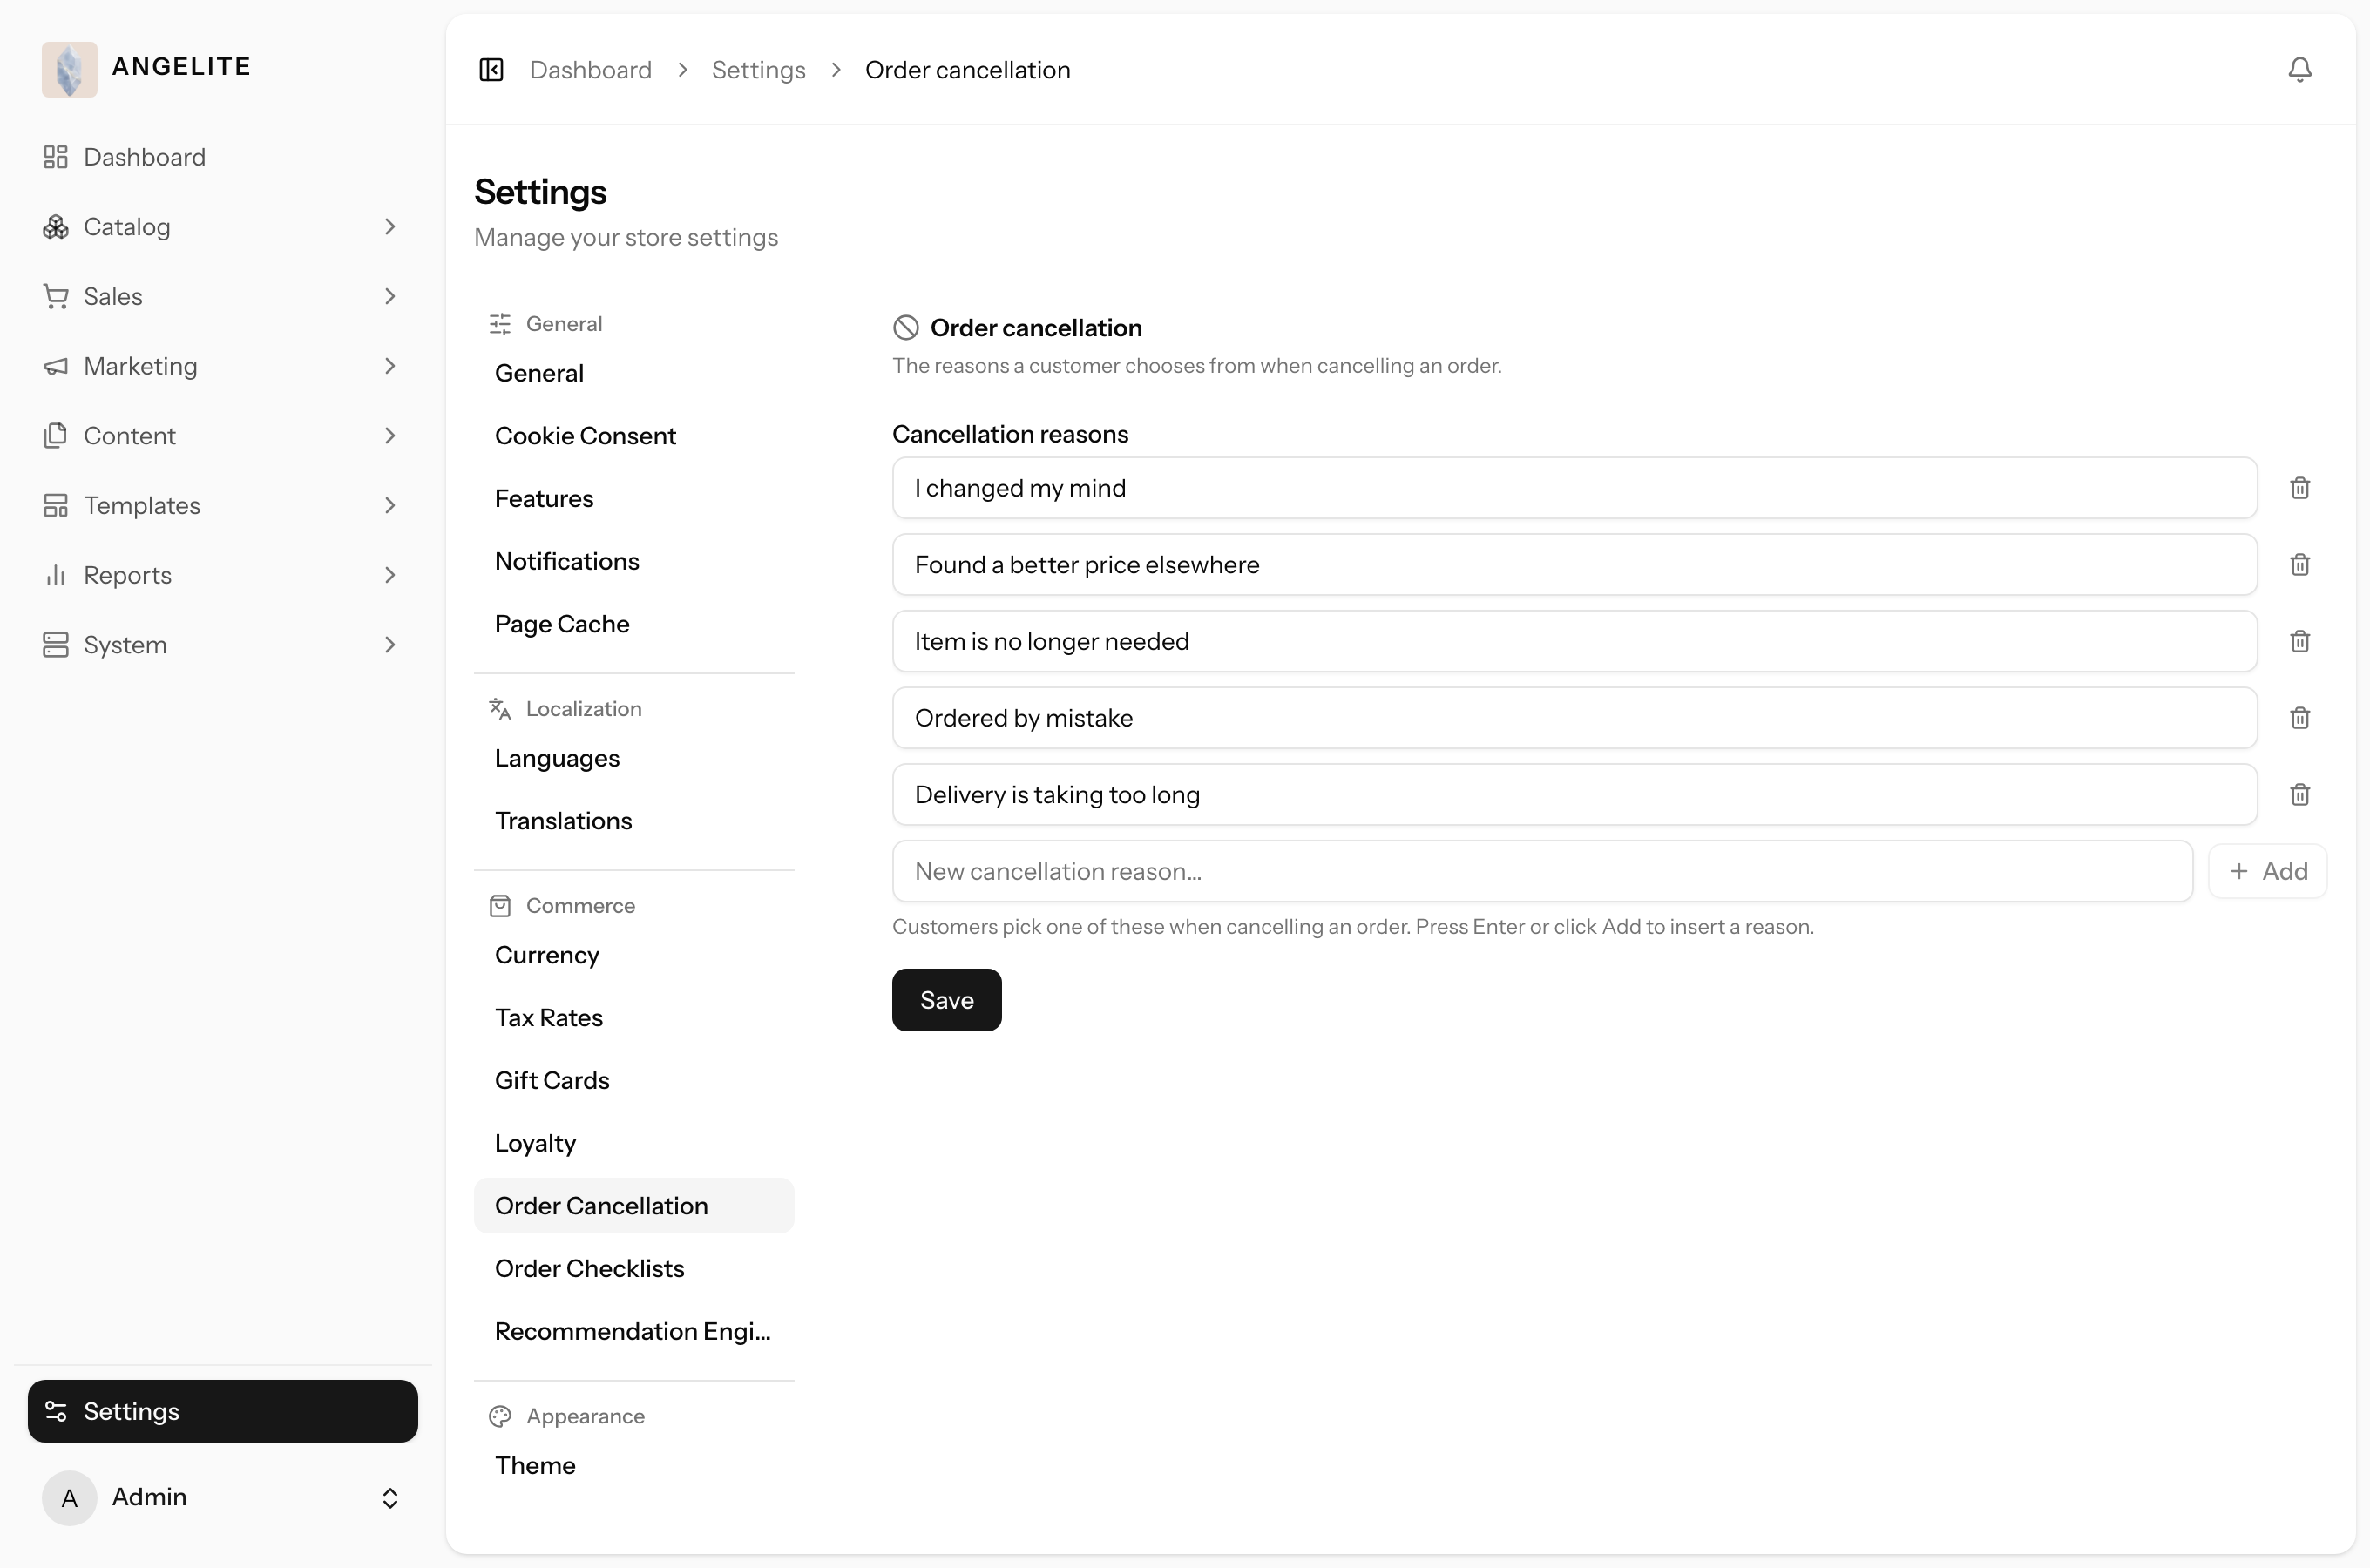
Turn every cancellation into something you can learn from. You write the list of reasons a
customer chooses from when cancelling an order, and the customer must pick one of your reasons when they
cancel, so patterns show up instead of shrugs.
In practice
Say a few customers have cancelled abaya orders lately and you would like to understand
why, whether they changed their mind, found a better size, or ordered the wrong colourway.
How Angelite handles it: open Settings → Order cancellation,
add clear reasons like "Changed my mind", "Ordered the wrong size" and "Found it elsewhere", and Save.
From then on, when a customer cancels an order they must pick one of your reasons, giving you a tidy
record of why orders fall through.
How to use it
Open Settings → Order cancellation (in the Commerce section).
Add, edit or remove the reasons in the list.
Save. These are the options a customer sees on the cancel form.
Where: Settings → Order cancellation.
Shipping
Admin
The problem: with a single take-it-or-leave-it delivery fee there is
nothing pulling a shopper from one abaya to two, and no way to reward the bigger basket that would more
than cover the courier's cost anyway.
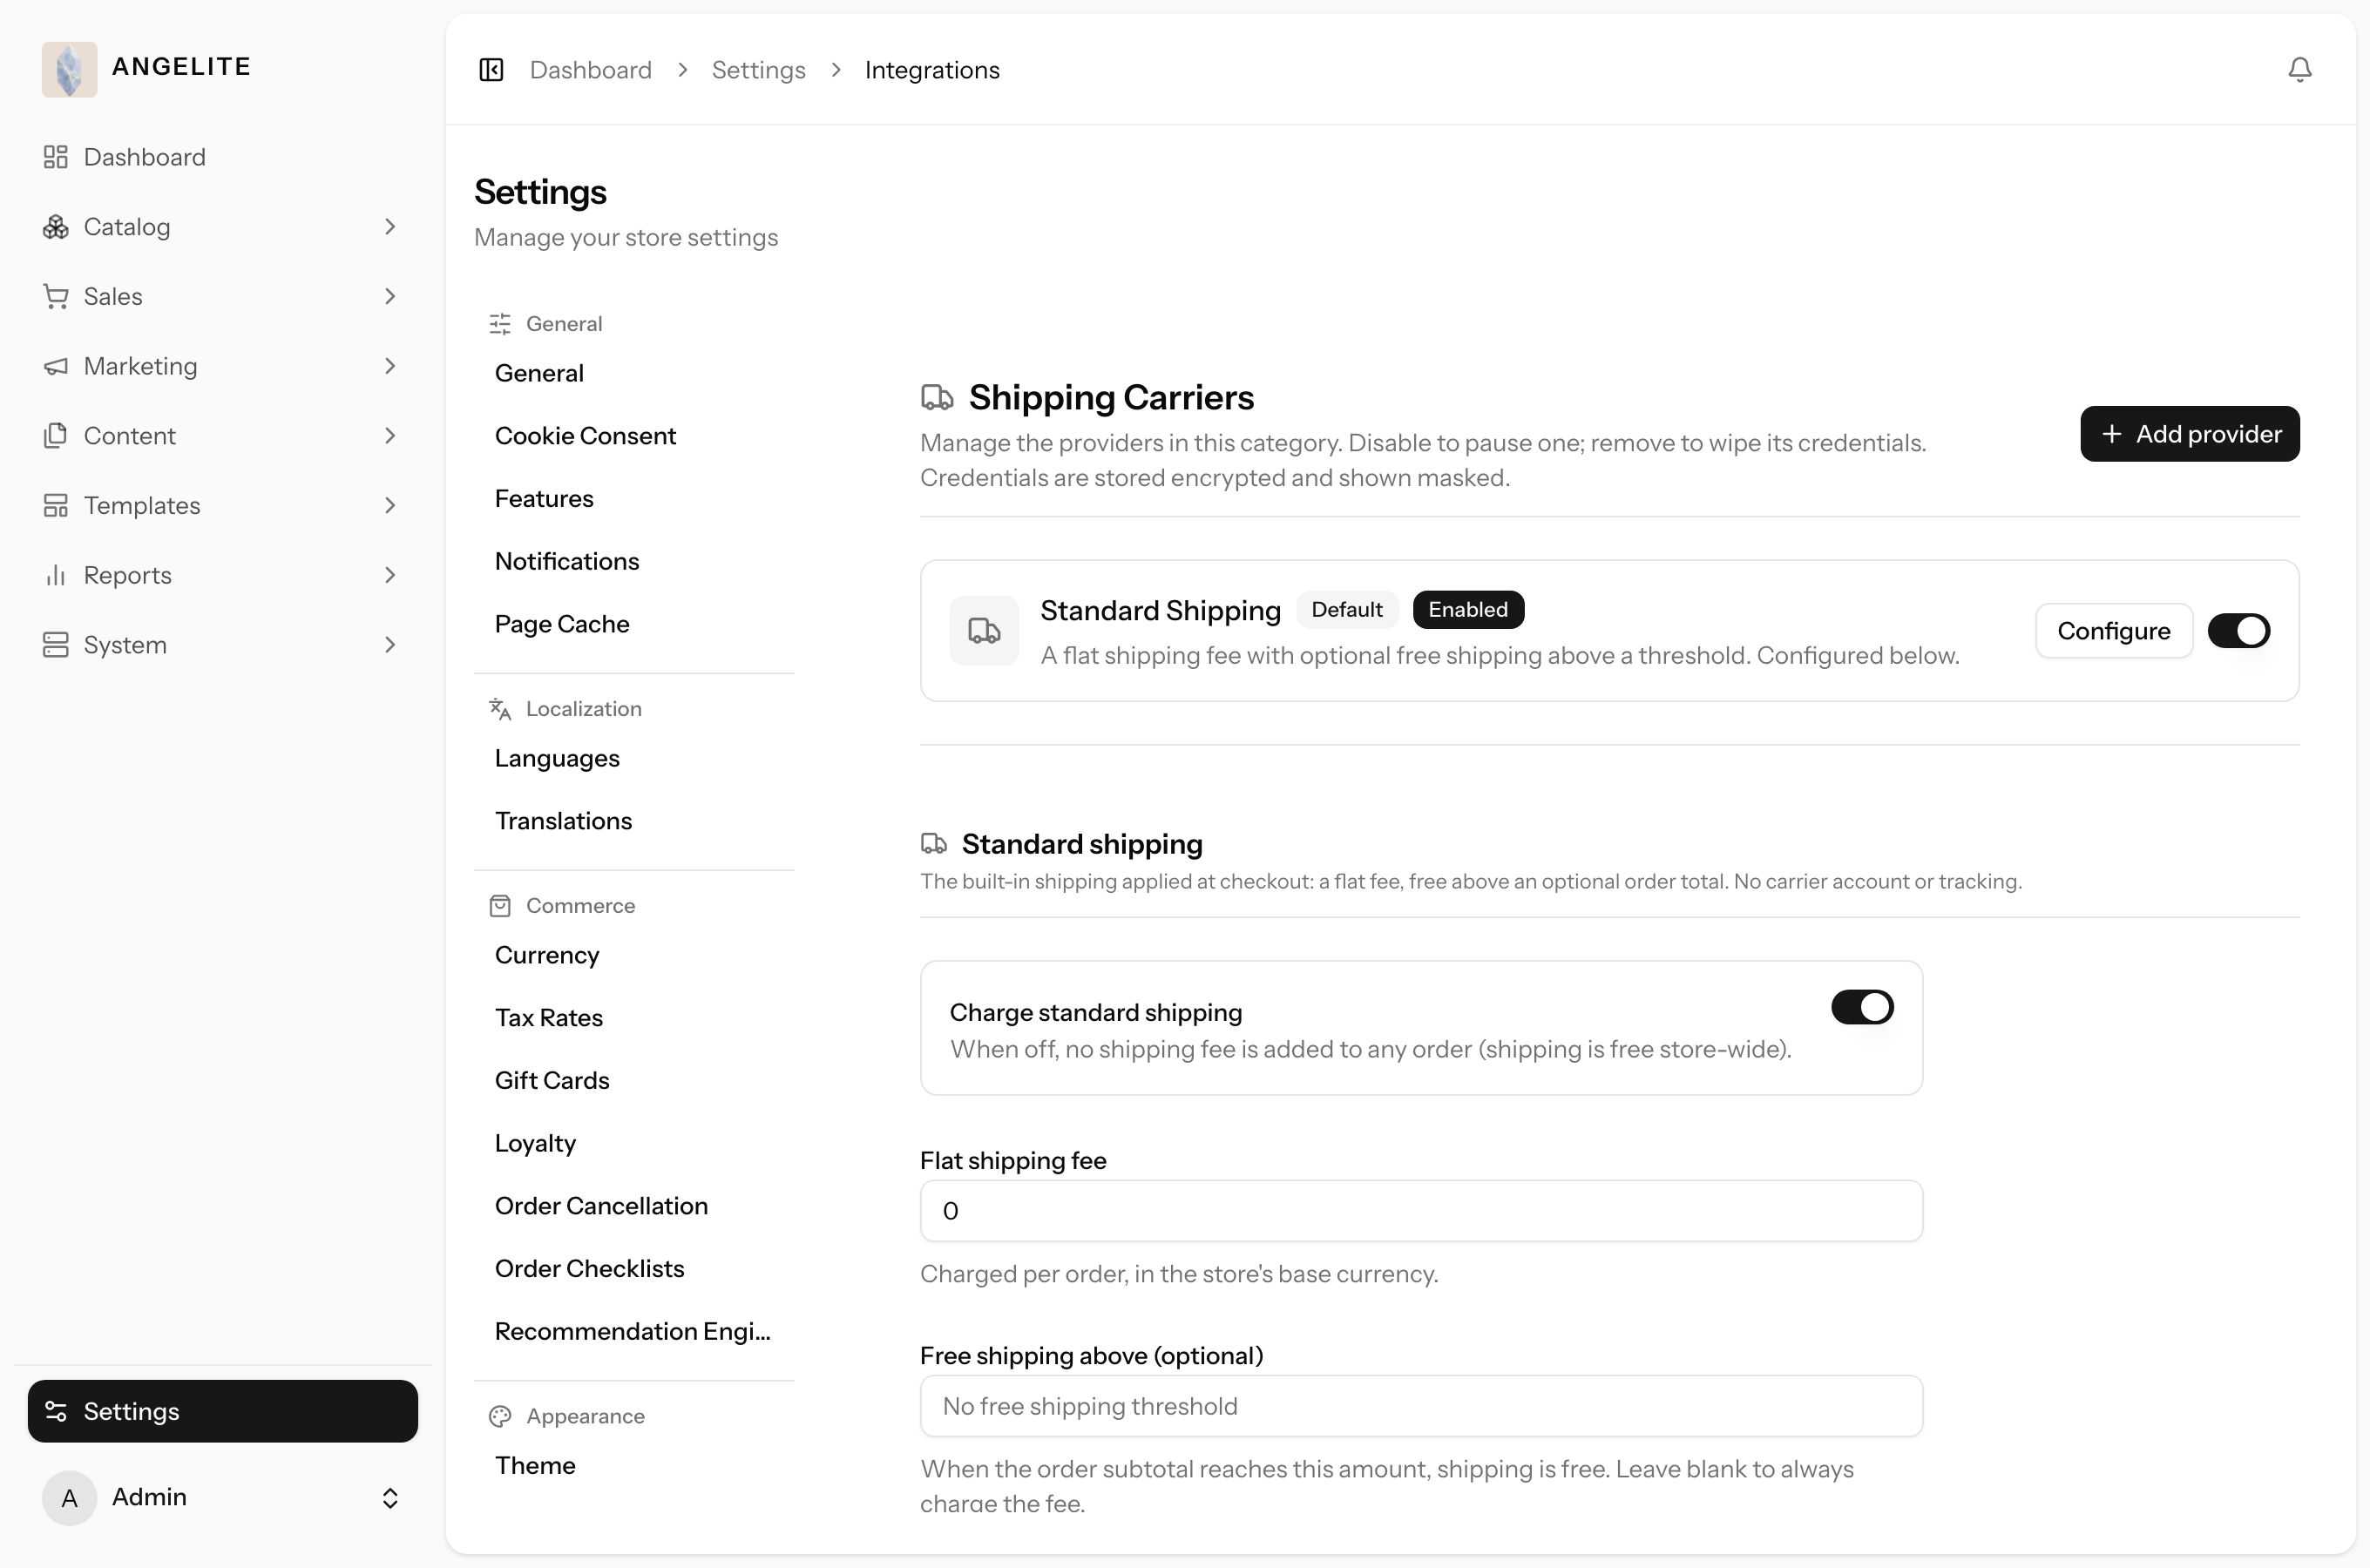
Set how shipping is charged, and use it to grow baskets. Out of the box the store uses a
standard flat-fee method, free above a threshold you choose, so delivery becomes a reason to add one more
piece. When you connect a carrier you can also build delivery zones and per-zone rate tables, all managed
on the Shipping Carriers page.
In practice
Say you want to encourage larger baskets, so any order over 500 riyals ships free
within Qatar, while smaller orders pay a simple flat delivery fee.
How Angelite handles it: open
Settings → Integrations → Shipping Carriers, set the standard flat fee and
the free-shipping threshold to 500 riyals, and Save. At checkout, a customer buying a single abaya
sees the flat fee, while a customer adding a second piece to cross the threshold sees delivery drop to
free, nudging them to add more.
How to use it
Open Settings → Integrations → Shipping Carriers.
Configure the standard flat fee and the free-shipping threshold.
If you use a live carrier, set up the zones and methods for it there too.
Related: carriers and live rate quotes are covered in Chapter 13,
Integrations.
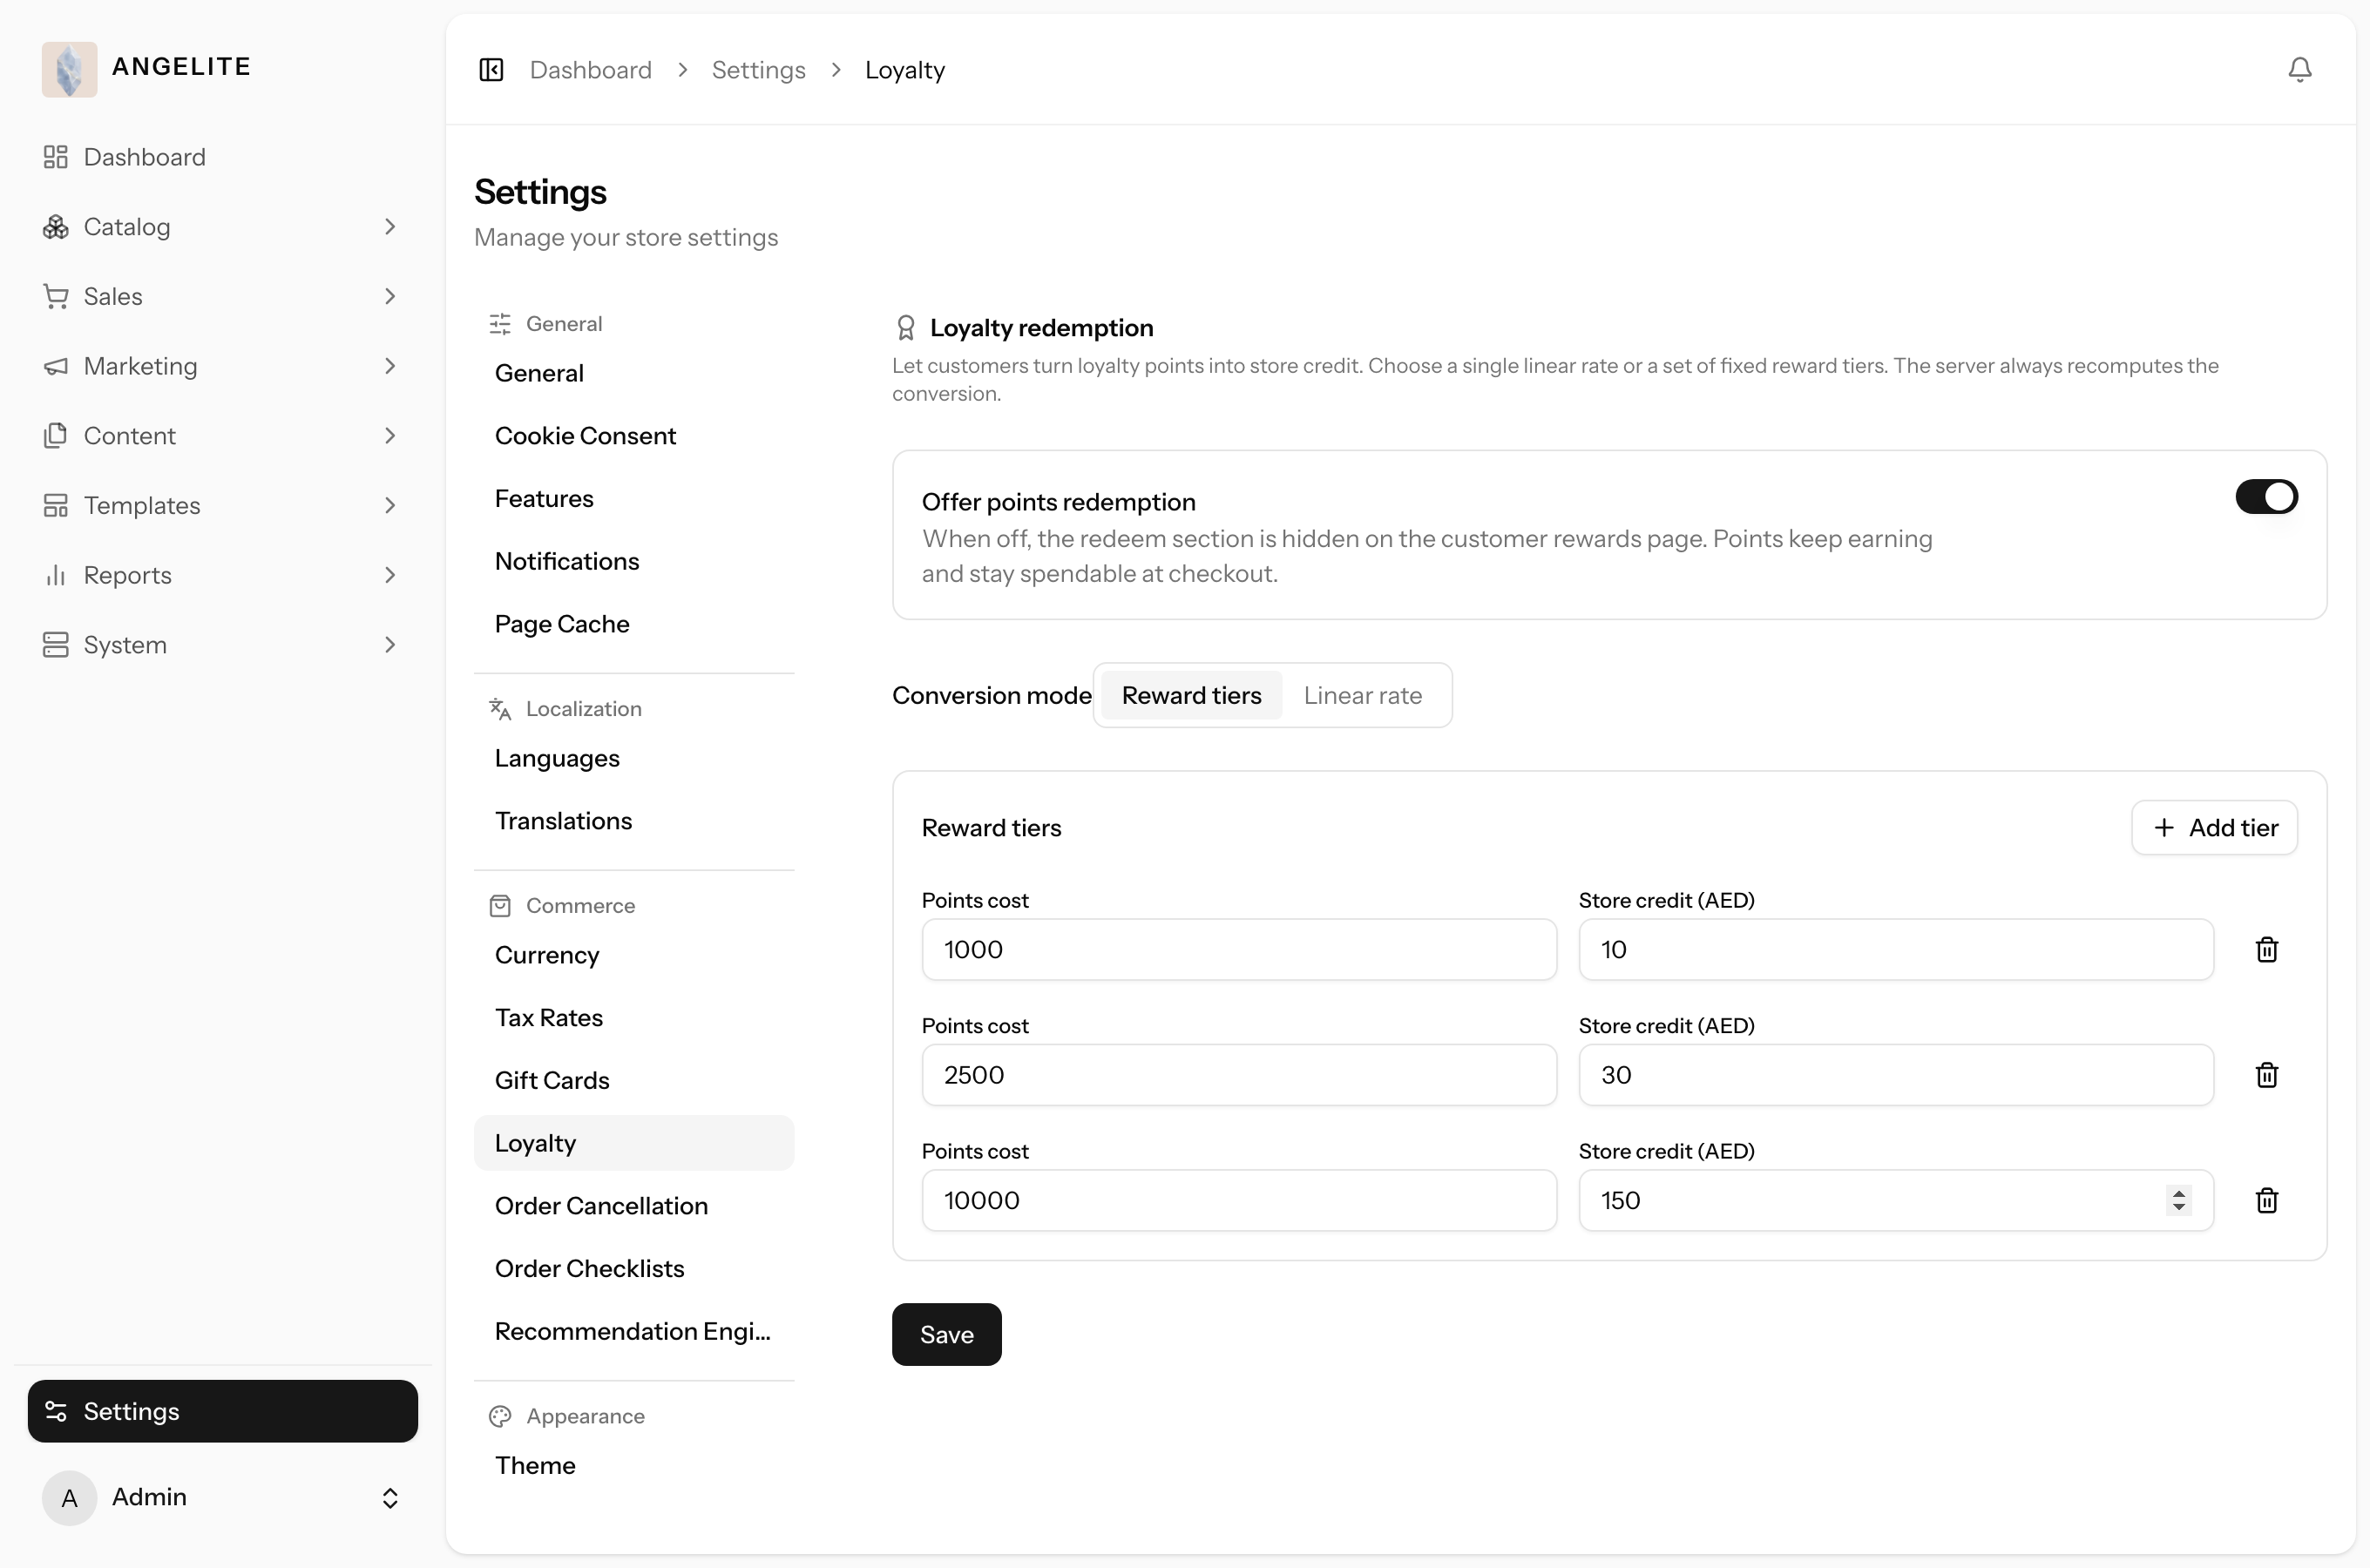
Loyalty redemption
AdminOptional · Loyalty Points
The problem: a points balance that never turns into anything real
teaches customers to ignore it, and a loyalty programme nobody redeems is just bookkeeping, not a reason
to come back.
Decide how loyalty points turn into store credit when customers redeem them, so the reward
feels concrete. You can set a simple linear rate (so many points equal a unit of credit) or define fixed
tiers (set amounts of points for set rewards).
In practice
Say your regulars have been collecting points on every purchase and you want a
clear, generous reward, where 100 points are worth 10 riyals of store credit toward their next
abaya.
How Angelite handles it: open Settings → Loyalty, set a linear
conversion of 100 points to 10 riyals of credit, or switch to fixed tiers if you prefer set rewards
like "500 points for a 60 riyal voucher", then Save. The next time a loyal customer redeems, their
points convert to credit at exactly the rate you chose.
How to use it
Open Settings → Loyalty.
Choose a linear conversion rate, or switch to fixed tiers and define each tier.
Save. The new conversion applies the next time a customer redeems points.
Where: Settings → Loyalty (visible when the Loyalty module is on).
Recommendation engine tuning
Admin
The problem: the "you may also like" row starts suggesting pieces that
only loosely belong together, and weak suggestions quietly cost you the second item in the basket, with
no way to correct them short of a developer retuning the machinery.
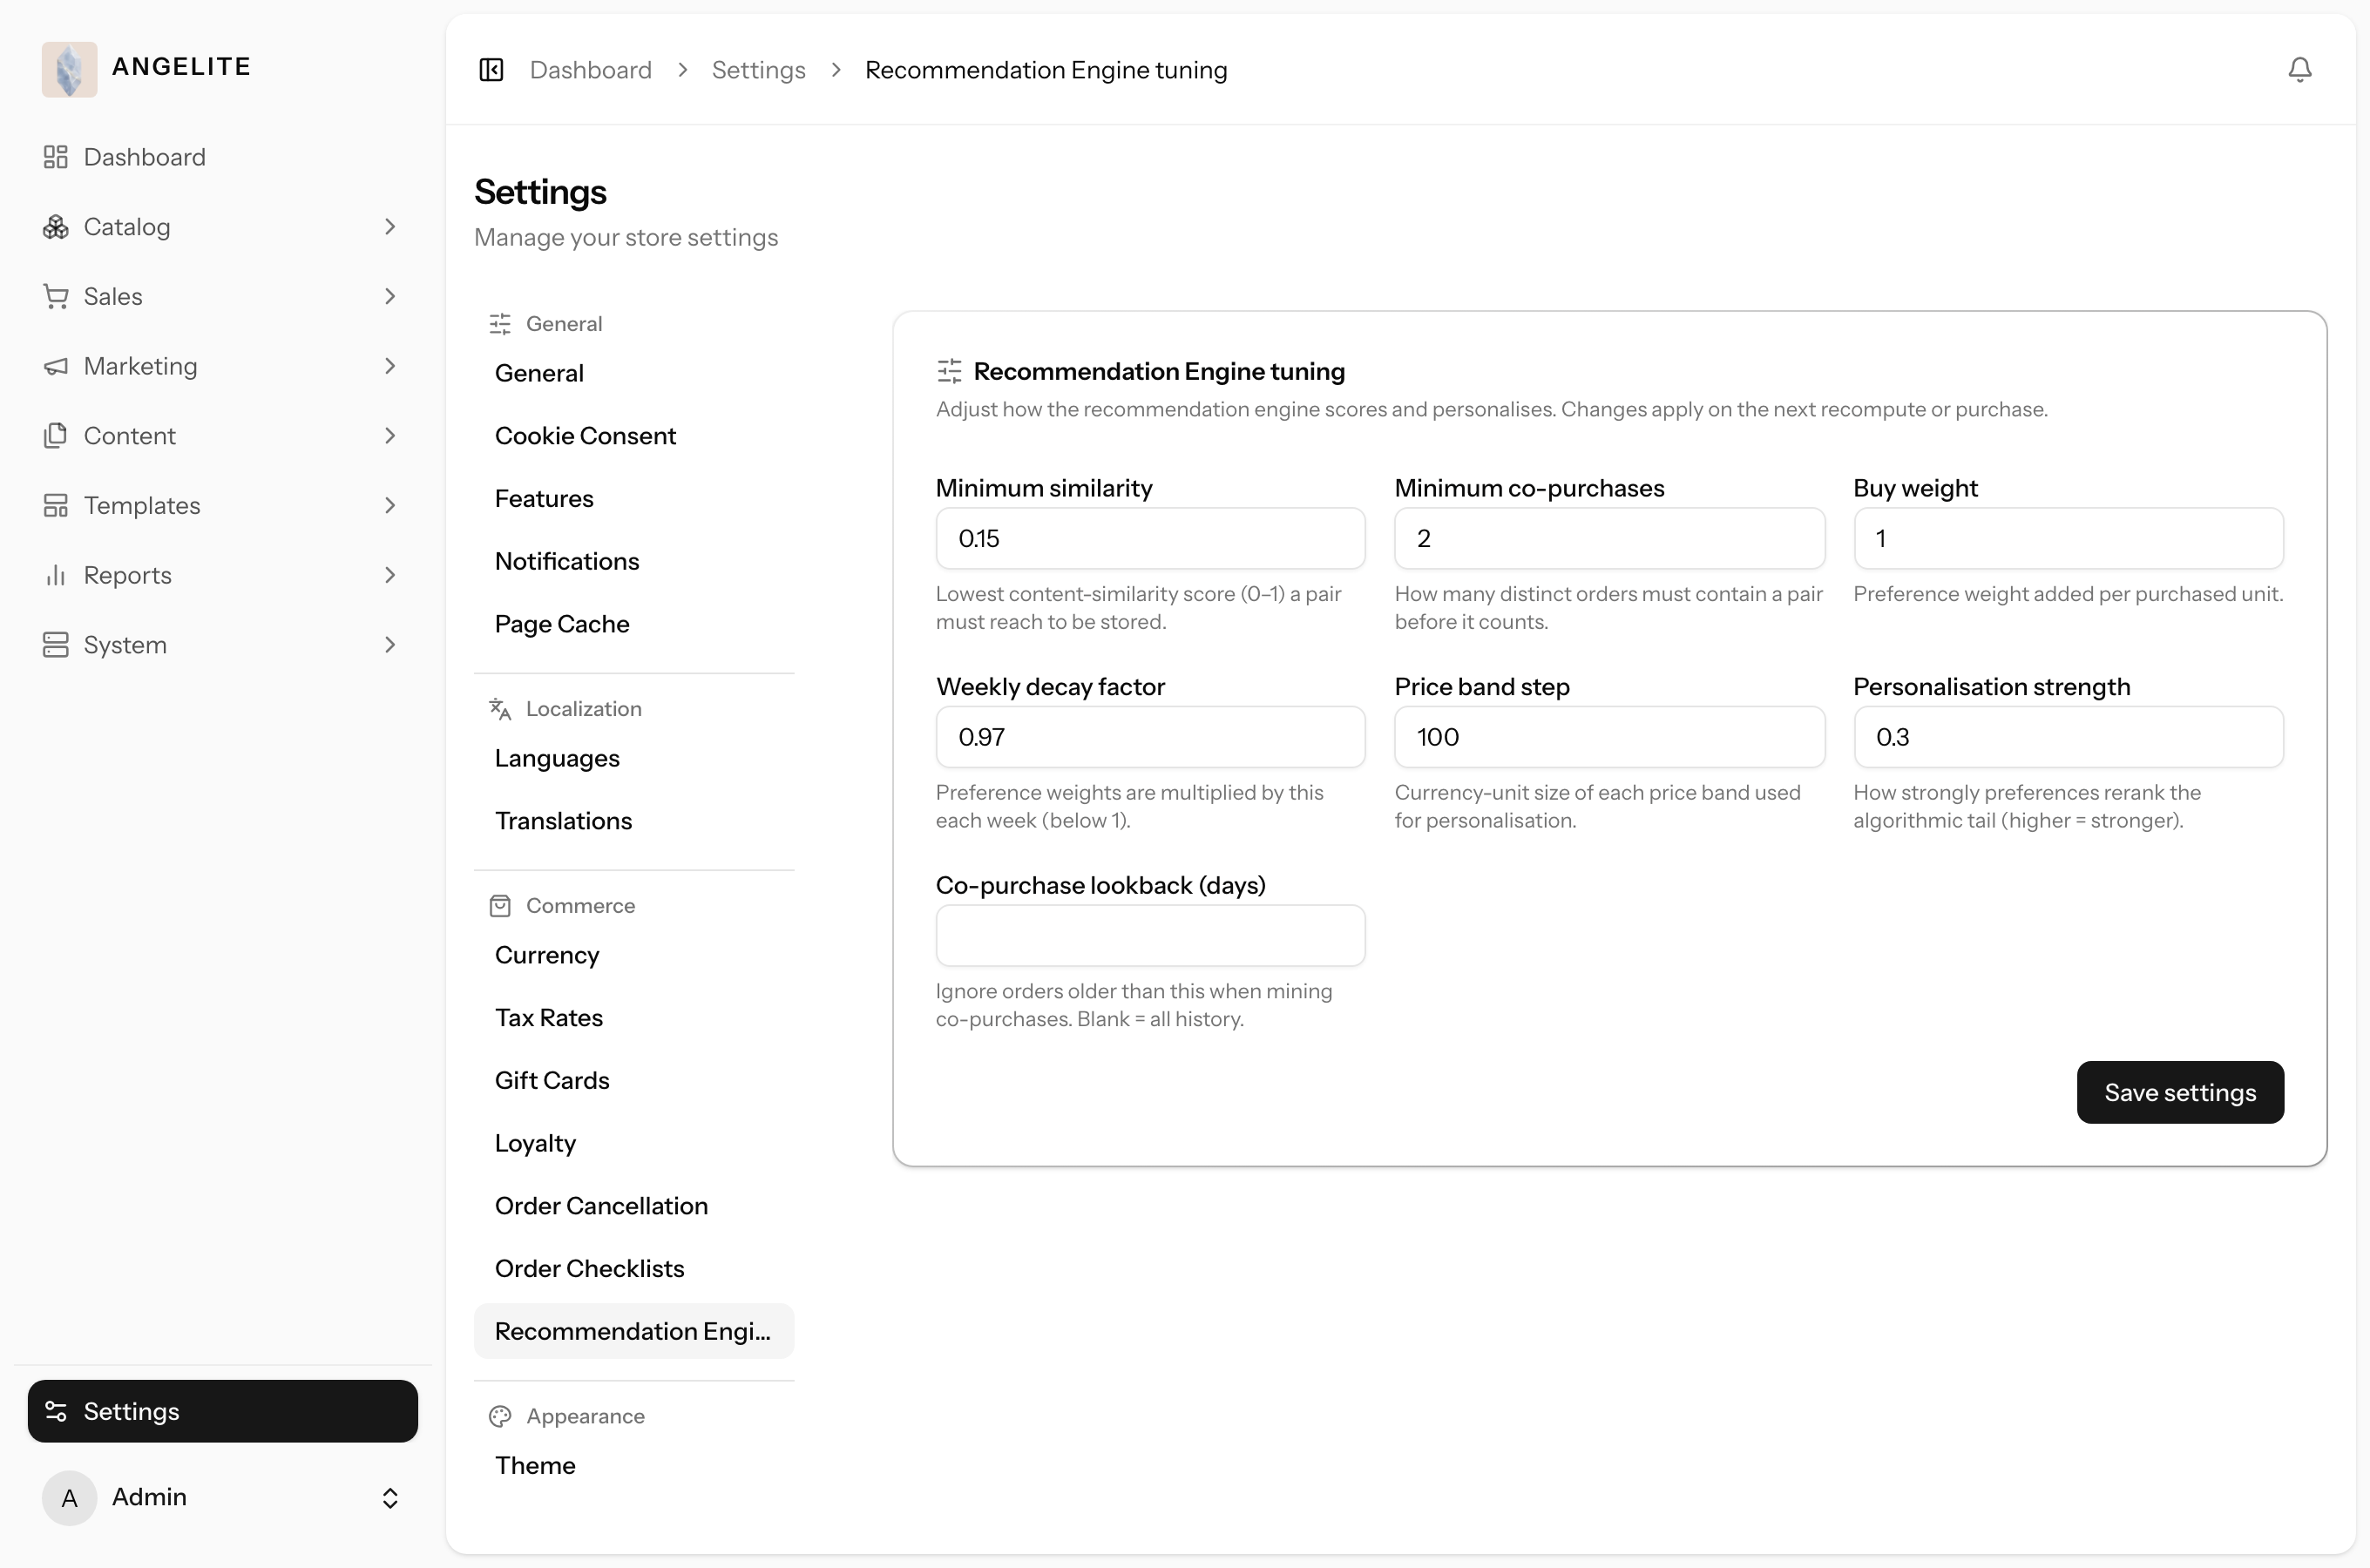
Fine-tune how the "you may also like" engine (Chapter 08, Marketing) weighs its
different sources: how alike two products need to be to count as similar, how many times they need
to sell together before that pairing counts, how far back it looks, and how strongly a shopper's own
browsing and buying history shapes the personal suggestions she sees. Most stores never need to touch
this; it exists for the moment you want to shift that balance yourself.
In practice
Say you notice the "you may also like" row on your abayas often suggests pieces that only loosely relate, and you would rather it lean more heavily on what customers actually buy together than on how visually similar two items look.
How Angelite handles it: you open Settings then Commerce then Recommendation Engine
tuning, lean the weighting toward purchase pairings and raise the similarity bar slightly so only
closer matches qualify. You save, and the change is picked up the next time the engine recomputes (or
straight away if you trigger a recompute from Marketing → Recommendations), so the suggestions
gradually reflect the balance you asked for.
How to use it
Open Settings → Recommendation Engine tuning (under Commerce).
Adjust the knobs you want to change: similarity threshold, co-purchase minimum and lookback window, buy weight, decay, price sensitivity, or personalization strength.
Save. The new balance applies on the next recompute (or the next purchase, for personalization).
Where: Settings → Recommendation Engine tuning.
Good to know: the defaults are tuned to work well out of the box, so this
page can stay untouched for the life of the store. It exists for when you want to deliberately shift the
balance.
System
Launch or pause a module without touching code
Admin
The problem: you want gift cards on sale before Eid but you are not
ready to run a loyalty programme, and turning whole store features on and off is normally a developer
job scheduled for someone else's week.
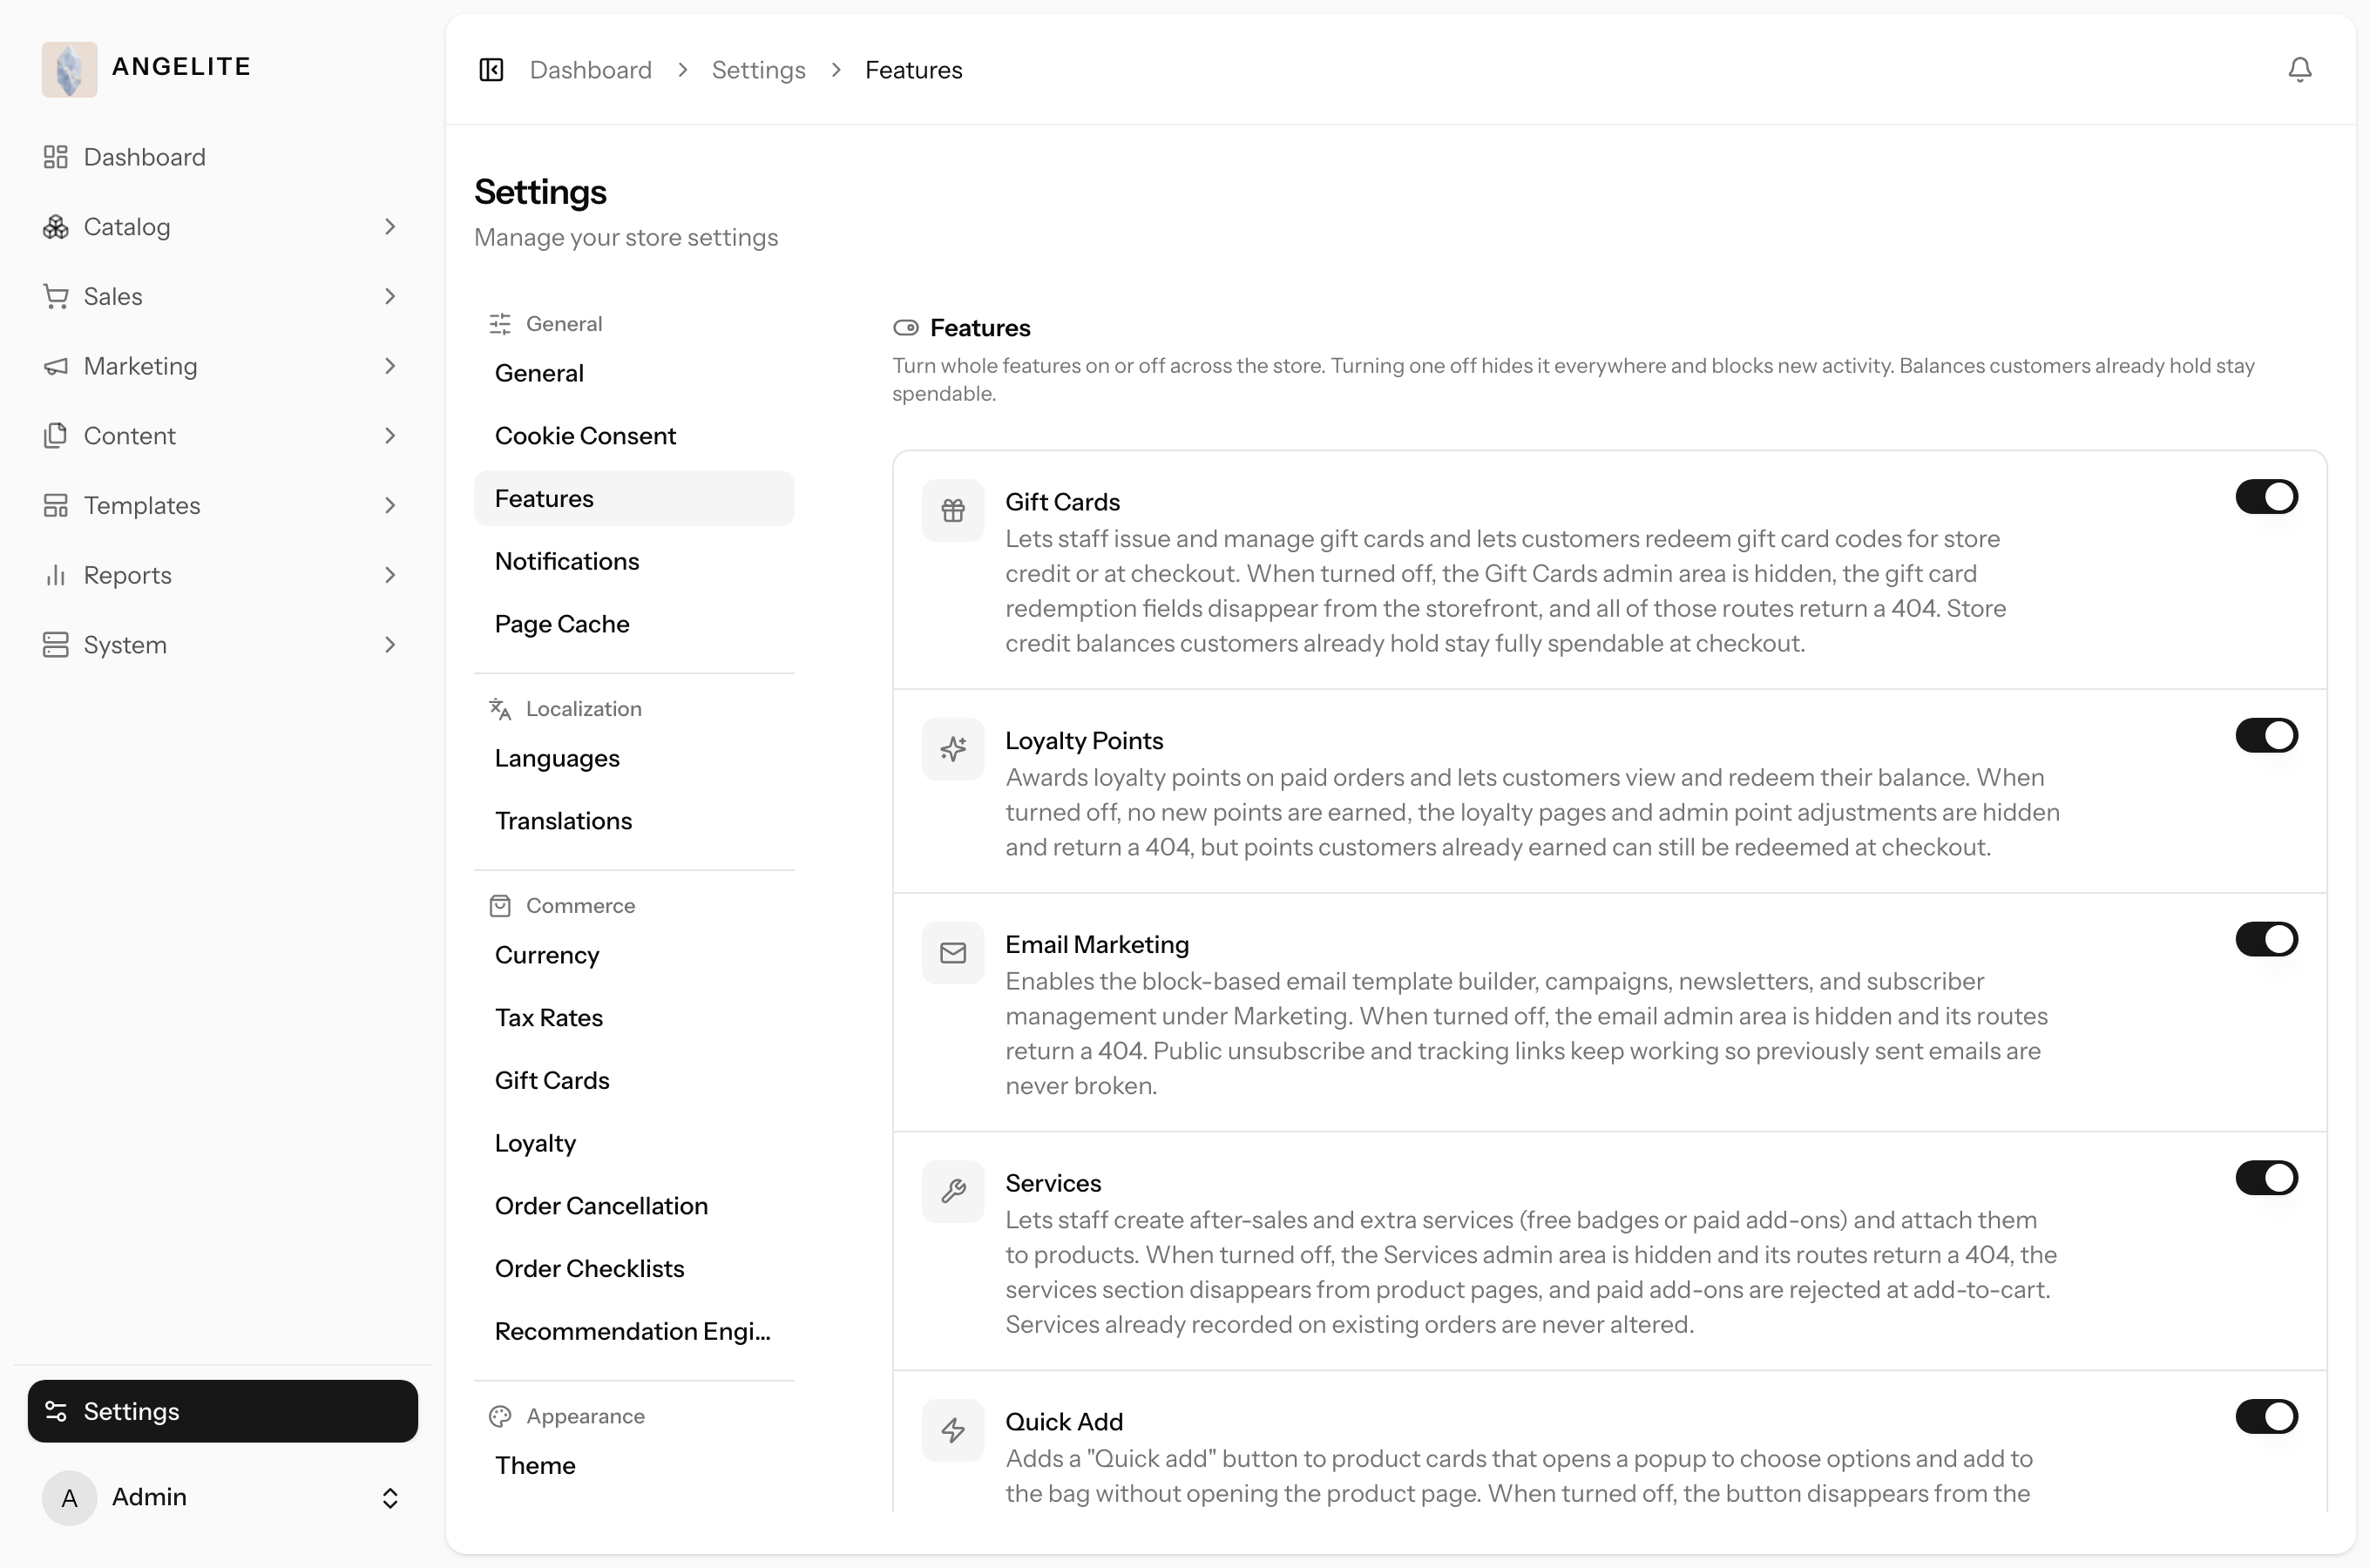
Switch whole optional modules on or off for the entire store yourself, such as gift cards,
loyalty, email marketing, product services and quick-add. Turning a module off hides it and stops
new activity, but never strands value customers already hold, so existing balances stay spendable.
In practice
Say you are not ready to run a loyalty programme yet but you do want to start
selling gift cards before Eid, so you need one module on and another off without any developer.
How Angelite handles it: open Settings → Features, flip the
Gift cards switch on and leave Loyalty off, then Save. The gift-card pages and storefront controls
appear at once while loyalty stays hidden, and if you later turn a module off, any store credit or
gift-card value customers already hold remains fully spendable at checkout.
How to use it
Open Settings → Features.
Flip the switch for each module you want on or off.
Save. The store updates straight away, hiding or revealing the related pages and storefront controls.
Where: Settings → Features.
Note: turning a module off blocks new activity but always leaves existing
balances, such as store credit, fully spendable at checkout.
Integrations
Admin
The problem: the step from a demo store to a real one, actually charging
cards and booking couriers, is exactly where a project usually stalls waiting for a technical hand.
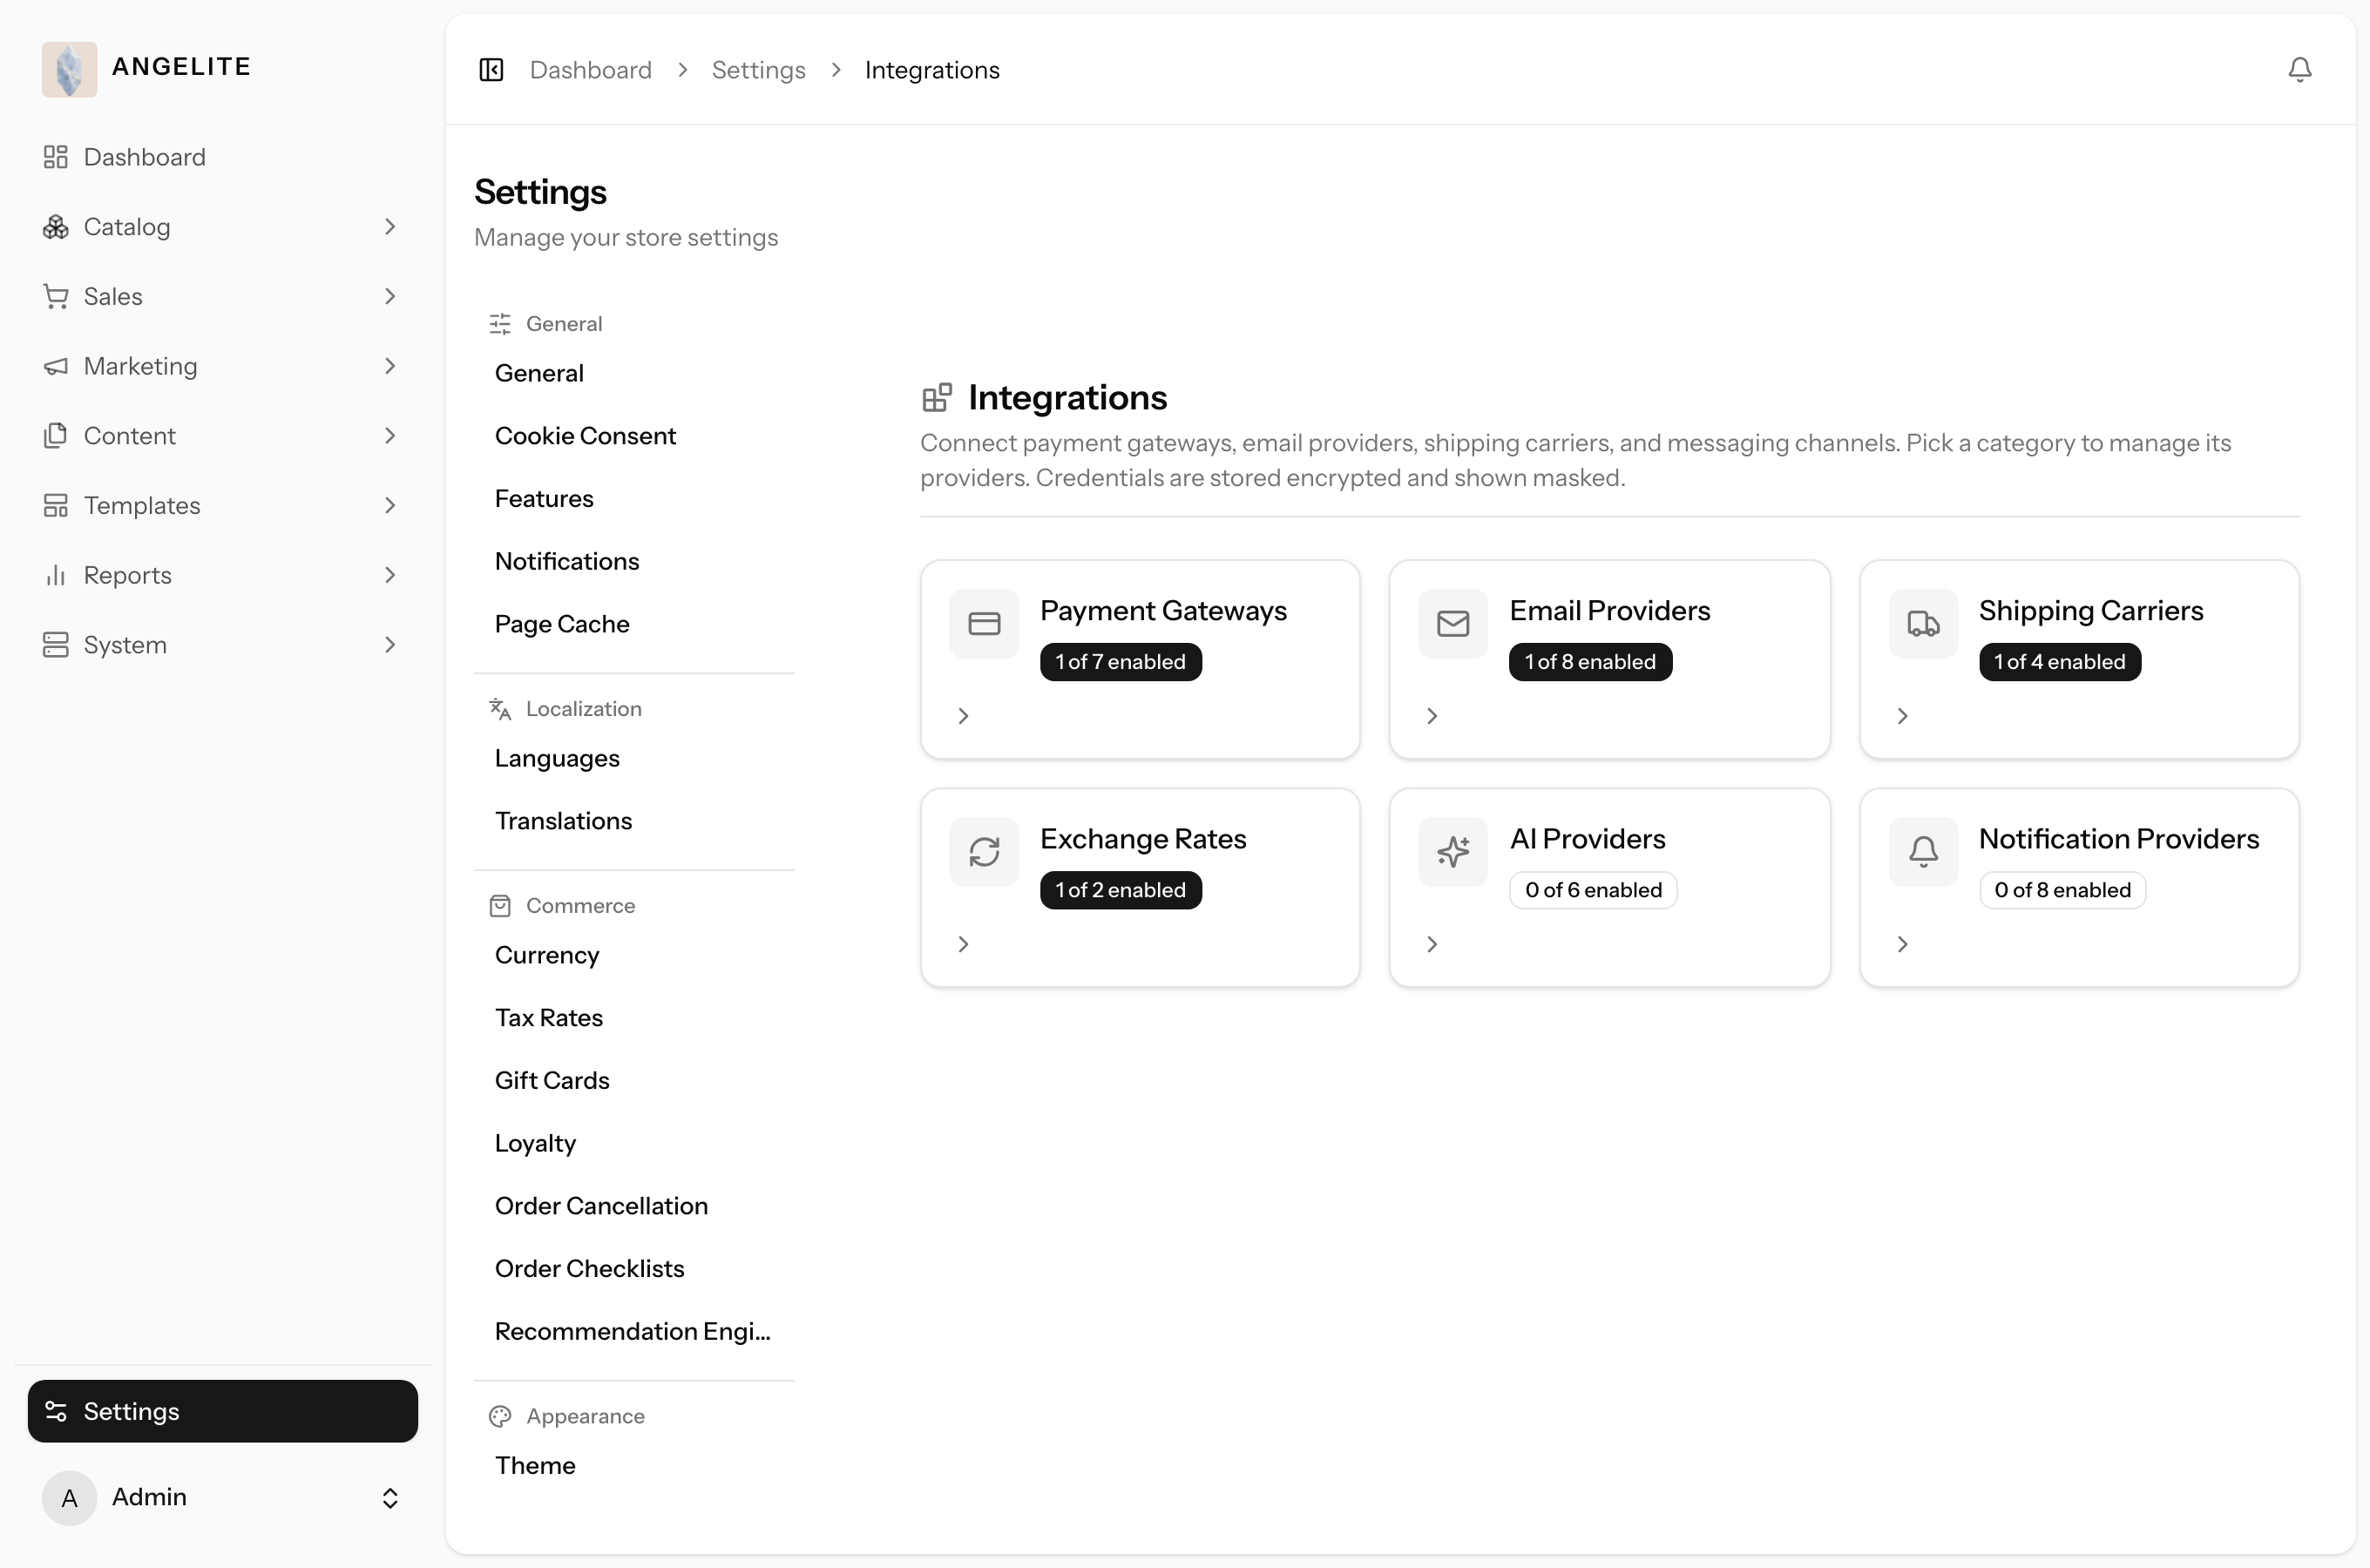
The hub for connecting outside services yourself: payment gateways, email providers,
shipping carriers, exchange-rate feeds, messaging providers and AI providers. Each category ships with a
built-in basic option so the store works from day one, and you add advanced providers as you need them.
In practice
Say you are ready to take real card payments for your abayas and accessories and need to
connect your payment provider so checkout charges customers properly.
How Angelite handles it: open Settings → Integrations, choose
the Payment gateways category, click Add provider, enter your account credentials,
and test the connection so you know it works before going live, then enable it and Save. Card payments
now flow through your gateway at checkout, alongside the built-in bank-transfer option that ships by
default.
How to use it
Open Settings → Integrations.
Pick a category, click Add provider, and enter its credentials.
Test the connection, then enable the provider and save.
Where: Settings → Integrations.
Related: the integrations system, its providers and health monitoring
are covered in full in Chapter 13, Integrations.
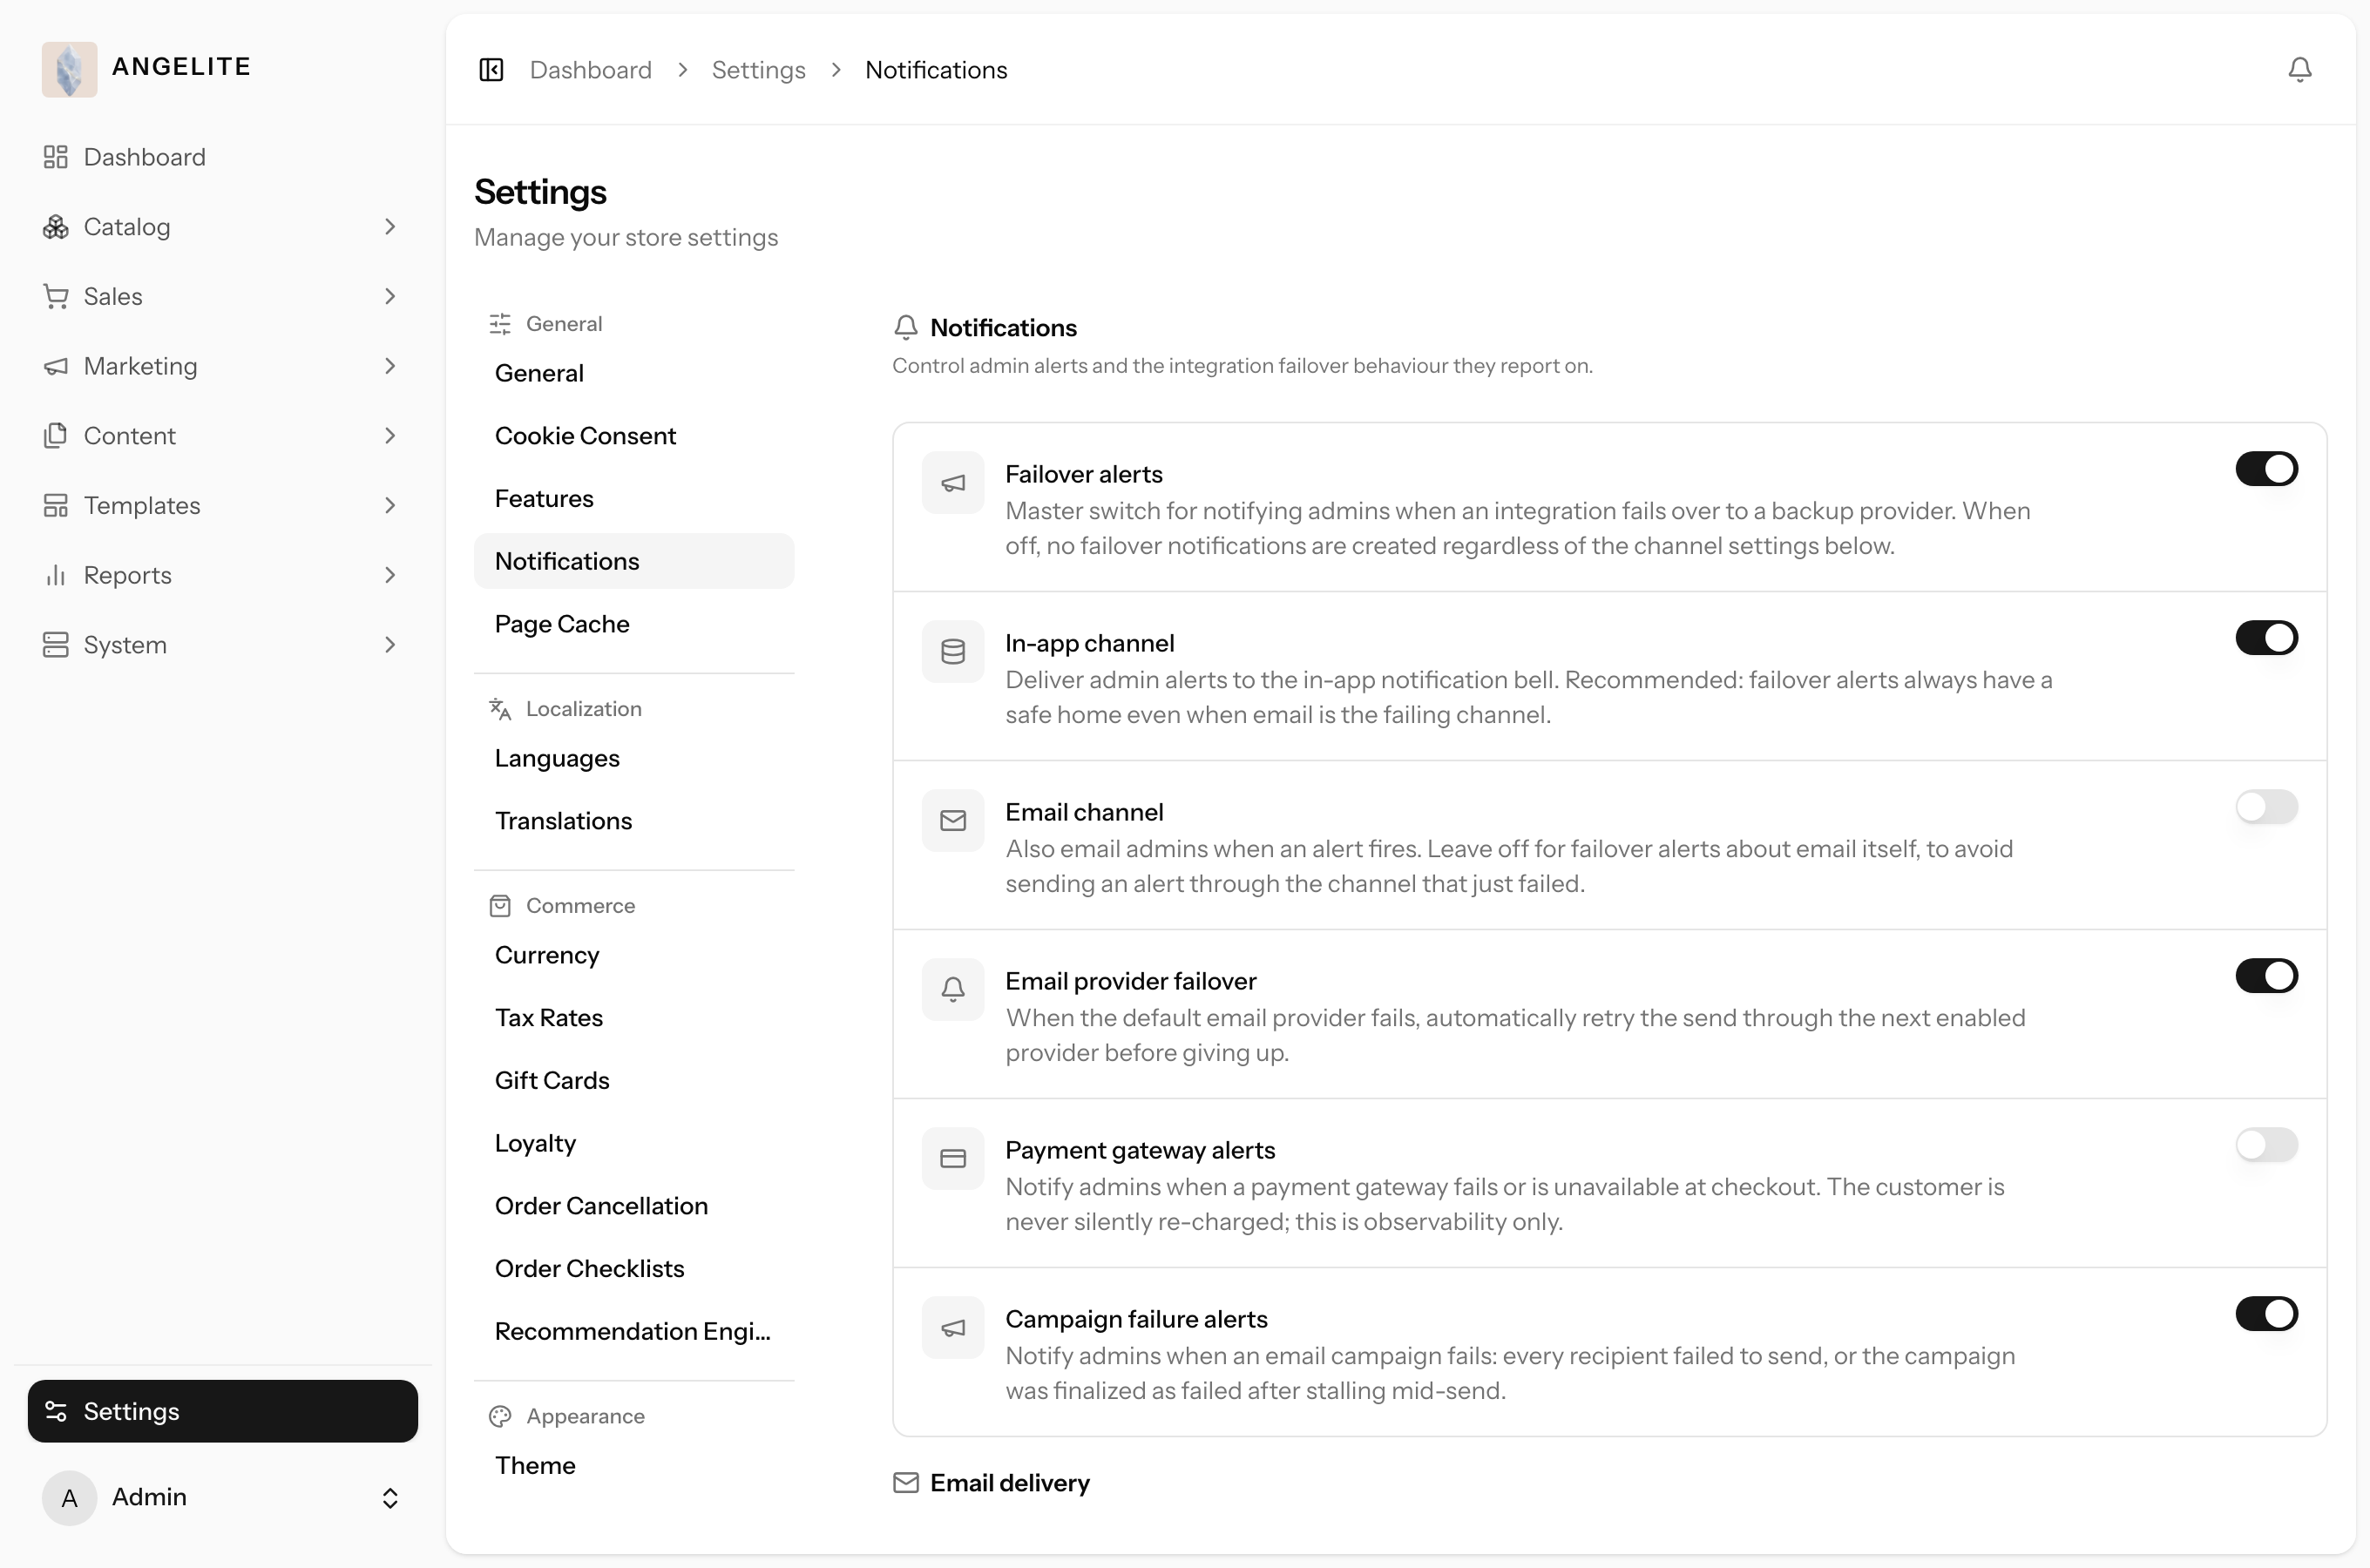
Notification settings
Admin
The problem: switching a brand-new messaging channel straight onto
customers is a gamble, and when a provider silently stops delivering, the first sign is usually a
customer complaint.
Tune how notifications are sent, and trial new channels safely. For each channel you choose
who receives customer messages, either just your admins or all customers, and you configure the alerts
that warn you the moment a provider has trouble.
In practice
Say you want WhatsApp order updates to reach your customers, but you are still
testing your SMS provider and would rather those messages go only to your own team for now.
How Angelite handles it: open Settings → Notifications, set the
WhatsApp channel audience to all customers and the SMS channel audience to admins only, review the
failover alert that warns you if a provider has trouble, and Save. Customers now get their order
updates on WhatsApp, while SMS stays internal until you are confident, and you are always alerted if a
provider fails.
How to use it
Open Settings → Notifications.
Set the audience for each messaging channel that has a provider configured.
Review the failover alert settings.
Save.
Where: Settings → Notifications.
Page cache
Admin
The problem: a fast storefront and a fresh storefront pull in opposite
directions: the pages that load instantly are stored copies, and the flash-sale headline you just
rewrote can sit hidden behind yesterday's version.
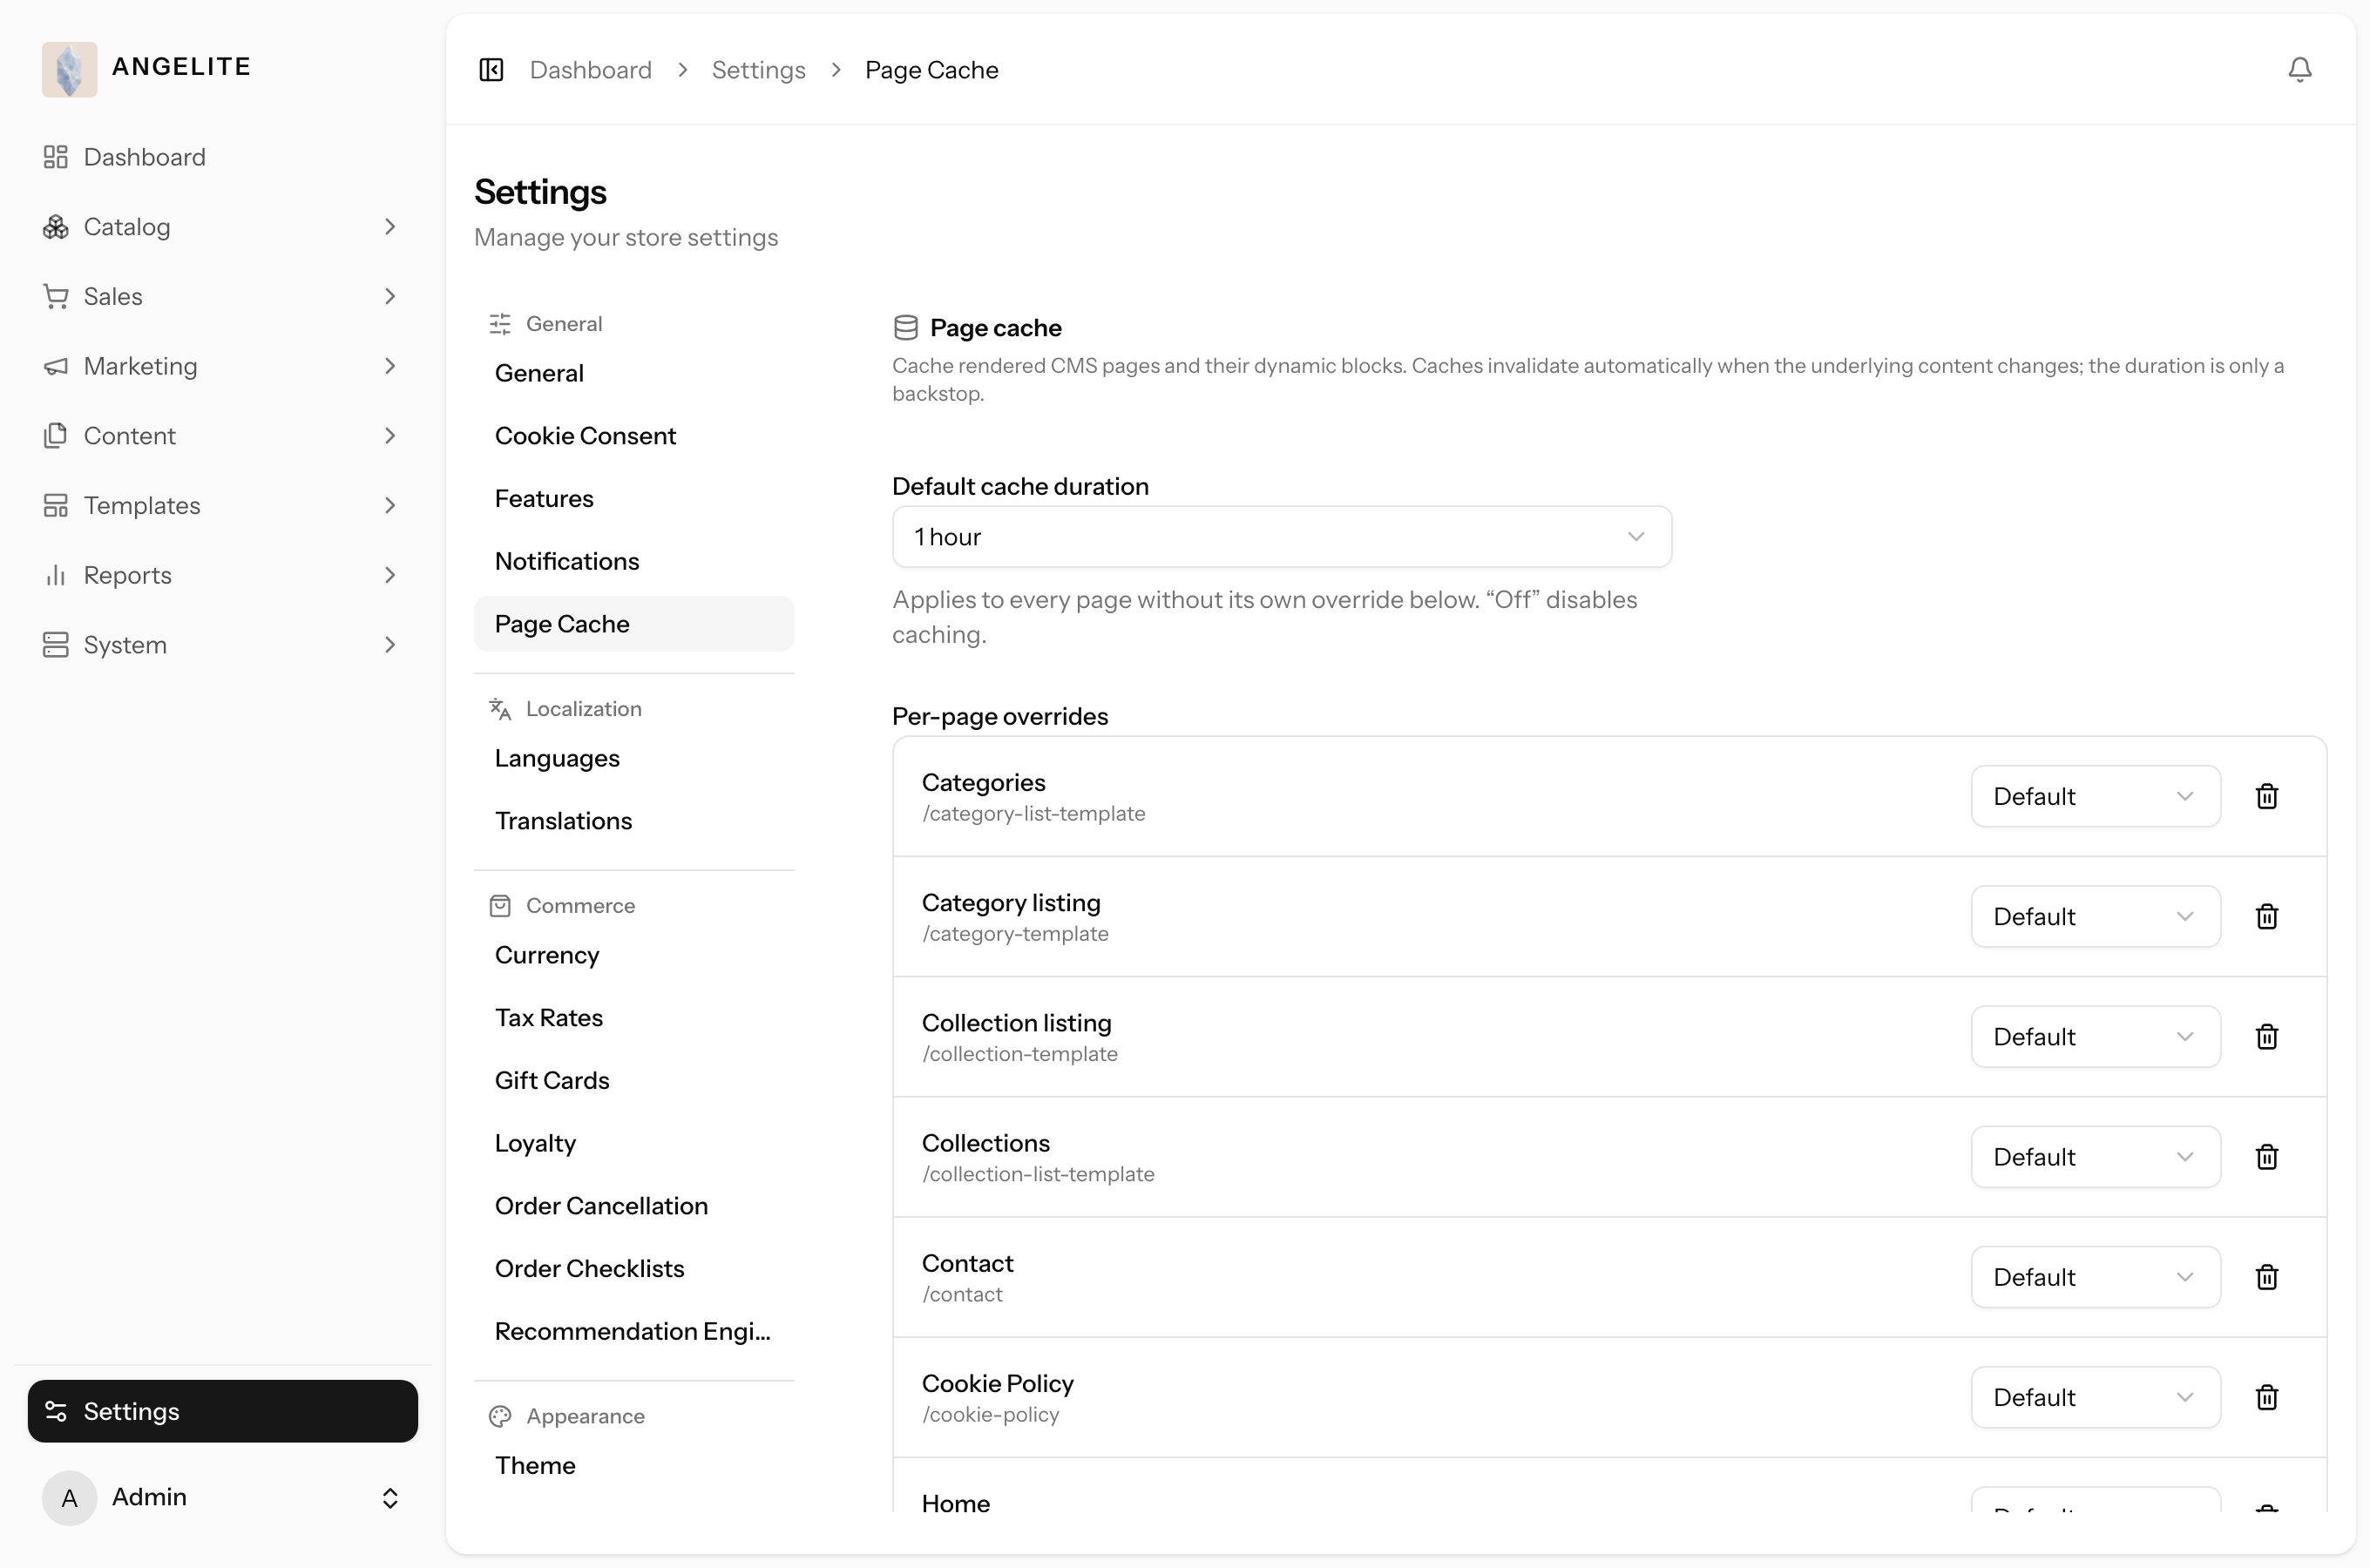
Get both speed and freshness. Choose the caching policy that matches how often your content
changes, and when you need a change to show right now, flush the stored pages by hand so the latest
content appears immediately.
In practice
Say you have just rewritten the homepage hero copy for a flash sale on a new abaya
collection, but the storefront is still showing the old wording to keep pages fast.
How Angelite handles it: open Settings → Page cache, click
Flush to clear the stored pages, and your new hero copy appears for shoppers
immediately. You can also pick a caching policy that matches how often your content changes, so the
storefront stays fast without holding onto stale pages for too long.
How to use it
Open Settings → Page cache.
Pick the caching policy that suits how often your content changes.
Click Flush at any time to clear the cache manually.
Where: Settings → Page cache.
Data import / export
AdminOptional · Data Import & Export
The problem: the supplier sends three hundred products in an Excel
sheet, or the new season needs a price change across the whole catalogue, and the only way through is
typing it all into the admin one product at a time. Nobody has the appetite for that.
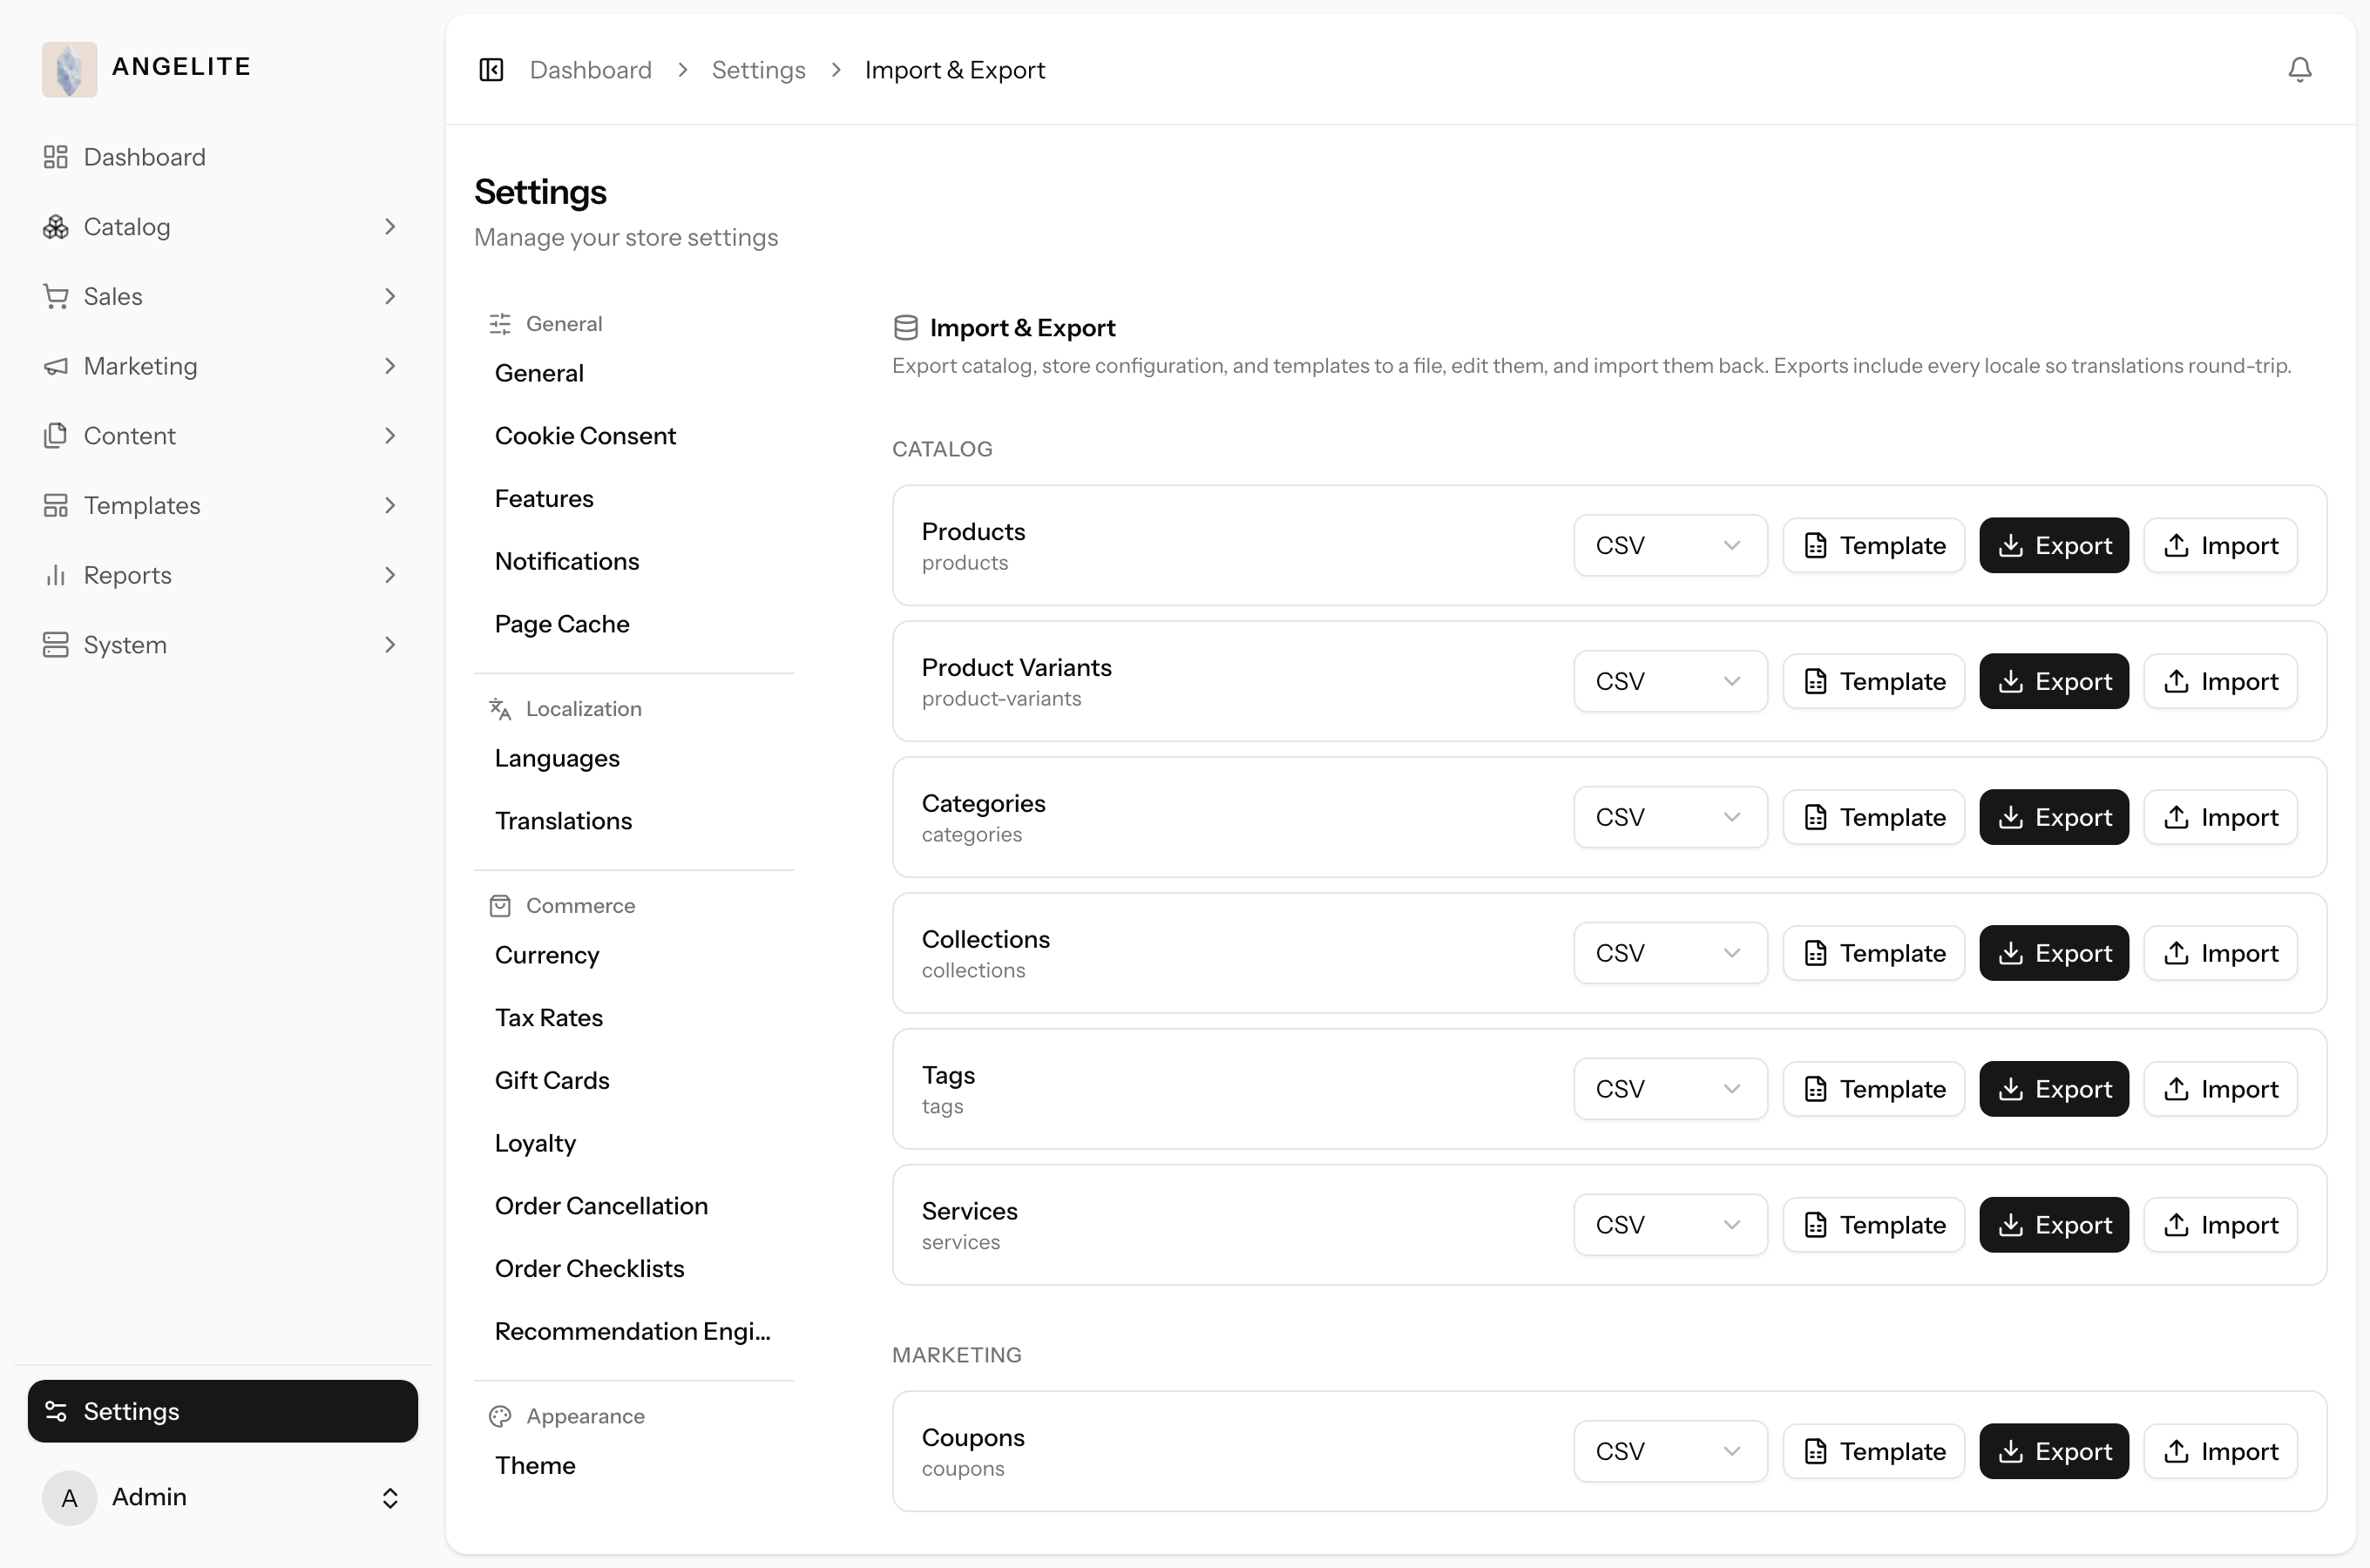
Move data in and out in bulk, in both directions. Export any part of the store as a
spreadsheet file you can open in Excel, edit it there, and import it back; or start from a blank template
to load new records. Pages and email templates travel in a format that keeps their design intact on the
round trip, and every import is checked and previewed before a single record is saved, so a bad file
never touches your live listings.
In practice
Say the supplier's autumn delivery arrives as an Excel sheet of fifty new abayas, and
in the same week you decide every price in the catalogue needs a small rise for the season.
How Angelite handles it: open Settings → Data, download the
blank products template, paste the supplier's fifty rows in, and upload the file; Angelite checks it
and shows a preview before anything is saved, then adds all fifty abayas at once. For the price rise
you go the other way: export all products, change the price column in Excel in one sweep, and
re-import; each row is matched to its existing product, so the update lands on the right records
instead of creating duplicates. The same export doubles as a dated backup of your catalogue.
How to use it
Open Settings → Data.
To bring data in, download a blank template (or a fresh export), fill it in Excel, and upload it.
Review the preview; nothing is saved until you confirm.
To edit in bulk or keep a backup, export an entity, adjust it in Excel, and re-import. Existing records are updated, not duplicated.
Where: Settings → Data (visible when the Data transfer module is on).
Cookie consent
Admin
The problem: visitors increasingly expect a store to say plainly what it
tracks, and a shop with no privacy notice, or one only in English, looks careless to the very shoppers
you are trying to win over.
Configure the privacy banner shown at the bottom of every storefront page until a visitor
accepts or declines. Set the title and message in each language, link to your privacy and terms
pages, and switch the banner on or off, all without a developer.
In practice
Say you want every first-time visitor to your abaya storefront to see a clear,
friendly privacy notice in both English and Arabic, with a link to your privacy policy.
How Angelite handles it: open Settings → Cookie consent, write
the banner title and message for both languages, add the links to your privacy and terms pages, switch
the banner on, and Save. A new visitor browsing your abayas now sees the notice at the bottom of every
page until they accept or decline, keeping your store transparent about privacy.
How to use it
Open Settings → Cookie consent.
Write the banner title and body for each language and add your privacy and terms links.
Switch the banner on, then save.
Where: Settings → Cookie consent.
Admin account
Admin
The problem: the people who share a dashboard do not share eyes, habits
or a first language: you work late and want a dark screen in Arabic, your assistant works mornings in
English, and one shared setting would leave somebody squinting at a panel that reads the wrong way.
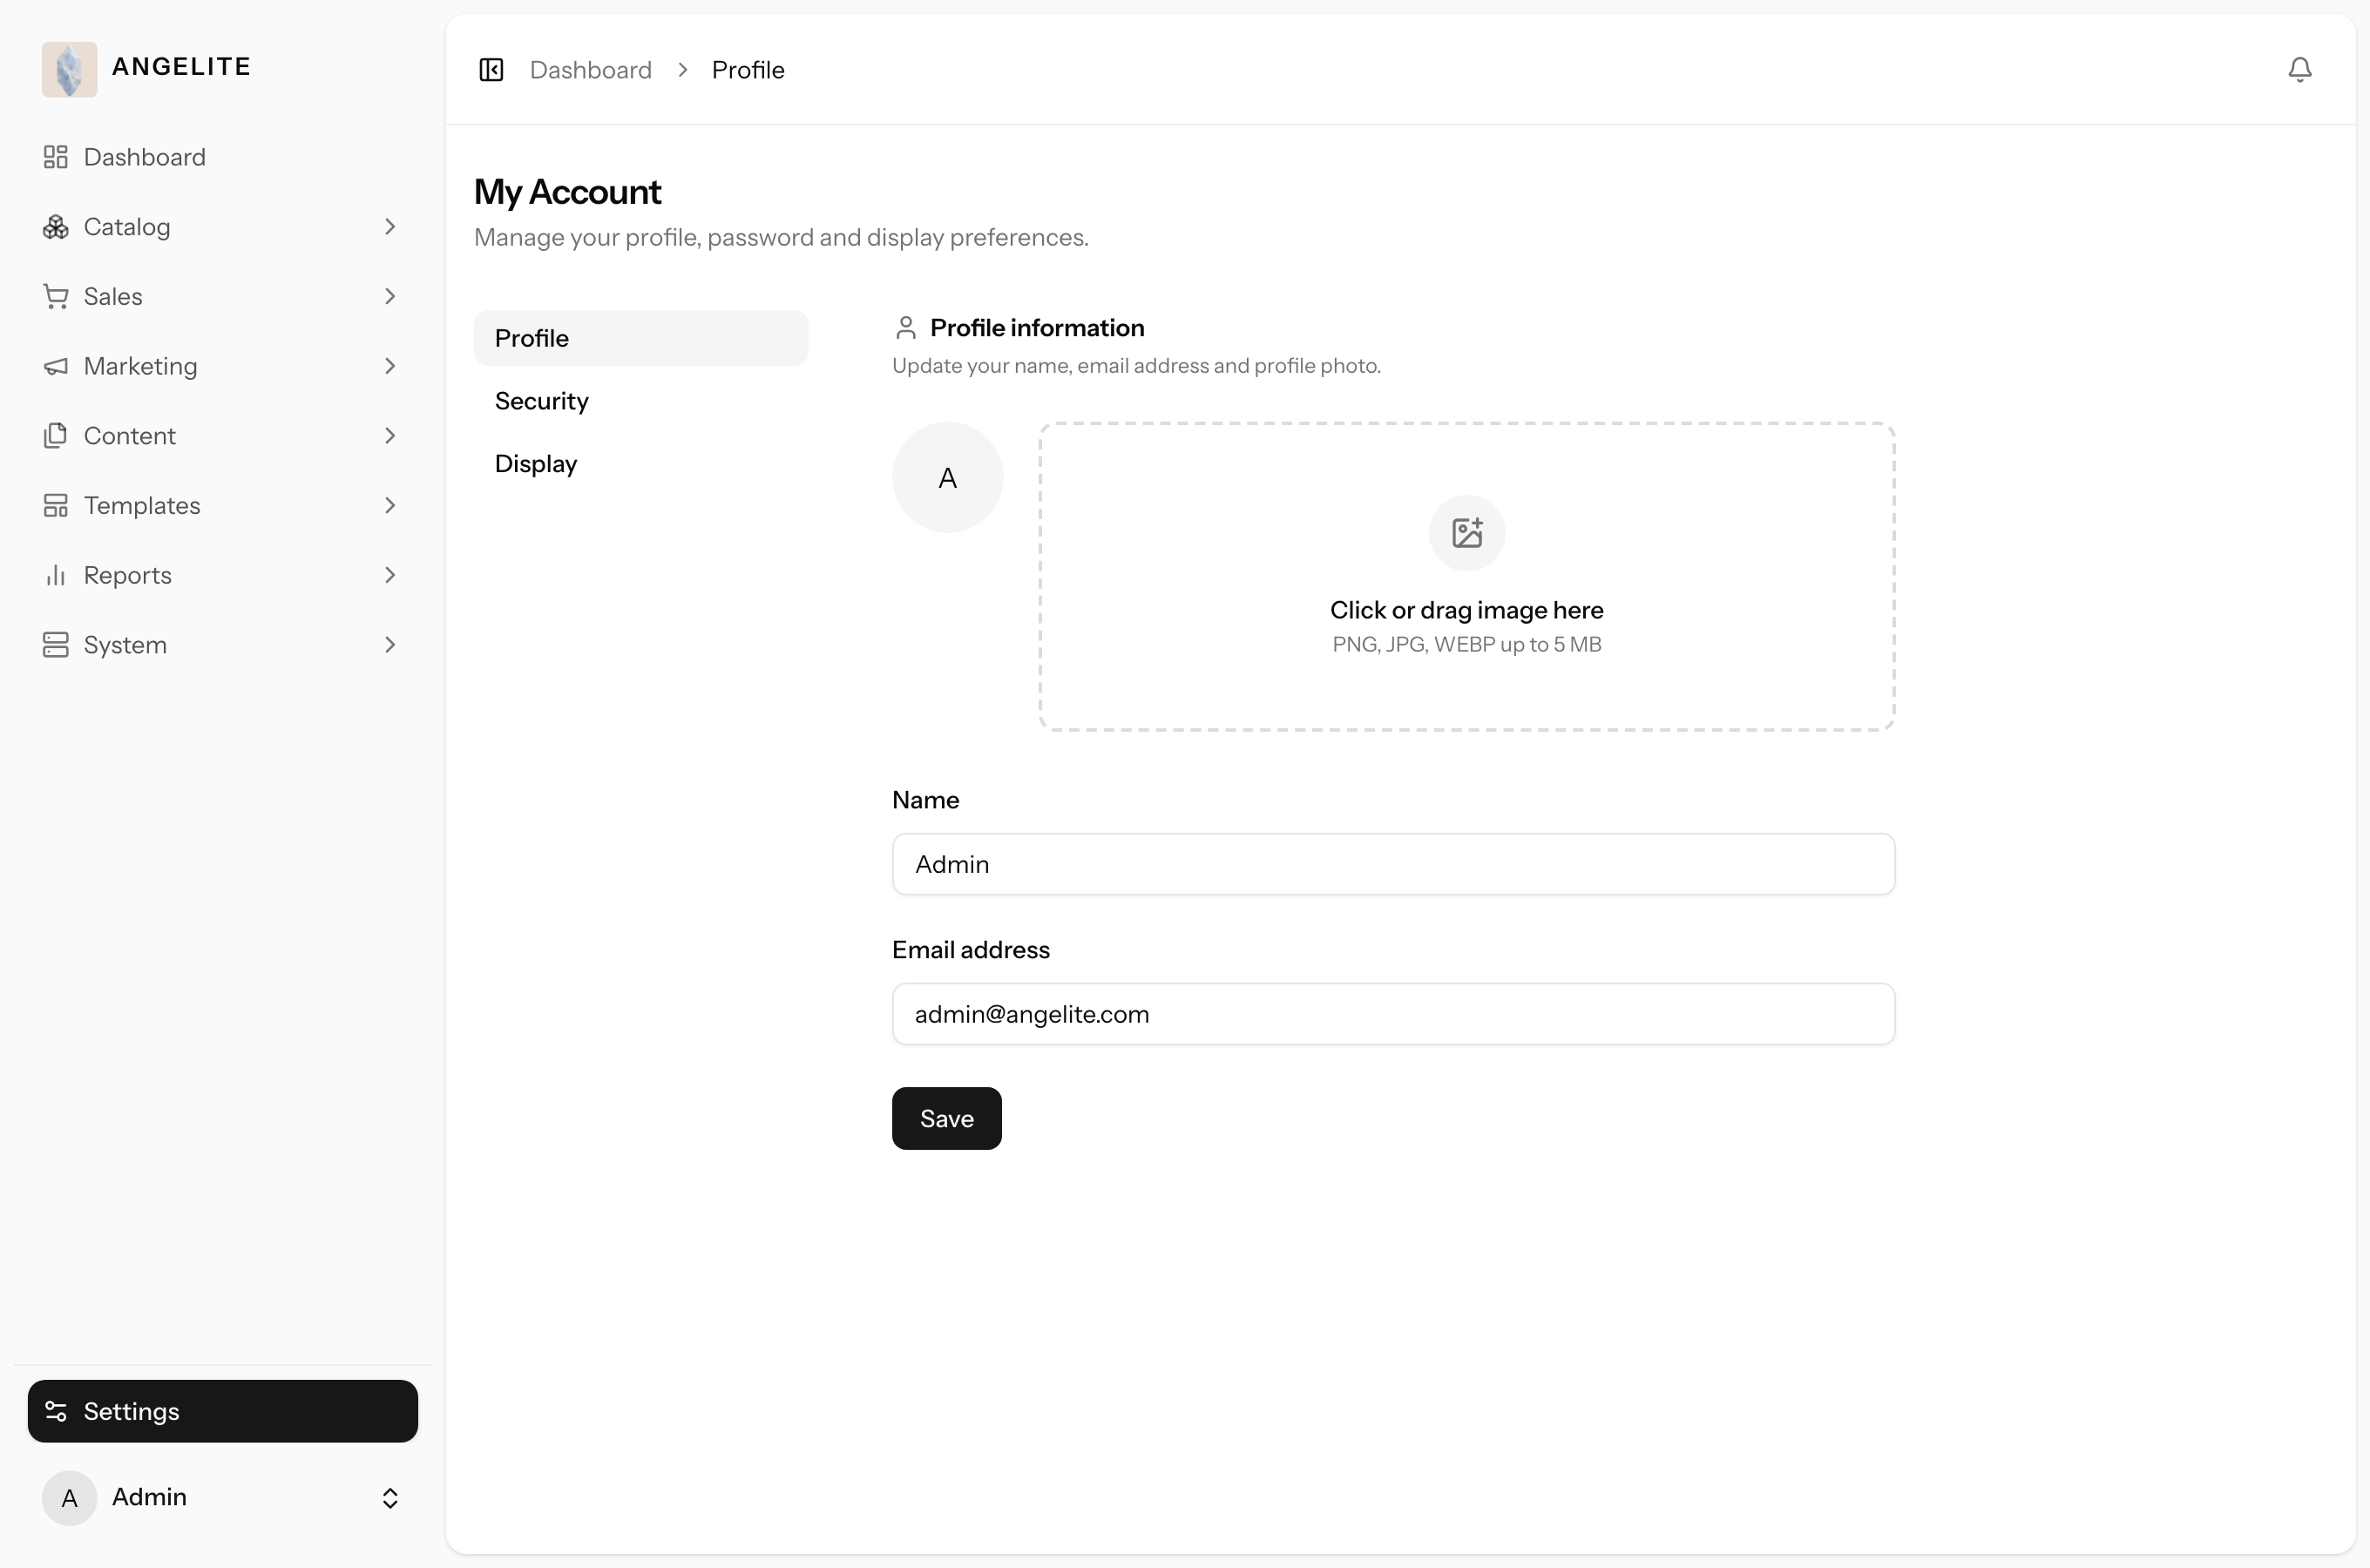
Look after your own admin account. Update your profile and avatar, change your password
and security settings, and set your personal display preferences: light or dark mode, and the language
of the admin panel itself, English or Arabic. Choosing Arabic flips the whole admin to right-to-left,
and because it is each staff member's own choice, you can run the admin in Arabic while an assistant
keeps hers in English.
In practice
Say you tend to manage the boutique late in the evening and the bright dashboard
tires your eyes, you think best in Arabic while your new assistant prefers English, and you also want
a stronger password now that a second person has access.
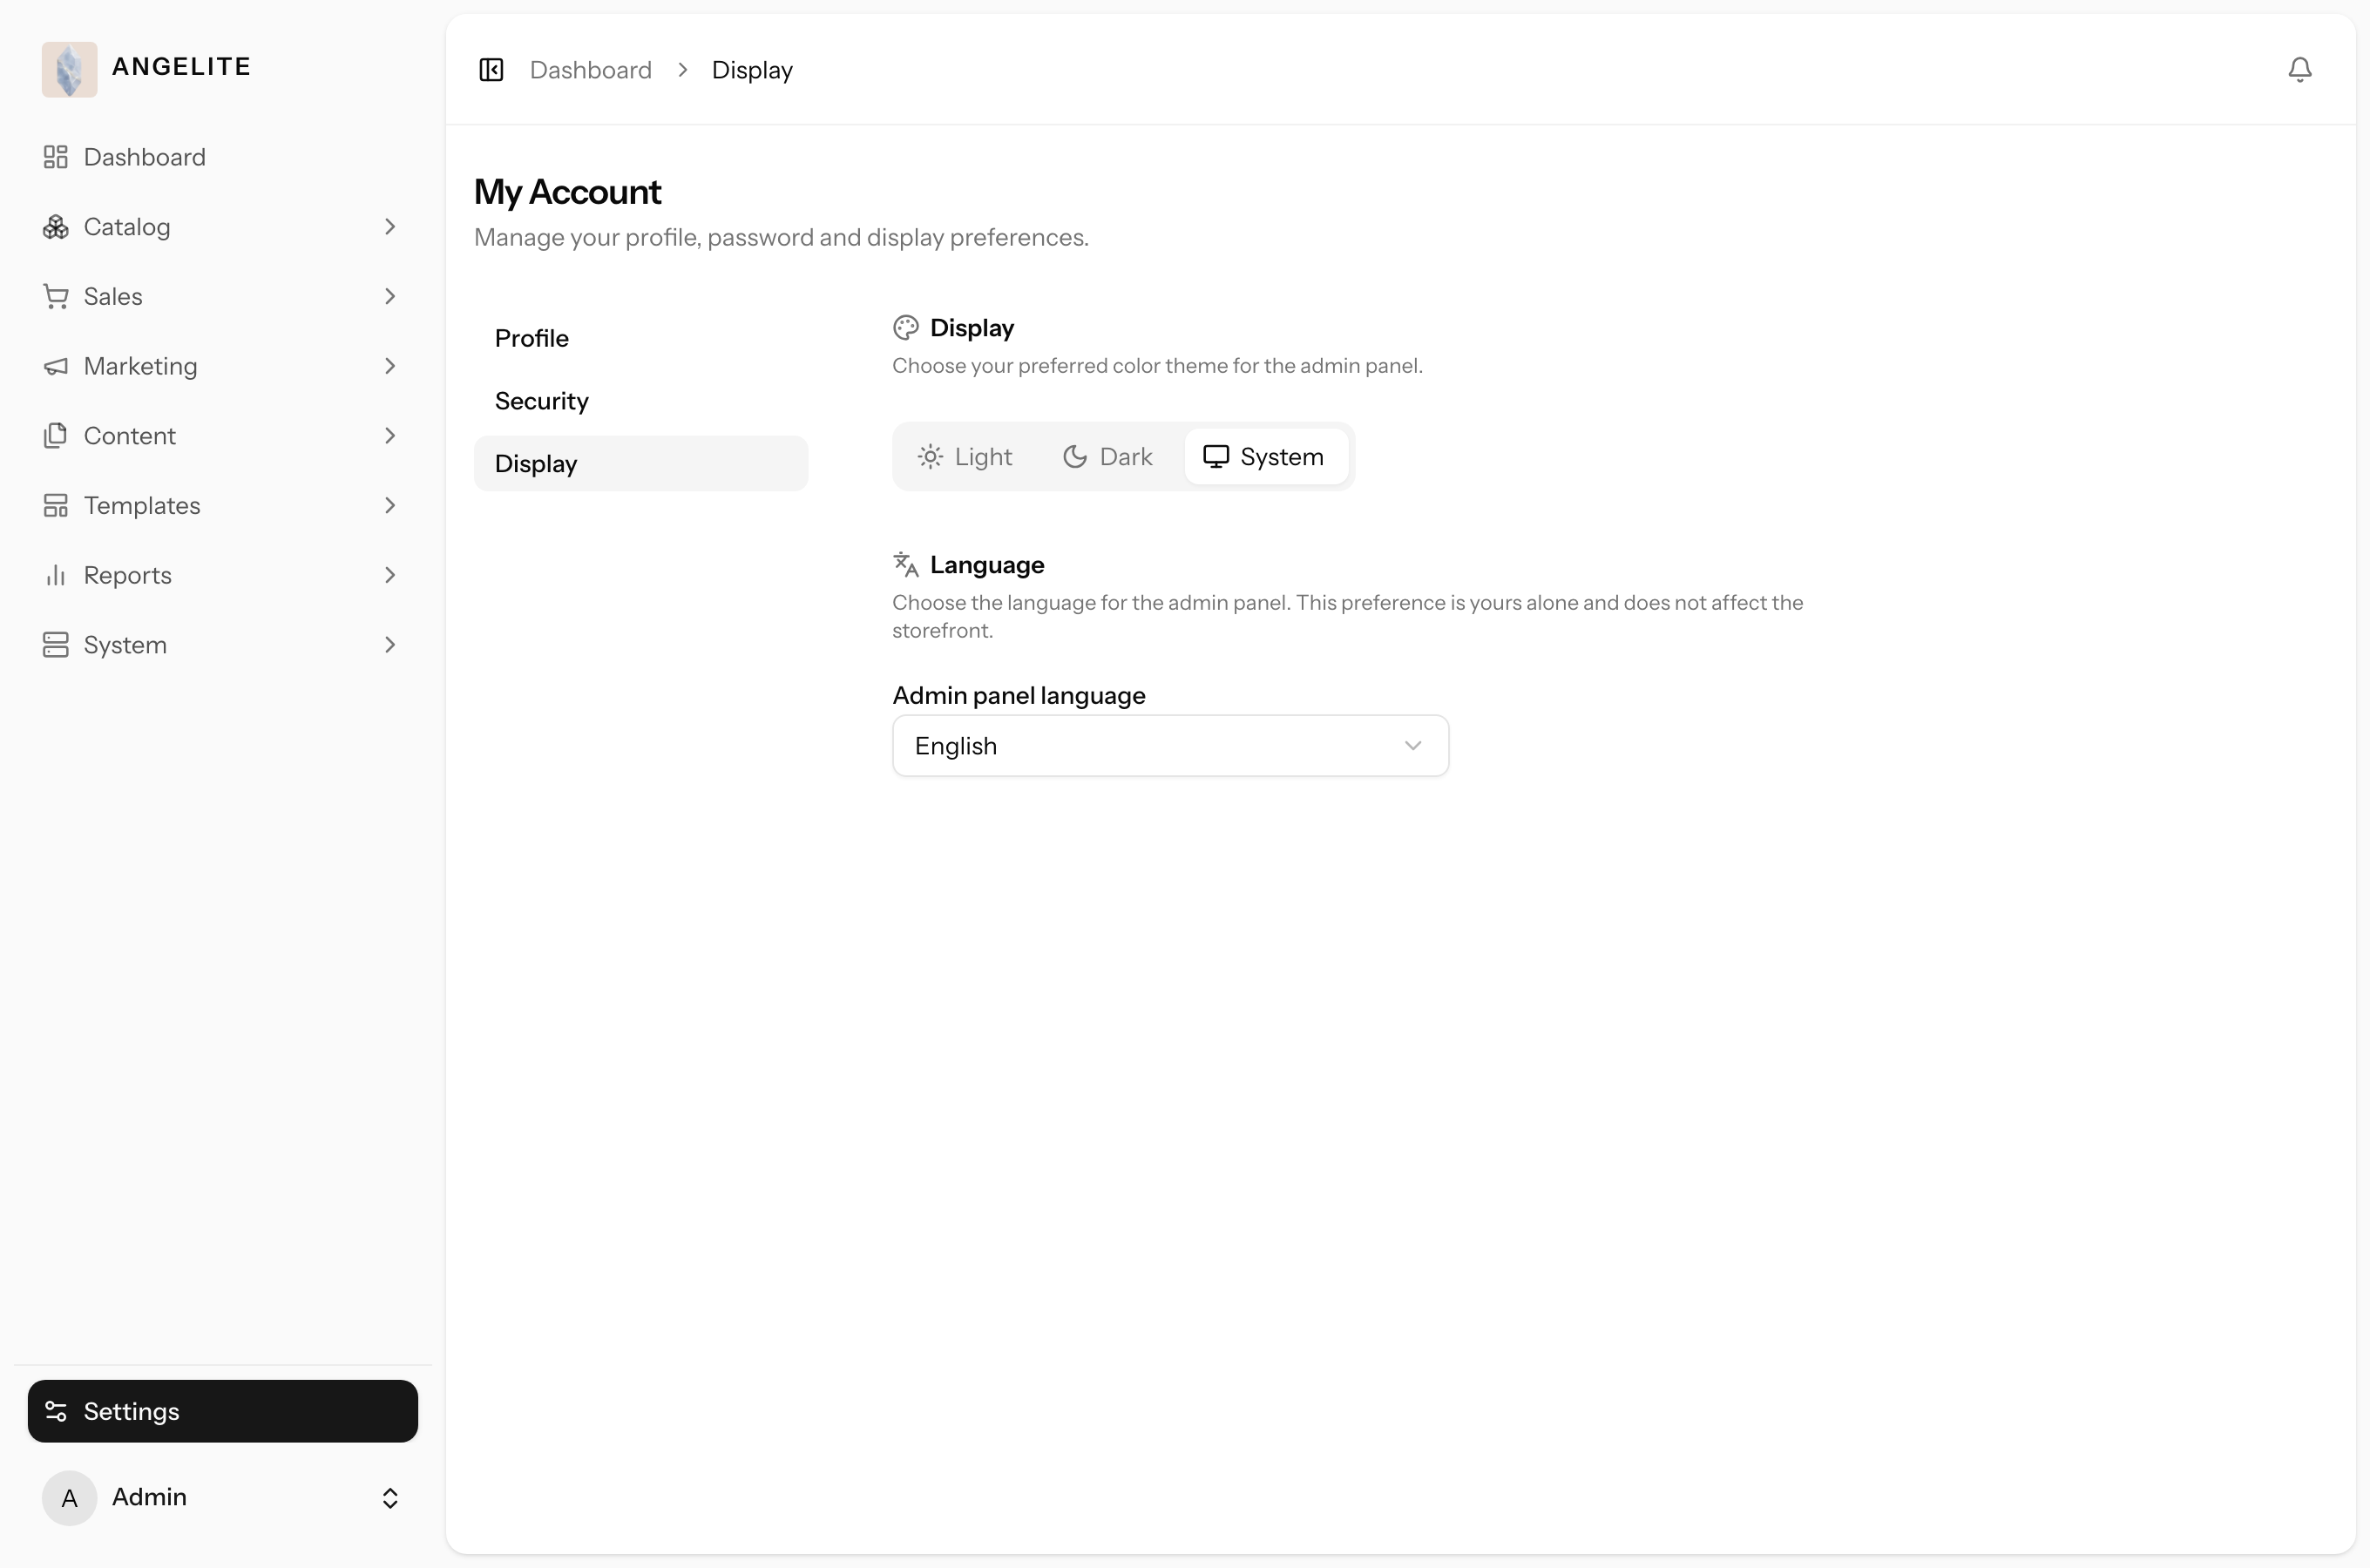
How Angelite handles it: open Settings → Display, switch to
dark mode, and set your admin language to Arabic so the whole panel flips to right-to-left in your
own language, while your assistant's account stays in English. Then open
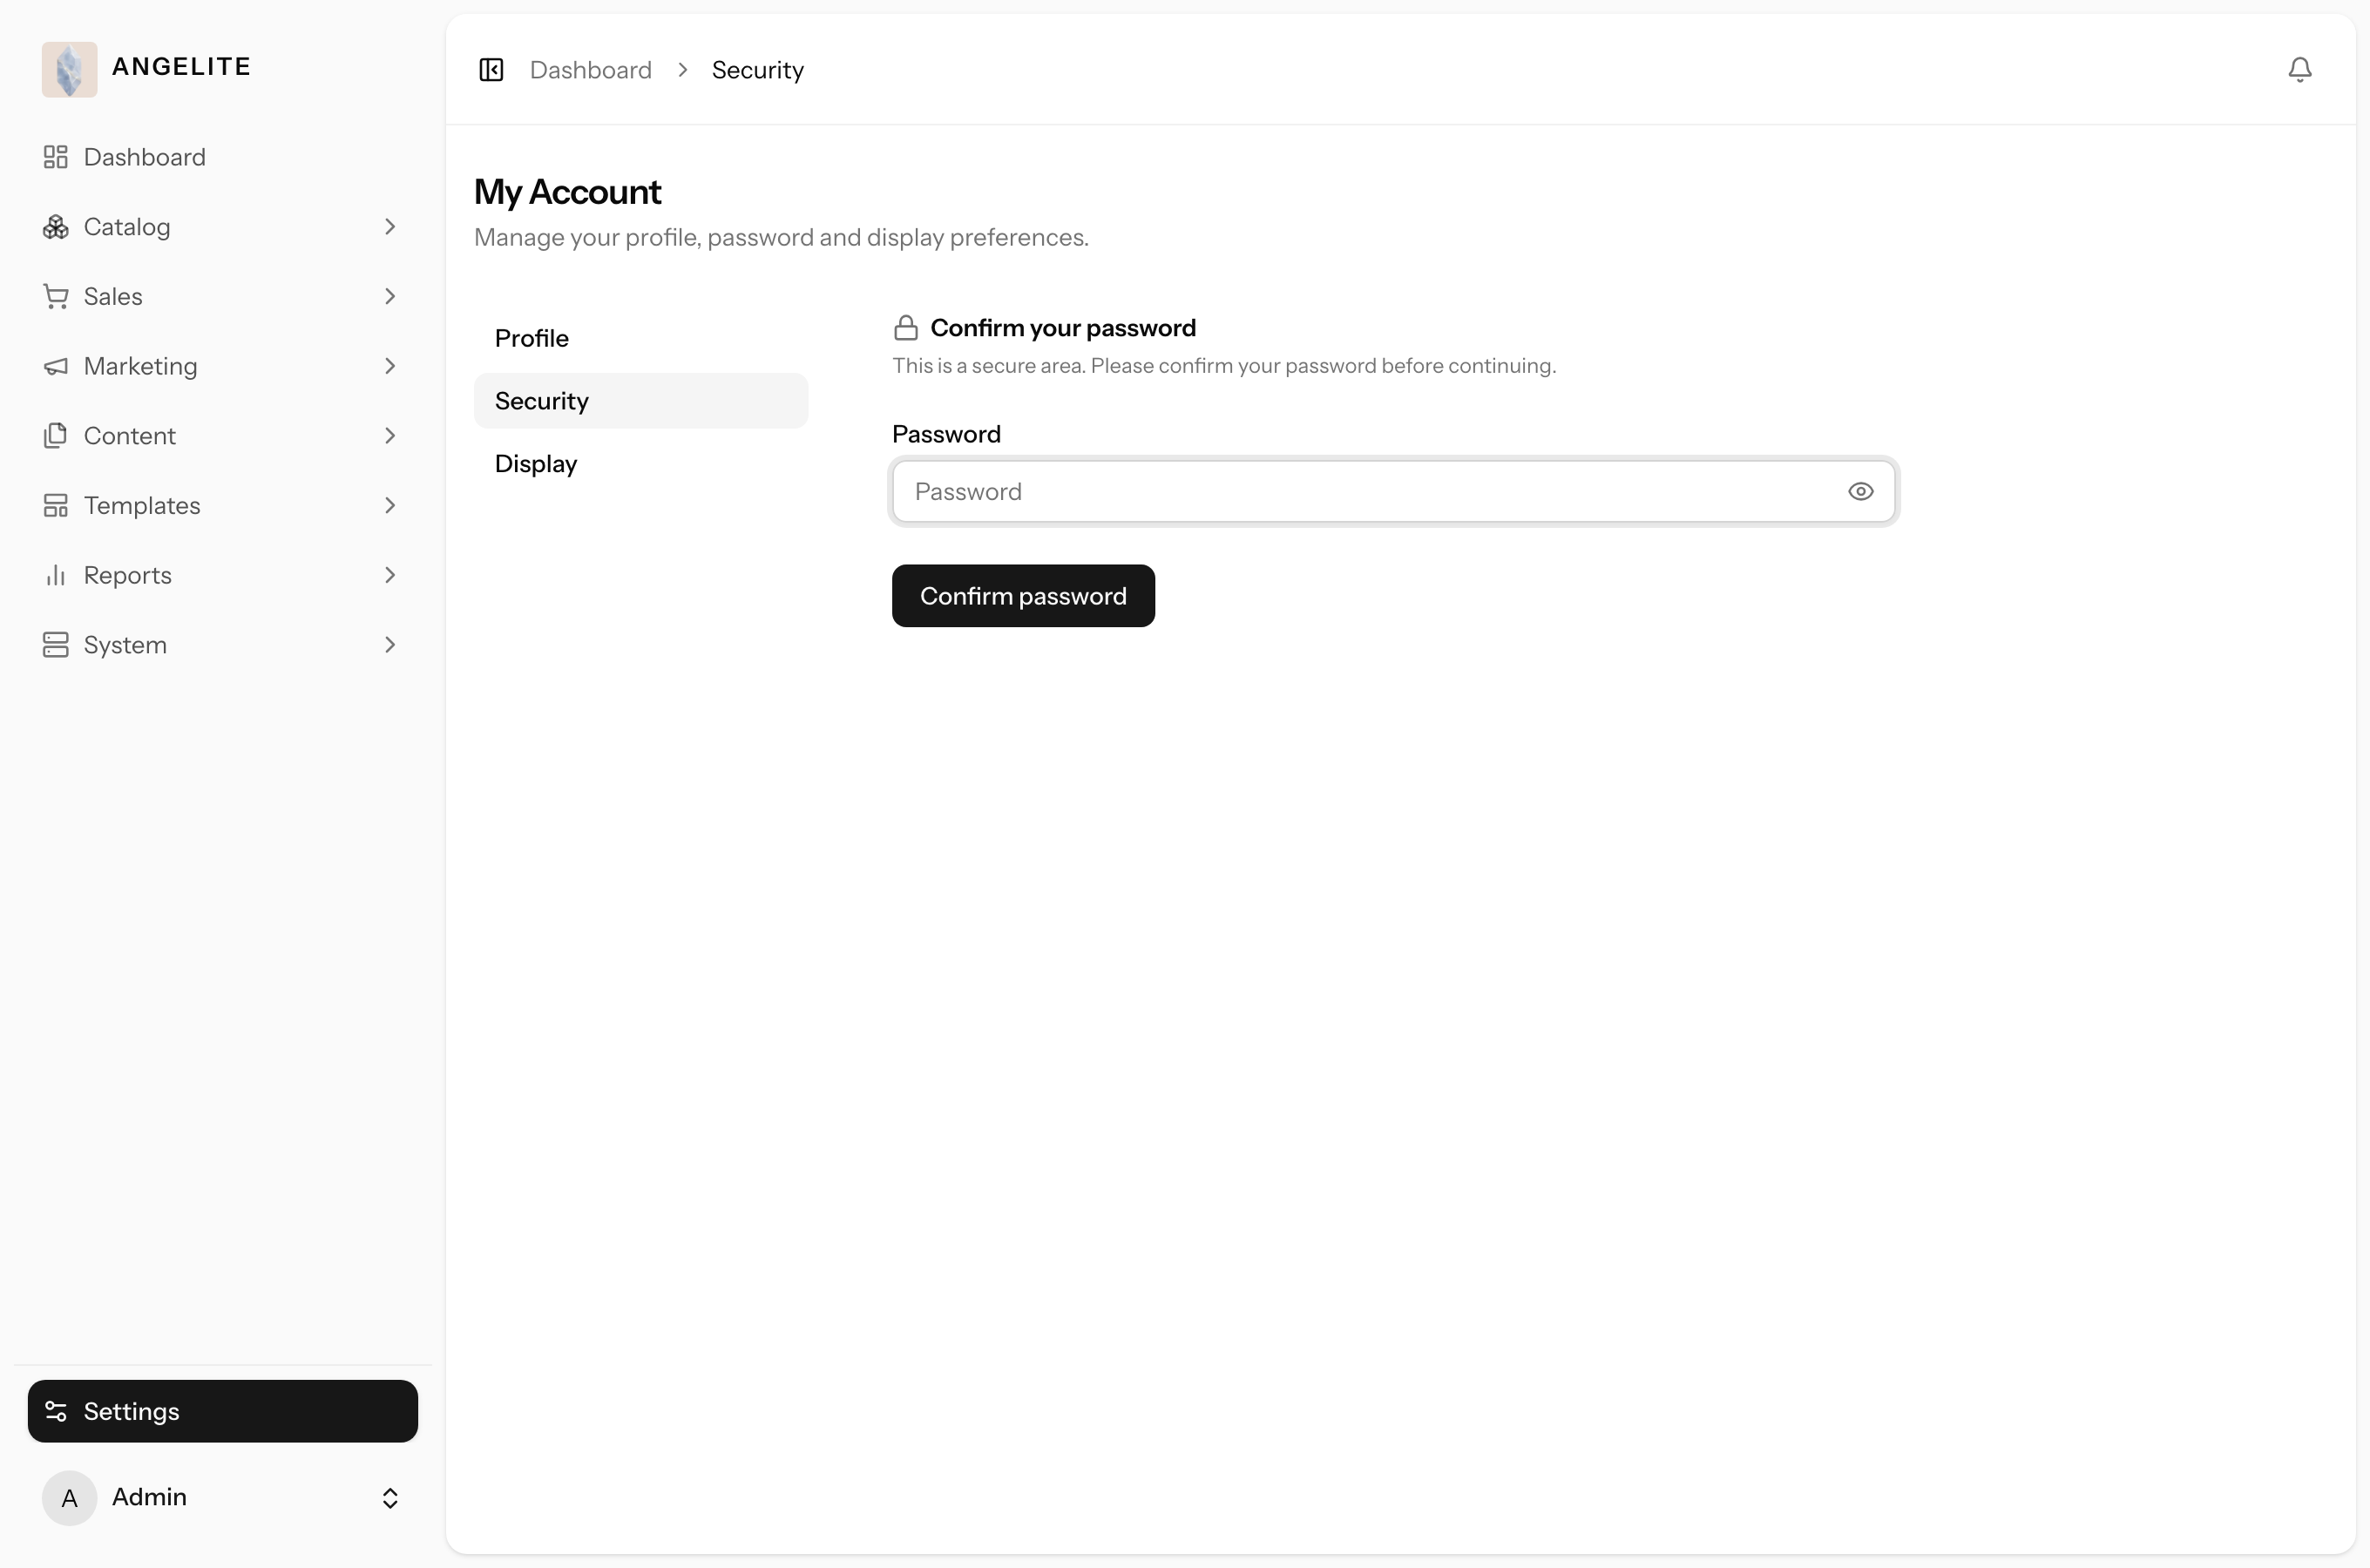
Settings → Security to change your password and review your security options,
and Save each section. Every one of these choices applies only to your own account.
How to use it
Open Settings → Profile to edit your name, email and avatar.
Open Settings → Security to change your password and manage security options.
Open Settings → Display to set light or dark mode and your own admin panel language, English or Arabic; Arabic turns the panel right-to-left for you alone.
Save each section. These settings affect only your own account.
Where: Settings → Profile.Where: Settings → Security, for your password and security options.Where: Settings → Display, for your personal light or dark mode and admin language.